Today, I'm passing the posting baton over to Ashlie.
This gal is awesome, super nice, and SO creative! She has come up with a darling project you're not going to be disappointed with...
Hello my fellow Craft Goodies friends. I am so excited (and lets be honest, a tad bit nervous) to be sharing on Wendy’s wonderful blog today. I am always in awe of Wendy’s incredible creativity. I have been an avid follower since she shared her adorable 2x4 turkeys.
My name is Ashlie, I can usually be found blogging over at Stuff by Ash.
As the title of my blog implies, I blog about “stuff”, everything from kids crafts and sewing to recipes and power tools. I love my Cricut and probably have permanent brain damage from inhaling too many Modge Podge fumes.
I live in what is technically a dessert. You think sun, heat, lots of sand, but no, we are still experiencing snow storms in the middle of March! Most likely we will still be experiencing snow storms until May. Needless to say, I am soo ready for spring! So even though St. Patrick’s day is just around the corner, I decided to take the Easter route with my project today.
Two of my most favorite crafting past times are, using things I already have to create something, also know as being frugal, also know as having a teeny tiny crafting budget. My second most favorite crafting past time is sewing, it is great because mistakes are fixable. If you mess up terribly, you just rip it out and try again. (Just make sure you don’t cut something that’s not supposed to be cut, there’s no going back from that!) With those two things in mind I ventured out to make an Easter basket for my little one out of an old sweater.
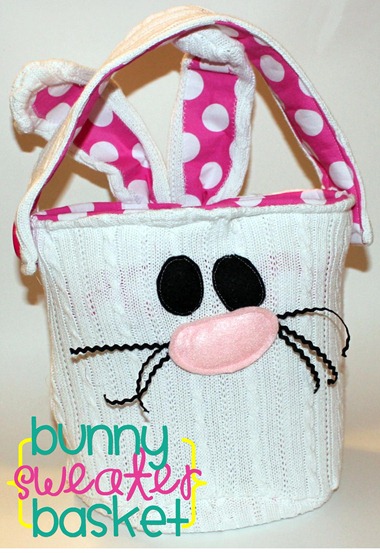
This is what I came up with:
To make your own adorable cuddly Bunny Sweater Basket you will need:
White sweater (mine was a woman’s medium)
1/2 yard lining fabric
1/2 yard fusible fleece
Small scraps of double sided fusible interfacing
Pink and black felt scraps
21 ish inches of Baby Black Ric Rac
Wire hanger
Piece of cardboard
2 jumbo buttons
scissors, needle, thread, sewing machine, tape measure, pins, marking pen
Once you’ve gathered your supplies, you are ready to get started!
First step cut out all your pieces.
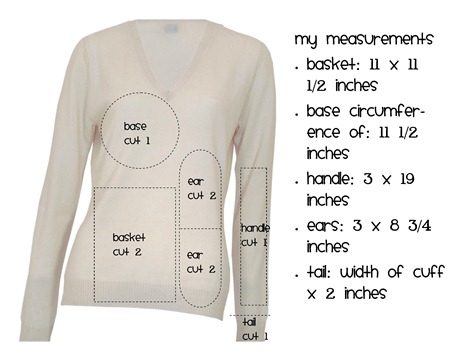
From your white sweater cut:
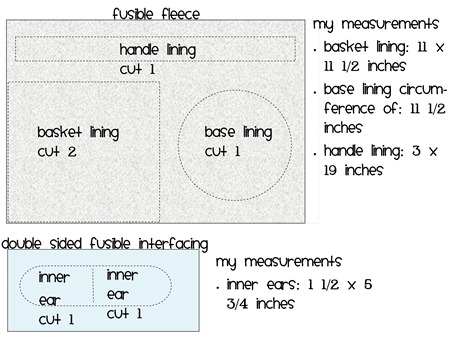
(Please note, these are not exactly to scale . . . I’m not the most mathematical person in the world, but you get the gist.)
Helps to go slow and have some really sharp scissors. Also to get a mostly perfect circle with the right circumference for the base of the basket I cut a piece of yarn that was 11 1/2 inches long (the length of the bottom of my basket) and started measuring round objects in my kitchen. I ended up using a medium sized round Tupperware. Really scientific huh. My engineer husband was totally disgusted.
While you are in circle mode, cut a circle from a thin piece of cardboard (like say a Diet Mt. Dew 24 pack, not that I had an empty one lying around the house or anything . . .). Make the cardboard circle about 1/2 inch smaller than your base so you won’t have to try to sew through your material and the cardboard.
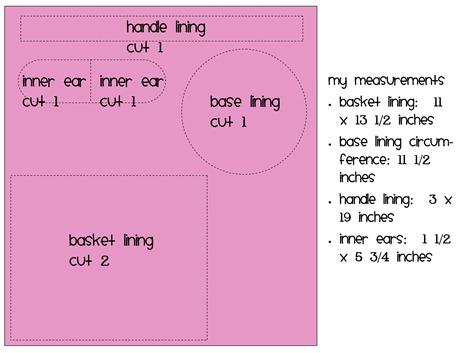
From your lining fabric cut:
From your fusible fleece and double sided fusible interfacing cut:
The fusible fleece is going to help the basket be a little more sturdy. The fusible interfacing is going to help the inside of your ear not fray and stick to the ears.
Take a quick break from all this cutting and go turn on your iron so you’ll be ready to jump right into ironing together your fusible stuff and your fabrics . . . . Continue cutting.
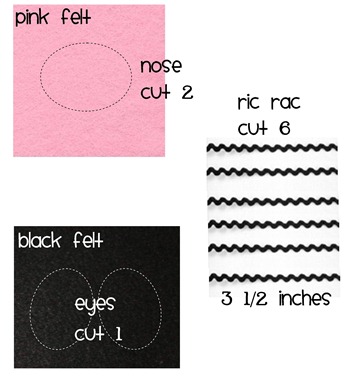
Last cut out the face details:
Next step is to iron on your fleece to your lining pieces. Just follow the instructions that came with your fleece. But if you can’t read them because your toddler has ripped them to smithereens, you could use these online instructions.
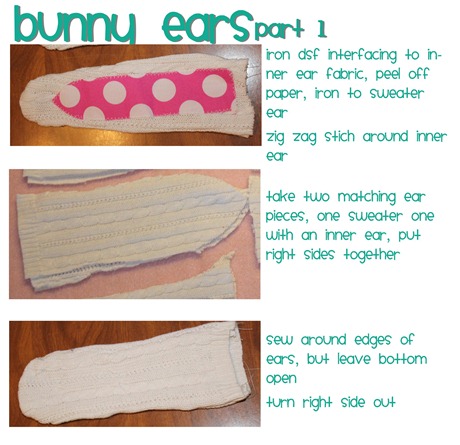
I like to have all the extras and details mostly assembled so they are ready to put on when I’m ready to pull everything together. So next I made some bunny ears.
You should have 4 ear pieces from your sweater. To cut mine I just laid out my sweater and eyeballed it, cutting through both the front and the back. Then moved it up and cut around it, cutting through two layers again. And wha-la you have your four pieces.
Now to make the ears a little sturdier I added some wire. This step is optional.
 I did not use my machine to sew in the wire or pinch the ears, the black lines are where there is stitching. It should now be starting to look like a bunny ear . . . if not call me! Set your ears aside.
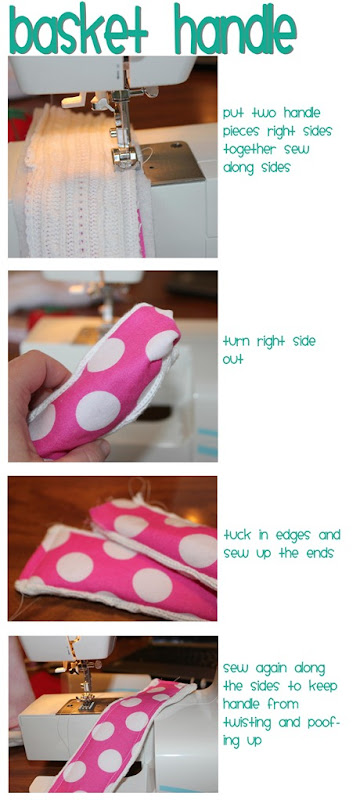
Next to make, the handle for your basket.
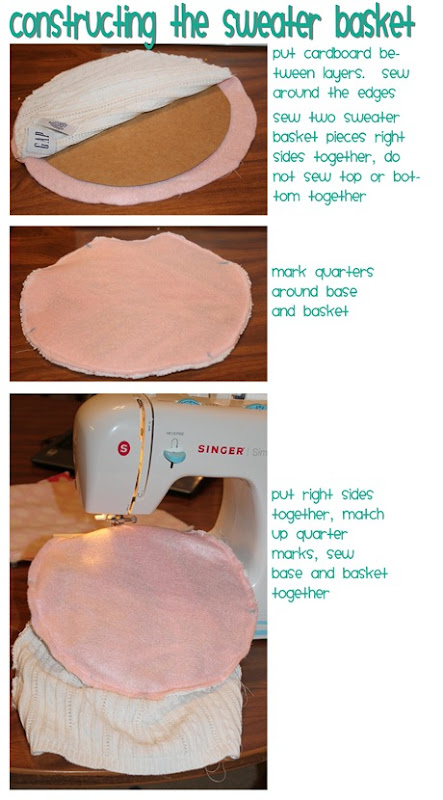
Now we’re ready to construct the basket part. We are going to make two baskets, one out of the sweater, and one out of the lining. Both follow basically the same steps.
I added a piece of felt to my base because I ran out of fusible fleece. I would highly recommend putting in a piece of cardboard to give your floppy sweater some stability.
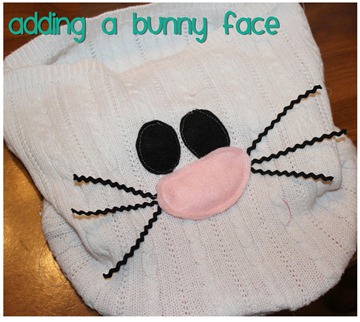
Now that we have the outer part of the basket constructed, it is the perfect time to add a cute little face. I sewed on the eyes with the sewing machine. Sewed the two nose pieces of felt together with a little stuffing in the middle. Last I sewed on by hand the nose and ric rac whiskers, each whisker is about 3 1/2 inches long.
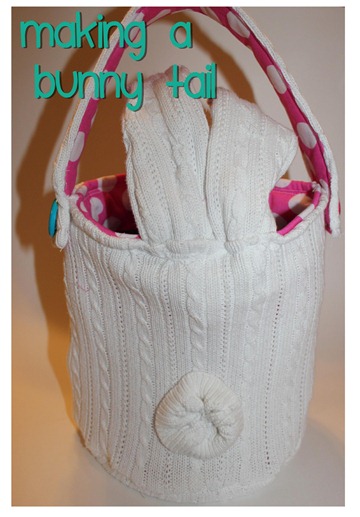
This is also where I added my bunny tail, but didn’t take a picture of it til the end, sorry. To make the bunny tail I hacked of the cuff of my sweater, about 2 inches from the end of the sleeve. Then hand sewed like a little yo yo ruffly thing along the hacked edge. This way the tail won’t fray, but I didn’t have to hem anything. Then attached the tail on the back of the basket.
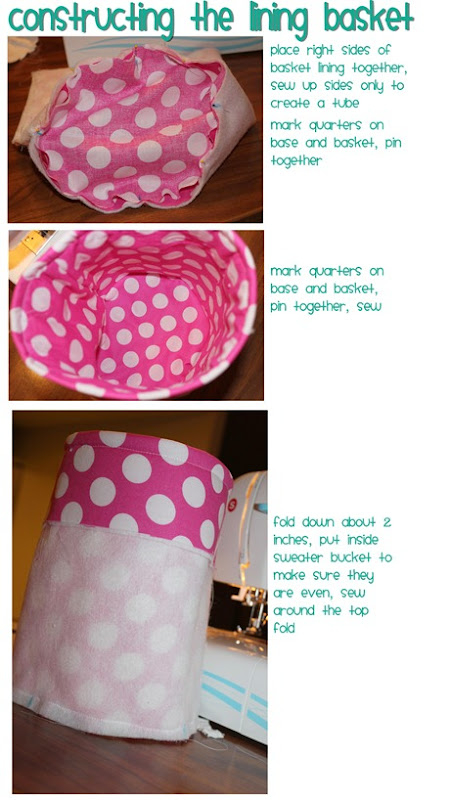
Now we are ready to move onto the lining of the basket.
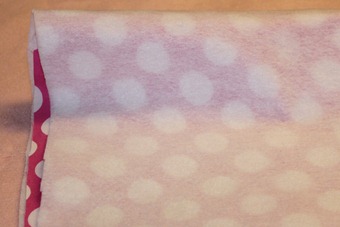
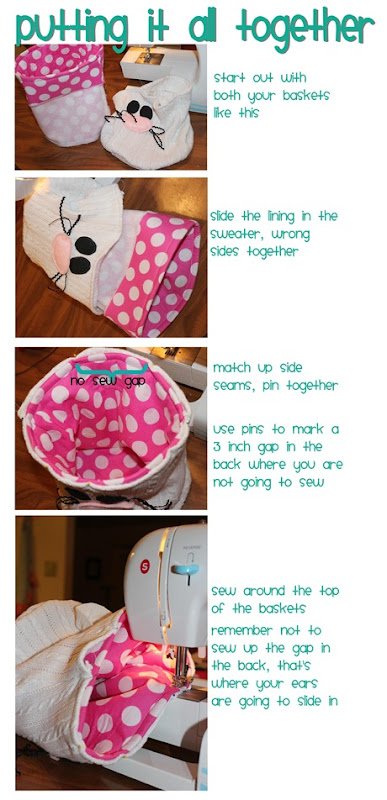
I choose to fold over the edge here to create a clean edge/hem for when I put my two pieces together. I did this because in the past when I’ve tried make purses with straps it always takes me ten tries to get the lining facing the right way and the strap on the outside. This way you can just put the two baskets inside each other and slip in the ears and add the strap.
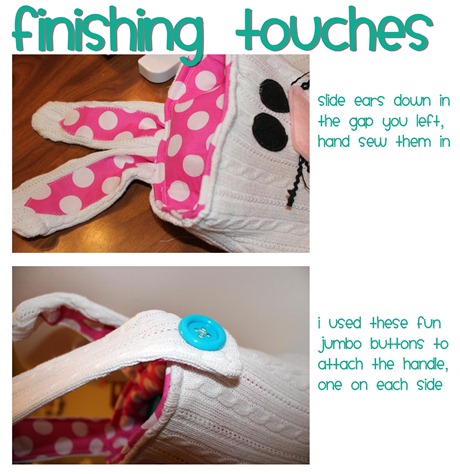
Last thing you are going to do is add the finishing touches, grab the handle and the ears that you made and the beginning.
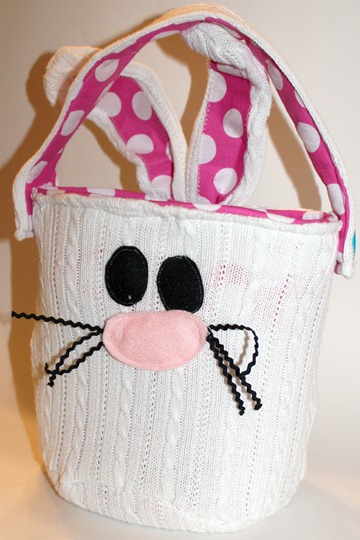
And the finished basket:
My Little Miss has been carrying it around all day! I can’t wait till Easter so we can fill it with lots of nummy goodies! Finished it is about as tall as a 40 oz jar of peanut butter and will fit two jars side by side, made it nice and roomy to fit lots of candy “for the kiddo”.
Thank you ladies (and gentlemen if you are out there) for putting up with me today! Easter and Spring stuff is already starting to pop up, I can’t wait to see what you all have created!
...amazing right?
Thanks Ashlie, so much for sharing this, I will infact be making 5 of these.
Love it...
Happy Crafting!







5 comments:
Seriously Adorable :)
Stef
itsallinmyheadstefsblog.blogspot.com
congrats ash! FAB tutorial!! and soooo cute! wish i were a sewer!! :)
Adorable!!!! thanks 4 the info!!!!!!! i might just have to make this!
HI from your newest follower this is the cutest thing I have ever seen what a wonderful idea and your directions are fabulous. I would love you to stop by my blog when you have the chance. I love to sew you can view this on my web site...♥ Sincerely Rachel
http://www.ourcreativehands.com
http://ourcreativehands.blogspot.com
That is SO adorable!
Post a Comment