Hi there! And welcome to Craft Goodies. I'm thrilled that you've stopped by and hope you find something here that makes your visit a great one...
Showing posts with label for the kiddos. Show all posts

Friday, February 10, 2012

Classroom Valentines x 4!!!

Okay, so I was hoping to have these up no later than noon, but it's been that kind of a day!
So early evening  it is, but they're still in time for a weekend project or two.

These are the Valentine's my girls will be sharing with their classes this year...

Nothing amazing, but they are sure excited so I think I did okay.

So here's the dirt on making these things:
My husband scored an amazing deal on packages of silly bands...like the FREE kind of deal so I was determined to find a way to not have them at my house. Enter Valentine's Day--oh, I love it even more!

My 2nd grader has a friend with a severe nut allergy in her class so these were perfect. I made up a fun little tag to fit over the top of each bag, I taped it into place on the bag and done!
If you'd like it, you can have it!

Click on it, save it to your computer and then print this baby out-I went with the standard 4x6 and unclicked the fit to frame button so it wouldn't cut off the flowers!

The little airplane I first saw at my sisters house. She whips them out as thank you gifts for her primary substitute teachers. Since then, I've seen them all over pinterest so I new I had a winner!

You need smarties, a stick of gum, two lifesavers, and an elastic.
The elastic goes through the lifesavers and then loops up onto the wings.
Place the smarties between the two lifesavers, but under the elastic and you just became an airplane mechanic!
Here's what I learned, wrap the gum in paper because the elastics pulls it down and don't use the candy lifesavers--go with the mint ones. The candy ones get really sticky and nasty...

my preschooler is taking these:

Perfect for pre-k, right! The pencil is a roll of sprees candy wrapped in yellow paper. A Heshey's kiss made up the point and pink and gray paper made up the eraser end.

For the tags on both the plane and pencil I just used the textbox options in microsoft word.

And last, this is my favorite! It fits my 6 yr olds personality to a T!

Inside each little bag are two gumballs and chocolate lips. The tag reads:
I only "BLOW KISSES" to people I like!
You could substitute Hershey's kisses here to but te lips were to cute to pass up. I found them at my local Dollar Tree.
I'm going to use the same tag but fill a larger container for her teacher.

Here's the tag if you'd like it, same deal as before.
Click, save, print.
I wet wallet sized again unclick the fit to frame button.


I have a few more to finish so I'm off to the papercutter and tape!
Have a great weekend-
Happy Crafting.

Thursday, November 24, 2011

Kids Meal Toy Ornaments!!!

Today's ornament is a quickie cause well, I have some cooking {and eating}to do!

This is one of those things that I seriously can't believe I had to stumble across to even think of. But in my world it is brilliant!
I can't tell you the amount of money I have spent on ornaments for my girls that look so very similar to these, had I only known.


 The supply list is minimal.
You really only need a kids meal toy that your kiddo can't live without and a screw-in eye hook. Pliers and a candle make it easier and the ribbon just makes it pretty.  
That's it! Just think how many ornament possibilities are in your toy box right now.

Use the pliers to hold the end of the eye hook over the candle flame to warm it up, then press the hot end into the plastic toy to make your drilling point. Squeeze those pliers tight and start turning.
Once the eye hook has cooled you can finish twisting it in with your fingers.

Your little friend will look like this:

From there just add your ribbon to make a hanger and your in ornament heaven!
Your kiddos will think you're A-mazing, and they will have a ton of non-breakable ornaments that you won't care if they take off the tree and play with. It's a total win-win!
(They would also make a fun way to personalize a present. Just tie on a favorite character to the package your giving and again, you're super cool cause they just got a little bonus present!)


And hey, if you have issues like I do, you'll end up with a full series of "collector" ornaments in a matter of just a few lunches!

Enjoy your day. Enjoy your families. And make something great-
happy crafting.

Monday, October 17, 2011

Halloween Hoots and a Goodie to Go With!

Hello there friends!
Happy Monday to you all, hope your weekend was full of rest and fun. Just a little quickie to share with you today. I found these little cuties a while back and immediately fell in love.

Pinned Image
from wipkits.blogspot.com
Can you think of a little munchkin that wouldn't love getting one of these? So much fun! And how perfect for a class Halloween treat.
My kiddos are super picky when it comes to any sort of "trail mix" so I've been searching for the perfect one and think I might have found it...finally!

Popcorn Scramble
recipe from CountryDoor.com

6 c. freshly popped popcorn
2 c. Rice Chex ®
2 c. Cheerios ®
1 c. salted peanuts
1/2 c. butter or oleo
1 c. brown sugar
1/4 c. light corn syrup
1/4 tsp. baking soda
1 tsp. vanilla

Mix popcorn, Rice Chex, Cheerios and peanuts in a large bowl. Preheat oven to 250 ° F. Melt butter in a large saucepan; stir in brown sugar and corn syrup. Heat slowly, stirring constantly, to boiling. Cook without stirring another 5 minutes. Remove from heat; stir in soda and vanilla. Drizzle over popcorn mixture and toss until evenly coated. Spoon scramble into a shallow pan and bake, stirring several times, for 1 hour. Cool. Store in a tightly covered container.


Still going to have to omit the peanuts but the rest is a keeper! Let me know if you try it too.
Happy Crafting.

Wednesday, August 17, 2011

Ruffled Cinch Bag {Mini} Tutorial...Cutest bags EVER!!!


It's okay, take a minute and just enjoy the cuteness of it all! I still giggle every time I see my girls sporting one of these.
Best part???
Each bag cost me less than $1.50 to make.

So here's the story quickly...
Attended a Thirty-One Party and saw this...


Loved it, ordered it. OH! Happy me.
Had a trip to Sea World with my two super-cute nieces planned, thought "How cute would it be to have those little munchkins running around Sea World with their own little ruffled bag to tote a few goodies in?"

Loved the idea-so excited, got all the supplies needed...ran out of time before the trip to get them made...bad aunt and mom!
Did however get them made after we got home. Perfect for toting around our new friends...
Do you love the outfit? She's so in the I can dress myself phase...

Seriously, super easy, and the compliments we get! Makes me a happy "Yes, I made those," mama.

Here's the skinny on making one for your little munchkin:

Small piece of muslin to make the bag
*Mine were 20 x 14 inches

1 XL plain T-shirt for the Ruffles
*I bought X-LG t-shirts from my local Dollar Tree, one shirt easily covered one bag in the size I cut. I just bought a few different colored t-shirts and the girls picked their designs.

Matching ribbon for the ties
*I used about 8 ft of ribbon per bag

That's it! So let's make one of these cuties...
I checked out this tutorial
 to learn the basics of how to make a cinch bag.

 And made my bag...


From there, I cut the t-shirt into 2 1/2 inch wide strips. I cut the strips across the width of the shirt-from one side seam to the other, so that it made a great big loop. And NO HEMMING! 
 Hooray for jersey knit!


Then I marked out my guide lines on my bag (1 inch up from the bottom and then every 2 inches) and started sewing the loops into place...


I didn't pre-pull my ruffles, I just tuck the fabric up under my presser foot as I go-there is no rule that says you can't pre-make the ruffles, I'm just a bit lazy that way!

Keep adding those ruffles until you reach the top...


Thread your ribbons through the top of the bag and then sew them into place on the bottom of the bag.


Pack your bag, cinch it up, and you're on your way!


You can finish the top in a few different ways, in fact if you look really closely at this picture, you might notice that I finished three of the five bags in a different way.
{I didn't take any pics of them individually, sorry. I'll add some in in a bit.}

 I love how the pink one came out but it was by far the hardest-probably just me.
I cut a strip of pink 4 inches wide and folded it over the top of the bag being sure that when I started sewing I would be below the pocket that the ribbon would run through.
And then I ruffled.
 It was probably hard because I was so paranoid that I was going to sew my ribbon channel shut and then there would be no "cinch"!
I also had to cut a slit into each of the sides so that the ribbon could come out.

Method 2 (the purple bag) was just to add another ruffle right over the seam line of my ribbon channel. Easy, cute, but you can see the different color of the bag along the cinched up edge.

And Method 3 ( the white & coral bag) I like this one best overall. When making the bag, I left the top alone-I didn't sew a channel for the ribbon. Instead, I folded one of the long loops in half, long side to long side, and sewed the edges closed to form the channel.
I then sewed on all my ruffles, making sure the last ruffle lined up with the top edge of the bag.
I then sewed the channel piece onto the edge of the top ruffle, seams together, so that when the ribbon was threaded through, all you see is a matching, finished edge.

What ever you choose, have fun and enjoy your ruffles!
Happy Crafting.
 

You can find this post at the CSI Project Knock Off Challenge!
Visit thecsiproject.com

Wednesday, August 3, 2011

Meet My Friend...Mariah from Giggles Galore & More!!!

Hi Craft Goodies fans!  I’m Mariah from Giggles Galore where I share my passion for sewing, celebrating holidays, crafts, parties and making memories with my kids. 
I am a busy mom to our sweet 4 year old and rambunctious 2 year old twins.  At times our house can be a little chaotic, but there are always giggles galore.
I am super excited to be guest posting today on Craft Goodies sharing one of my easy craft projects you can make for your kids.

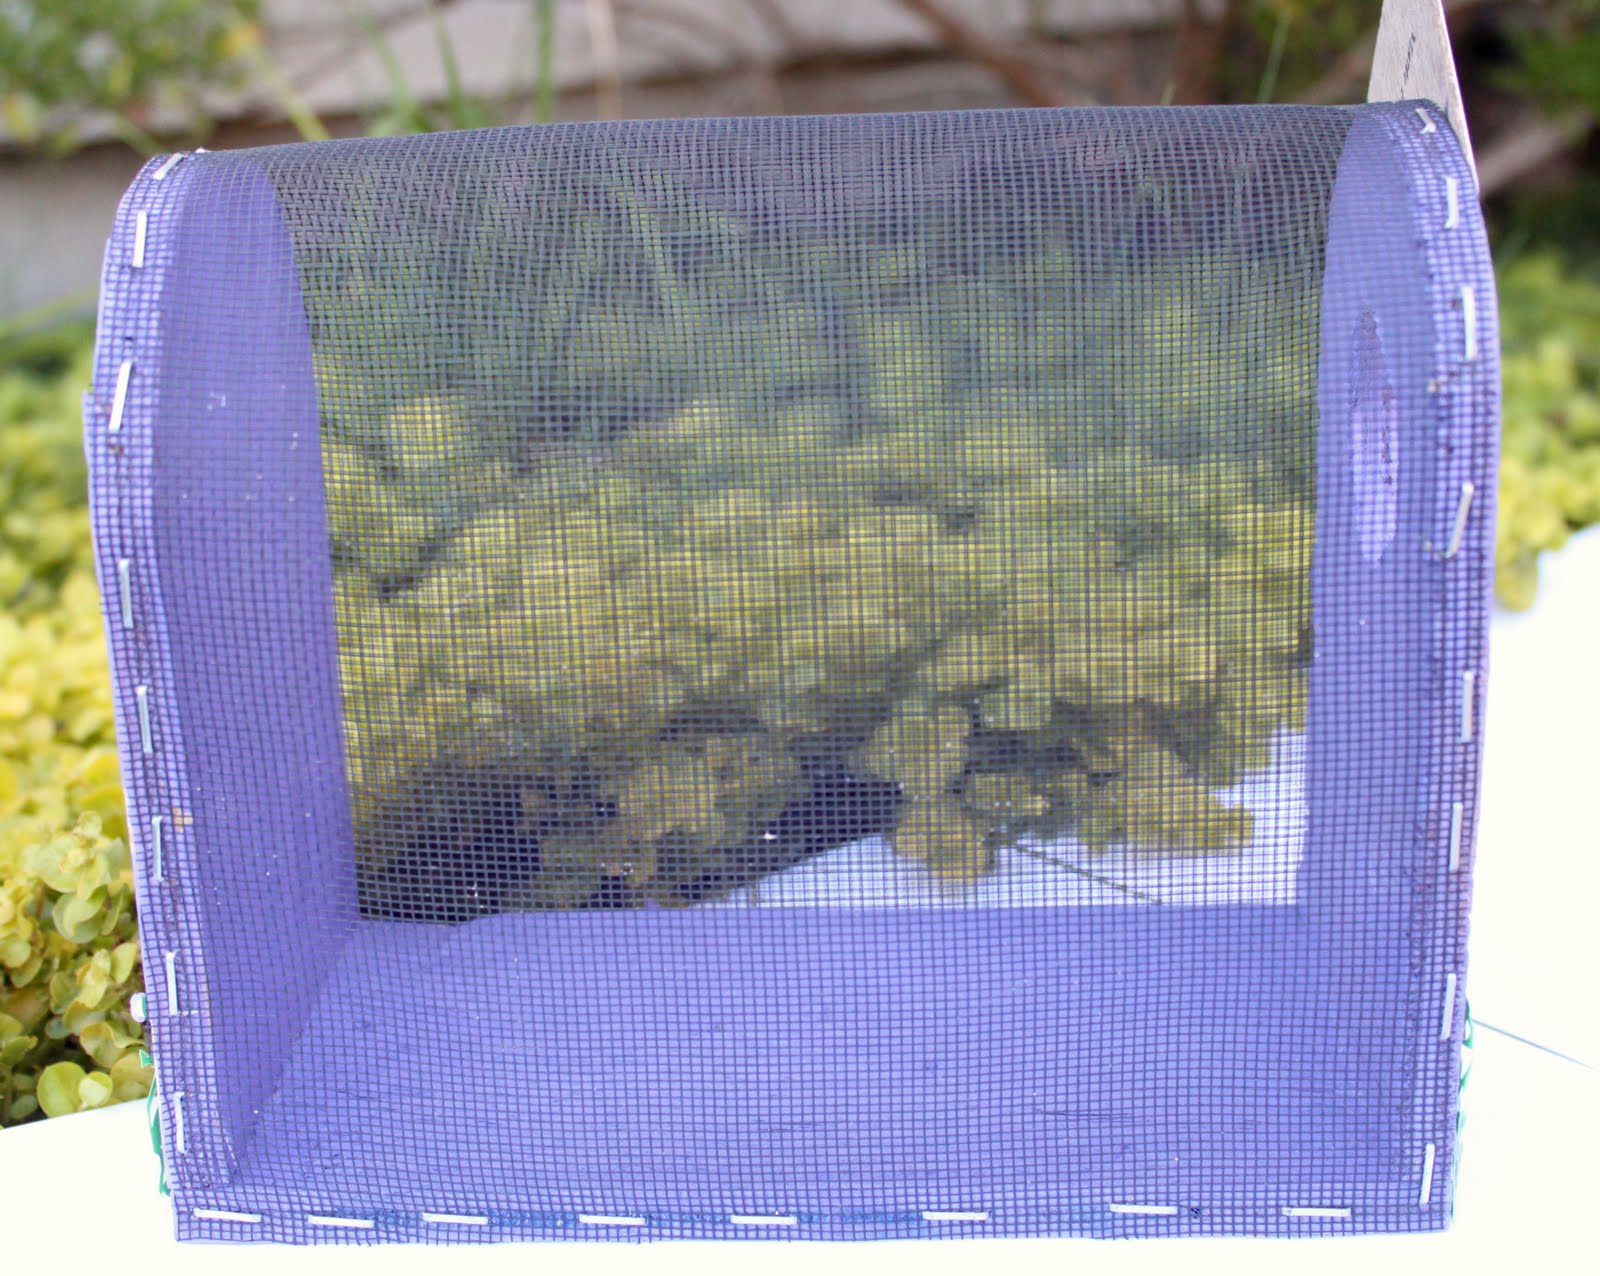
When I was a little girl my dad made us wooden bug boxes to catch bugs.  I remember filling them with roly-poly's (pill bugs), ladybugs and caterpillars.  It was fun to create a home for the bugs with grass and twigs and watch them, especially on the rare occasion that the caterpillar lived long enough to transform into a butterfly!

The original box was made out of 1/2" cedar but I was trying to only use what I had on hand.  So I went to my scrap wood pile and found some 1/4" plywood that would work.

I made a template for the 3 pieces, which you can download here.

Use a jigsaw to cut out the curved pieces and a table saw to cut the flat bottom piece.

Take one piece and drill a hole in the top middle.  This will be your opening to put the creepy crawly things in.  My husband used a 1 1/2 size drill bit to drill the hole.

Next, attach the side pieces to the ends of the flat bottom piece with wood glue.  Staple the bottom for reinforcement.

My plywood wasn't very pretty so after the glue dried I let the kids pick out what color they wanted to paint their bug box.  I gave each box a few coats of spray paint.

So far, I've spent nothing on this project.  But I needed a screen to cover the box and went to one of my favorite places to shop, The Habitat Restore to look for something that would work.  I found an old window screen for $0.25, perfect!  I cut the screen out of the frame.

Measure the outside of the box and cut the screen to fit around the opening

The next step may required an extra set of hands.  I wanted to make sure the screen was pulled very tight so my husband helped me staple the screen to the outside edges of the box (ok, ok the truth is that darn staple gun was hard to do!)

Now you just need to add a door to your little bug home.  I used counter top samples that I got at Home Depot.  They are solid and already had a hole at the top (you don't want bugs escaping and crawling all around your house do you?)

Take a small screw and drill it into the wood to secure your door.

Every home needs a little decoration so I spruced up our bug boxes with stickers and embellishments I had on hand.

Now you have a pretty little home to collect insects.  You can collect anything from grasshoppers, centipedes and lady bugs to lightning bugs, butterflies, moths and more.


I hope you have fun creating your own bug box, I'd love to see what you create!  Thanks Wendy for having me and thank you for crafting with me today!  Be sure to stop by my blog or etsy shop and say hello!  I love meeting new friends!

SO much better than a glass canning jar!!! My girls will be hitting up their grandpa for a few of these! Thanks so much Mariah for a great and crazy-fun idea.


Thursday, July 28, 2011

Meet My Friend...Rachel from Blooming Mommy!!!

Rachel from Blooming Mommy offered to share this tutorial with all of you and well, I couldn't say no becasue when I saw the first picture, I thought she had taken it in my play room! If nothing else, I NEED THIS TUTORIAL!!! So thank you Rachel for helping me out...twice!
 
"When I saw this:


I knew our whole toy storing situation desperately needed to be dealt with. Our one basket just wasn't cuttin it anymore! At first I went venturing out looking for some cute storage bins, baskets or shelves. NOTHING!!! It was either too expensive for what I desired or not what I needed.
So I decided to make "Toy Themed Bags." We have a whole heap of Toy Story toys, Pirate toys, Cars toys, Animal toys, Train toys and so on. You get the picture. So I made some bags to go along with the toy specified. Example: Pirates go in the Pirate bag. Toy Story goes in the Toy story bag and so on! The boys LOVE this idea and it's SUPER easy for them to put their toys away! Works for us! Soooooo, come see how we did it and then make some yourself! It takes about an hour (or more if your a new sewer) to make. :)

Materials:
About a yard 1/2 of material (I used snuggle flannel cause it was on sale....super sturdy too)
Thread to match
Rotary Cutter
Cutting mat
Ruler
Rope for drawstring (Wal-Mart or JoAnns)
Sewing Machine
Iron and Ironing board


Step 1: Measure and Cut
First you are going to measure and cut your material. I folded my material in half wrong sides together to see how big I wanted it... think of it like folding a piece of paper in half. (I measured about 22in. or more cause I wanted them big) You decide how big you want yours to be and then add about 4 1/2 inches to the top for the flap. (see later how we put in drawstrings)


Step 2: Whip It... Whip it good!
You want to whip stitch (the zig zag stitch) all around the edges of your material to avoid fraying. It just makes it look nicer too. :)


Step 3: Fold, Iron and Sew Edges
Fold down your edges and iron down. You can pin if you want, but I just glided it on through my sewing machine. Sew along the edge carefully until all edges are done.


Step 4: Pin and Make a Flap
After edges are complete, fold fabric in half right sides together. Sorry my picture is so bad, it was late. Anywho, pin the edges of your fabric together as seen in my "great" picture! ;) (Follow the arrows)
At the top of your bag you are going to want to leave about 4 inches unpinned in order to make a flap for your drawstring to go through. YOU WILL NOT BE SEWING the 4 inches at the top yet... so hold on to your horses! ;)

After pinning together, start sewing your sides and bottom. See picture for where to start and stop. Remember you need at least 3 and 1/2 to 4 inches un-sewn at the top. Start and stop at the lightening bolts. :)


Step 5: Drawstring Time
After sewing, grab your drawstring and place it at the top of your bag like so. Measure how much you want to use. I layed it on the top and left about 3 inches hanging out of the sides to tie at the end.

Flip extra fabric or flap over your drawstring and pin. You can either keep your rope there and continue pinning of remove it and stuff it through later... it's up to you.
Then pin it down. Make sure to ONLY pin the flap part together, NOT ALL of your fabric. You want to still make it a bag remember, so it needs an opening. :) (sorry I don't have a picture of it)

Step 6: Sewing that Flappy thing
Sew your edges together to make it easier to sew the flaps. Start at arrows and then stop at the cute little lightening bolt. :) (about 2 inches)

After you sew both sides, open up your bag and slide it onto your sewing machine to sew the flap together. Sew it all the way around and viola! Your done with the sewing part.

Then take your cute little snake of a drawstring and start pushing it through. I call it the chinese finger trap...

After the trap, flip your bag right side out. Tie knots in the end to avoid fraying. (You can even burn the tips of you want to go the extra mile)
Now my little A.J. insisted on having a "Buzz Lightyear" bag. So I decided to apply an applique to it when it was finished. I simply sewed around the edges of buzz and through his middle to ensure safe holding. :) Love it!
So there you have it! I made a few and now have a little bit of order to my mayhem! I hope you have fun making yours! Happy Sewing! Muah!


Don't worry play things-I'll be home to organize you soon! Thanks so much Rachel for sharing such a fun idea.
Happy Crafting.
Related Posts Plugin for WordPress, Blogger...