Hi there! And welcome to Craft Goodies. I'm thrilled that you've stopped by and hope you find something here that makes your visit a great one...
Showing posts with label re-fashioned. Show all posts

Wednesday, August 17, 2011

Ruffled Cinch Bag {Mini} Tutorial...Cutest bags EVER!!!


It's okay, take a minute and just enjoy the cuteness of it all! I still giggle every time I see my girls sporting one of these.
Best part???
Each bag cost me less than $1.50 to make.

So here's the story quickly...
Attended a Thirty-One Party and saw this...


Loved it, ordered it. OH! Happy me.
Had a trip to Sea World with my two super-cute nieces planned, thought "How cute would it be to have those little munchkins running around Sea World with their own little ruffled bag to tote a few goodies in?"

Loved the idea-so excited, got all the supplies needed...ran out of time before the trip to get them made...bad aunt and mom!
Did however get them made after we got home. Perfect for toting around our new friends...
Do you love the outfit? She's so in the I can dress myself phase...

Seriously, super easy, and the compliments we get! Makes me a happy "Yes, I made those," mama.

Here's the skinny on making one for your little munchkin:

Small piece of muslin to make the bag
*Mine were 20 x 14 inches

1 XL plain T-shirt for the Ruffles
*I bought X-LG t-shirts from my local Dollar Tree, one shirt easily covered one bag in the size I cut. I just bought a few different colored t-shirts and the girls picked their designs.

Matching ribbon for the ties
*I used about 8 ft of ribbon per bag

That's it! So let's make one of these cuties...
I checked out this tutorial
 to learn the basics of how to make a cinch bag.

 And made my bag...


From there, I cut the t-shirt into 2 1/2 inch wide strips. I cut the strips across the width of the shirt-from one side seam to the other, so that it made a great big loop. And NO HEMMING! 
 Hooray for jersey knit!


Then I marked out my guide lines on my bag (1 inch up from the bottom and then every 2 inches) and started sewing the loops into place...


I didn't pre-pull my ruffles, I just tuck the fabric up under my presser foot as I go-there is no rule that says you can't pre-make the ruffles, I'm just a bit lazy that way!

Keep adding those ruffles until you reach the top...


Thread your ribbons through the top of the bag and then sew them into place on the bottom of the bag.


Pack your bag, cinch it up, and you're on your way!


You can finish the top in a few different ways, in fact if you look really closely at this picture, you might notice that I finished three of the five bags in a different way.
{I didn't take any pics of them individually, sorry. I'll add some in in a bit.}

 I love how the pink one came out but it was by far the hardest-probably just me.
I cut a strip of pink 4 inches wide and folded it over the top of the bag being sure that when I started sewing I would be below the pocket that the ribbon would run through.
And then I ruffled.
 It was probably hard because I was so paranoid that I was going to sew my ribbon channel shut and then there would be no "cinch"!
I also had to cut a slit into each of the sides so that the ribbon could come out.

Method 2 (the purple bag) was just to add another ruffle right over the seam line of my ribbon channel. Easy, cute, but you can see the different color of the bag along the cinched up edge.

And Method 3 ( the white & coral bag) I like this one best overall. When making the bag, I left the top alone-I didn't sew a channel for the ribbon. Instead, I folded one of the long loops in half, long side to long side, and sewed the edges closed to form the channel.
I then sewed on all my ruffles, making sure the last ruffle lined up with the top edge of the bag.
I then sewed the channel piece onto the edge of the top ruffle, seams together, so that when the ribbon was threaded through, all you see is a matching, finished edge.

What ever you choose, have fun and enjoy your ruffles!
Happy Crafting.
 

You can find this post at the CSI Project Knock Off Challenge!
Visit thecsiproject.com

Tuesday, August 9, 2011

Meet My Friend...Leigh Ann from This and That!!!

Hi! I'm Leigh Ann. I write a blog I call "This and That". It's about all the mommish things I do - sewing, recipes, kiddo boredom busters etc. Here's one of my favorite projects I recently did.


A friend gave me this Gap skirt but it was too short for my modesty. It was sitting in my Goodwill bin but I just couldn't get rid of it. Then my I found this XL shirt my dad had given me and decided to use the fabric to put a ruffle on the bottom!

I found a pattern for this flower here. I really think it ties together with the ruffle well!I measured the bottom of the front and back of the skirt x2 (you need to have double the fabric to ruffle it) and my desired length to figure out how much fabric I needed for the ruffle and then I cut that shirt to shreds!The finished product! Click on the picture to see it bigger. I just LOVE it! I've gotten so many comments on this skirt!

Such a great idea, I love ruffles on grown up girls too!
Leigh Ann is an amazing crafter and home schooling momma. She shares a ton of her lessons and projects on her blog.
In her words...
"My kids and I have had a lot of fun studying World Geography this past year.  Take a look at some of what we've done!"

Thanks so much Leigh Ann!
Happy Crafting.

Tuesday, July 19, 2011

Meet My Friend...Dorian Busily Spinning Momma

Hi, my name is Dorian and I blog over at Busily Spinning Momma. If you wanna know more about lil' ol me, you can read up here.
busily spinning mommaI blog about sewing, and crafting and mommy-ing, and how to look awesome good on a cheapo's budget. I do a bit of everything with a whole lot of fun.
When I saw that Miss Wendy needed some guest bloggers on her AH-dorable blog, you know I just had to help! I have long loved Wendy's stuff, sew (HA! see what I did there? I'm a clever one, I am. LOL!) I am honoured to be guest-ing here today.
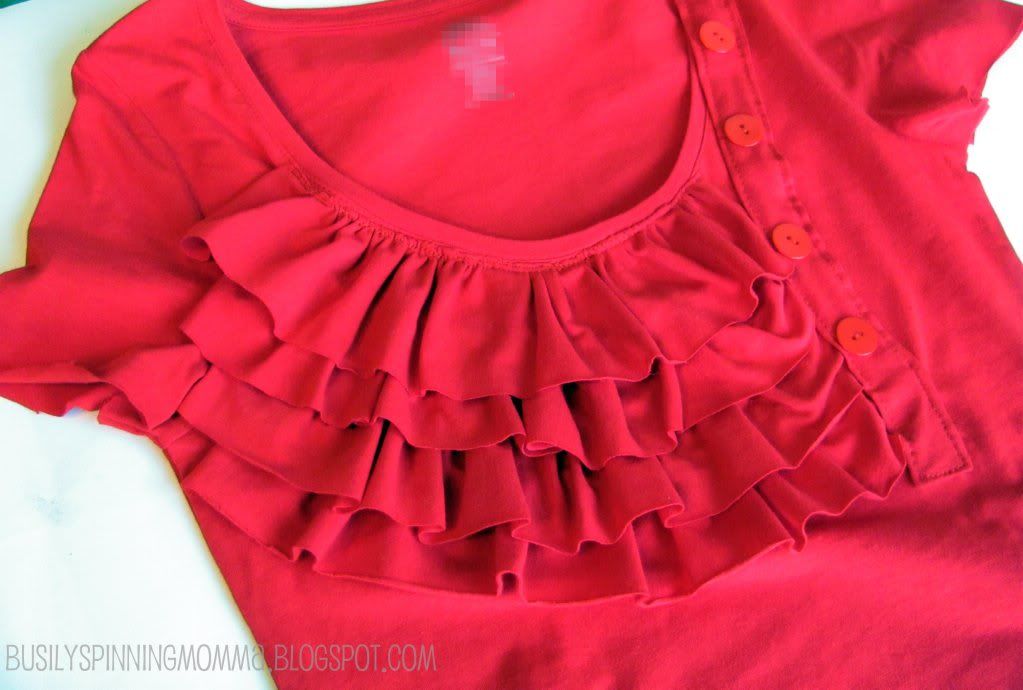
Wendy asked that I pick one of my tutorials and share it with you. Today, I chose to share my most popular tutorial with you, My "Ruffles & Buttons" Anthro Inspired Tee refashion.
In this tute, you will see how to make a look alike of this lovely (but price-y!!!) dress:
into a tee-shirt from a long sleeve shirt.
To finish with this:
Go to HERE for the full picture tutorial.
If you want even MORE tutorials , make sure to click on my "Tutorials" Tabs for many more. Enjoy!
Thanks for having me Wendy! I hope you're enjoying your time with your family and come back refreshed and happy! I know I speak for all of us when I say we can't wait to have you back :)

This tutorial is SO easy to follow! And there are SO many more great fashion knock-offs to be found at Busily Spinning Momma.
You really need to go check out her Rustic Spoon Pendant tutorial. Super cool!
Happy Crafting.

Thursday, June 2, 2011

How to Hem Your Jeans...My {BEST} Little Secret!!!

 
I'm sitting here giggling as I type this. I'm seriously such a dork-but this really makes me happy.
This is like one of those little magic tricks that is so simple but oh so brilliant that you kind of don't want to tell anyone how easy it is so they will continue to think you are amazing-know what I mean?
But in all honesty someone else shared this with me(thanks Jenni!) so it's I'm feeling the need to pay it forward.
 
Here's the deal, you find a great pair of jeans.
They fit in the waist and thighs, make your booty look hot, and are just the right color and weight- only problem, they are about 4 inches to long! (Or 8 in my case)
So do you walk away sad and jean-less, buy a pair of platforms to wear with them, or do the old tuck and roll? Well ladies, kiss all of those options good bye cause I'm here to save the day!
 
Go for it, buy them-don't feel bad about it cause in about 10 minutes they are going to be the most perfect pair of jeans you've ever owned.
 
Put your new loves back on and roll the cuff to where you need the hem to be or have a friend pin them for you. Take them back off and cut the excess fabric off.
 
 
Take the piece you just removed and cut off the already sewn hem about a 1/4 inch above the stitches.
 

 Pull the hemmed fabric apart, revealing the center threads and cut them all the way around the hem. Remove the cut threads from the hem piece.
 
Next your going to turn the hemmed piece so that the side that was against your leg (or the inside) becomes the new outside and the outside that has the cut edge becomes the new inside.
 

Before the flip-the raw cut edge is on the outside

After the flip-the raw cut edge is now on the inside and the smooth edge is on the outside.

 
From there you're going to make a "hem sandwich". Open up the hem piece and place the jean leg inside the fold of the hem being sure to match up the side seams. Fold the smooth edge of the hem up over the front of the leg. Pin into place.


Restitch the hem onto your jeans following the old thread channel and your done.
 

 In less than 10 minutes you can have awesomely hemmed, non-bulky, no rolls made to fit jeans!
Use a matching thread to hide your hem or be bold and match your thread to that of the jean seams.
Your friends will be dying to know where you shop because you always have perfect fitting jeans!!!
 
Just smile, enjoy the moment, and then share the secret too...
Happy Crafting.


Thursday, May 26, 2011

School's Out! Jean Bulletin Board...

So it's the end of the school year and I have found myself surrounded in well worn-no knees remaining and too small jeans.
I salvaged what I could into shorts for the summer-(I have a great hemming trick I need to share with you!) but still had a few odds and ends left over. I'm having issues with tossing things out that I know I could use for something so I had to find a use for these little critters.
 
 
I found it!
I cut and sewed the remaining pieces together to form a patchwork wonderland of denim.
I made a point to keep the pockets so they could be used to tuck notes or pictures into.
 
To make the board (I'm going backwards, sorry and I have no pictures. Wasn't thinking there!) I covered a 3 ft x 3 ft piece of plywood with foam-core poster board. I used two pieces and had to cut them a it to fit the board completely. I glued the foam core into place with wood glue.
 
Then I covered the dry foam-covered board with the fabric piece, attaching it to the back of the board with the staple gun and duct tape!
 
From there it could have been done, it looked great. But I have a tall skinny wall to cover and wanted it to take up a bit more space so I built a frame out of 1x3's and added a 6 inch wide shelf across the bottom.
It looks awesome in my daughter's room and she is thrilled to have a "cool" bulletin board.
 
A few after thoughts here-
you could easily do this with a store bought bulletin board. Either pop off the frame, cover the board, and then re-frame it. Or just cover the whole thing using your good friend the duct tape to keep it all in place.
 
The pockets are super fun! They are great to hold a pen, extra cash, or a love note from mom. Good choice to use them.
All the buttons and zippers were a pain to sew around but they add so much to the overall look of the board I'm glad I kept them.
I also made a point to keep some of the patches on the knees-these were my daughters favorite pants, and the patches helped her to recognize them and know in a way she still had them! (She's a total sap-just like her mom!)
 
Overall-a fun project to use up the no longer wearable jeans and a super cute functioning bulletin board.
 
 
Happy Crafting!!!

Tuesday, May 17, 2011

Re-Purposed Garden Decor part 2... Climbing Obelisk

One more quick and easy garden decor idea for you.
So I love these:
garden, outdoor, cobraco, obelisk, antoinette, vine, plants, decorative, emphasize, textured, black, finish, ideal, apartment, condo, balconies, structures, add, tasteful, element, arbors, areathe, arbor, makes, suitable, back, drop, weddings, ceremoniesthe, attractive, trellises, obelisks, perfect, flower, gardenwith, height, exquisite, detailing, stand, entrance, displaying, type, ways, stylish, patios, dimensions, 10.25l, 10.25w, 47h, part, collection, adds, touch, areas
 
but I'd rather put my money into my plants than into the decorations around them, especially one that is just going to get all covered up with vines! These babies can be upwards of $70 each.
So what to do? Go without this garden lovely, NO WAY!
Let's make our own...
 
I actually had this thought as I was cleaning up the side yard. The previous owners had left about a 1/2 dozen tomato cages of all sizes there and I was just going to toss them as the were pretty rusted and bent. I had the stack of them sitting on the patio, up-side down when it dawned on me that they looked an awful lot like my coveted obelisks.
Light bulb!
 
I found a scrap piece of 2x4 and cut it to a square block, drilled a hole into each corner of the block and then fit it onto the tines of the tomato cage.
It would work, but still needed a fancy topper.
That was solved with a quick trip to Lowe's and a fence post finial.
 
A coat of paint later and ta-dah!
A $3 garden obelisk.
 
I'm using this one to support my green peas, I cannot wait until it is just covered in the tiny little vines! Even now it makes me happy to look at.
 
I'm thinking for the next one, I'm going to try and make it a bit more ornate by adding some swirls and twirls to the round supports with heavy duty craft wire.
If it's ugly, it's okay. Soon you won't be able to see it!
 
Happy Crafting!


Re-Purposed Garden Decor...Gazing Ball & Stand

The weather here in Southern Texas has been amazing lately. The wind seems to finally be dying down to a gentle breeze and the humidity is yet to return so being outside is a must!
(I am writing this from my back patio now-it's perfect!)


I love being outside, working in the yard and gardens, getting good and dirty, and feeling SO accomplished when the plants start to show off their goods.
This house has such fantastic garden potential. The previous owners must have been avid gardeners as well as there are raised beds lining almost all the fence edges. 


A veggie lovers heaven.
I've gotten most of my babies in the ground by now,  put in the last of the seeds this past weekend. Hooray for fresh veggies! (in a few months)
The flower beds were bit of a different story...very over grown and very oddly planted...
...fast forward to I've completely replanted, pruned, shaped, mulched, and hauled rocks around to get these girls into shape.


 So much better, but they needed a little pizazz while the plants are filling in.  
I wanted a gazing ball or two, didn't however want to pay for them.
So I came up with my own little version here...


I used a round fish bowl,
alcohol ink to get the color,
Krylon metallic spray paint to fill in the gaps,
E-6000 glue to attach the bowl to the base,
and a few pieces of wood for the base:
a 4x4 block, mine is about 18" tall
a pine 1x6 cut to two 5.5 x 5.5 squares
and a 2 x 8 cut to two 7.5 x 7.5 squares
 
I nailed the wood together, centering the blocks onto each other to create the stand, didn't paint or stain it because I want it to age by the sun.
To finish the bowl I followed the directions on the ink label adding the ink to the inside of the bowl, let it dry completely and then applied a second coat.


 Once that coat was dry I sprayed the inside with the metallic spray paint to fill in any gaps I might have missed with the second coat of ink and to make the ball not see through.
 Then I glued it to the wood base and she was good to go! 
 
Because I had all this stuff lying around my house (seriously Wendy!) this was a totally free project for me! Just more $ to spend on plants...oh happy day!
 
Just a few after thoughts:
I used the fishbowls because I had them. If I were starting this from scratch I would have bought round glass jars/vases that don't have that little lip. You can find them at Micheal's and Hobby Lobby and even at full price ($5-ish) they are cheaper than a fish bowl. The fish bowl glass is however thicker.
 
Alcohol ink is awesome! But it smells like a science project gone wrong so don't stick your nose in the bowl! It comes in a ton of different colors and while one pack of 3 is around $10 without a coupon, I had 1/2 a bottle of red and green leftover when I was finished. (Plus the brown I didn't use.)
Enough to do another set or share with a friend.
 
Check out your local construction sites for free wood scraps-if the workers are around they might even make a quick cut for you. If you have to buy wood, check the scrap bins first! They are SO cheap and you won't end up with a ton of extra wood yourself. Otherwise, go in on this one with a friend you can each make 2 bases from 1 six foot 4x4.
 
Happy Crafting! 
 
Linking this project to the Summertime Ideas Challenge at:
 Visit thecsiproject.com
 
Related Posts Plugin for WordPress, Blogger...