Hi there! And welcome to Craft Goodies. I'm thrilled that you've stopped by and hope you find something here that makes your visit a great one...

Sunday, April 10, 2011

More Super Salads...Keep them Coming!!!


  I'm still in a summer sort of mind and really want to create a great recipe link for all those amazing salads out there, so I've found a few more to add to the collection!
 
I've also reposted the link if you've got a great salad you want to share. I've tried a few of the already linked ones...haven't been disappointed yet!
Thanks ladies for sharing your goodies! 
Unbelievable Chicken Salad

Unbelievable Chicken Salad

4 skinless, boneless chicken breasts
1/2 cup cranraisins (dried cranberries)
Mayonnaise
1 small package chopped walnuts
1 tall stalk celery, chopped small
Salt and pepper to taste
Boil chicken breasts until tender; drain and cool completely. Dice chicken into small bits. Stir in cranraisins, walnuts and celery. Mix in enough mayonnaise to make salad spreadable, using 4-5 tablespoons. Salt and pepper lightly. Refrigerate about 1 hour; stir again before serving with butter crackers.
Nancys Layered Fruit Salad Recipe

 Layered Fruit Salad

20-oz. pineapple chunks or tidbits (undrained)
22-oz. mandarin oranges (drained)
One small box instant vanilla pudding
2 or 3 bananas sliced diagonally (optional)
1 pint fresh blueberries
12-oz. whipping cream (lite or plain free may also be used)
1 pint fresh strawberries (sliced)


Place pineapple with the juice in 3 quart glass bowl. Add the oranges & sprinkle dry pudding mix over fruit and stir well. Refrigerate for 20 minutes until set. Layer bananas then layer blueberries, 1/2 of the container of whipping cream and then layer strawberries. Add remaining whipping cream over the top and garnish with mandarin oranges, blueberries & strawberries. Refrigerate for 2 hours
 
Happy Crafting!


Friday, April 8, 2011

T.G.I.F.-Thank GOODIES it's Friday #12 & Usborne Books Giveaway! (CLOSED)

Happy Friday all!
It's weekend time and this is going to be a good one. We're kicking it off  with a fun giveaway from
Usborne Books! and the T.G.I.F. linky party!
Usborne Books is a world leader in children's educational products. They produce top quality materials in a variety of topics and interests and can cater to every age and stage of childhood.
They carry a line of books specific to infants and toddlers through ages 12+.
All with the purpose of making our children lovers of books and reading! They carry picture and story books, chapter  books, coloring and activity books, science and research materials, flash and activity cards. International best sellers as well as titles that link to on-line sites for more research info.
Here's a bit of info from the company themselves...
"We spent considerable time analyzing the vision for this company and what its purpose is.  Yes, we sell the very best children's books in the world, but we feel we have a higher purpose.  We feel we are part of the overall education and literacy movement in the nation, and we feel our products can make a difference in the lives of children.  Our Mission Statement clearly defines the vision of our company


UBAM MISSION STATEMENT:
"The future of our world depends on the education of our children.  UBAM delivers educational excellence one book at a time.  We provide economic opportunity while fostering strong family values.  We touch the lives of children for a lifetime."
Books are such a great thing to have in your child's life, better than any toy you will ever purchase.  Did you know that it's a proven fact, the more books you have available for your children to read in your home, the better they will perform on standardized tests as well as through out their school career!  
So the giveaway?
You can win your choice of books up to $20!!!
Here's how to enter:
1. Be a follower of Craft Goodies
2. Check out the Usborne site and leave a comment letting me know what books you'd select if you won.
(3. Enter the linky party for an extra entry!)

This giveaway will close on Thursday, April 14th, at midnight.
 I'll announce the winner on Friday, April 15th.


There you go! Quick, easy, and painless!
I ordered a bunch of these a month ago. My kids LOVE them.
(I also got a bunch of the activity books for Easter baskets)
Have fun checking them out!

And don't forget to link up your awesome-ness! I missed last week  and can't wait to see what you've been up to...LET'S PARTY! 


Thursday, April 7, 2011

Wood You Like to Craft? the Craft Goodies way...April Project!


Hey friends,
Just a quick reminder that this month's Wood You Like to Craft? linky party starts Friday 4/8 at Sassy Sanctuary and will remain open for one week!
If you played along or plan to be sure to link up your project. 5 will be high-lighted with the top pick winning a super fun prize.
All 4 versions are up over at Krysal's blog, go check them out if you need some inspiration...here's mine...
 
I'm linking this project to the CSI Easter Challenge


Visit thecsiproject.com
 
 
"I'm so excited to be here to share with you my take on Krystal's Candlestick Rabbits.
I knew what I wanted to do the minute I saw them...


So what did I do different? Let's find out...


First, I didn't use candlesticks!
 (I think I have an issue with size, maybe it's my awesome-not-quite 5'2" stature that makes me feel the need to up-size, but once again I went BIG!)
I purchased two 29 inch table legs from Lowe's.
They had quite a few to choose from, ranging in height from 9 inches to 36 inches.
 And in several different styles, some more rounded, some a lot less ornate.
The cool part is the ends are all finished with a sphere-ish end and a squared flat end-perfect for a rabbit head and a base to stand up on!
I didn't need any other wood pieces because of the shape of the legs.
 I did cut the base on one to shorten it a bit and cut off the extra "bump" from the tops.
I painted and sanded and then got to decorate...


The cheeks are "blushed" with pink ink. The nose and carrots are polymer clay. Black thread for the whiskers, painted eyes, and drawn on mouth and freckles.

The ears are cut and sewn muslin-stitching on the outside and ruffled a bit for shape. Blushed with ink in the inner ear, and slipped over a wire loop to help hold them up.

I used a "boring bit" to make a 3/4 inch tunnel in the top of the piece to give the ears a place to sit.  Everything is hot glued into the tunnel so the ends don't stick out and it helps to give a strong support to the ears. Sorry, forgot to take a picture of that...

Then it was just raffia, some ribbon, and a few flowers to finish them off and TA! DA!
2 super cute, slightly tall, adorable rabbits!
{Even my not-so-in-favor-of-my-projects daughter walked by and said,
"GOSH! Those are cute mom!" BIG TIME compliment...}


Thanks Krystal, for a great project and for letting me be here today!
I can't wait to see what other ideas you've inspired...
Happy Crafting!"


2x4 Spring Chick Tutorial


This one's quick and easy, and super cute when finished-all fluffy and soft!
(except for the wood block part...)
 
Here's what you'll need:
 
 
2x4 block cut to 5 inches tall
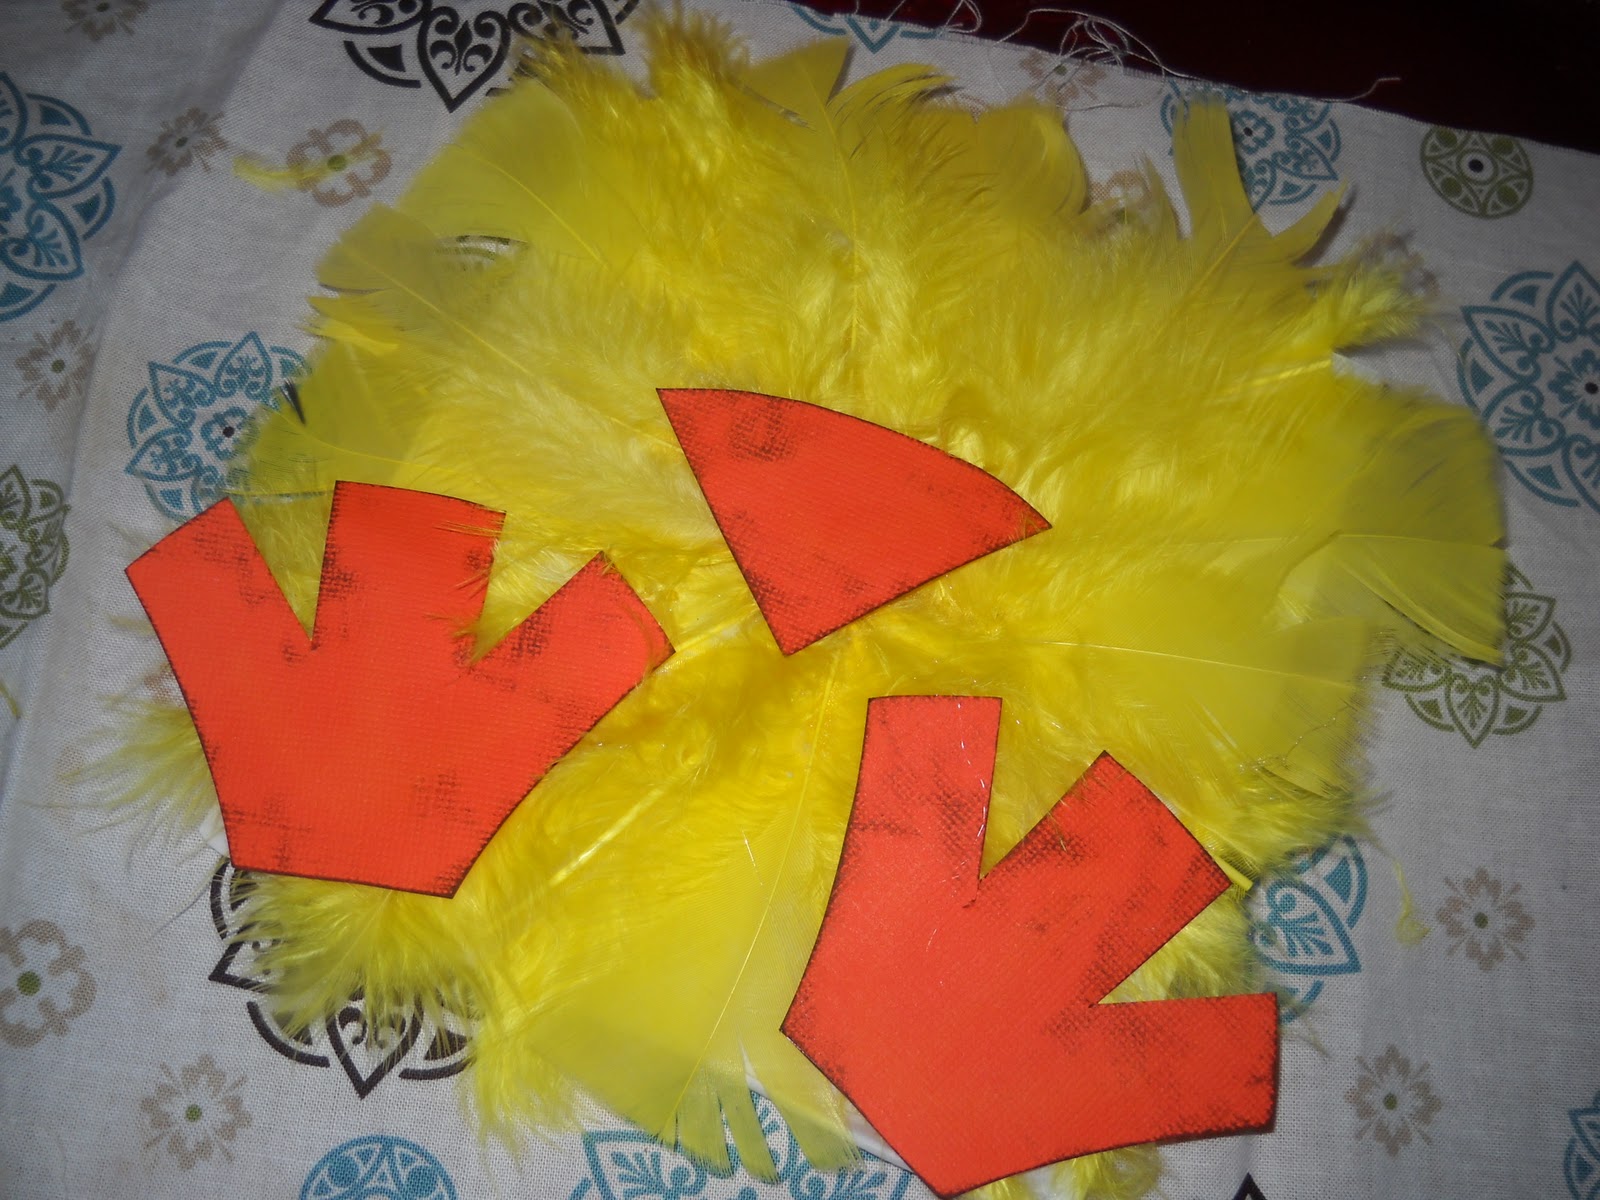
a handful of yellow feathers, I used 12
beak and feet cutouts
(mine are 1/2 inch MDF, you could use foam, chipboard, or paper)
orange paint and brush
2 black furniture tacks
ribbon
 
General Supplies:
glue gun
scissors
hammer
sandpaper
 
*I needed a gift bag for a baby shower so you'll notice I'm not using a block, but a paper bag. The process is the same, just lighter...)
 
Start  by sanding the edges smooth on the block and your cutout pieces.
You can paint the block yellow if you wish, I didn't cause well, unless you're looking at the back side, you can't see it!
 

Using your glue gun, attach the feathers.
 Think of your block as a clock, start at 12 o'clock and work your way all the way around. Use the scissors to shorten the feathers as needed, be sure to save the cut pieces!
They work perfectly to fill in gaps.


The feather ends should all meet in the middle, just above the center of the block.
You'll cover them up with the beak piece...


Paint the beak and feet pieces orange. Sand or ink the edges and then glue them into place.


The beak will cover the feather ends and the feet should sit off center just a bit up from the bottom edge of the block.

Using the hammer, set the eyes into place...


Add a sweet little bow and your little chicky is done!
*I slipped a little flower under the "wing" in the top picture*
SO "TWEET!"

(Hehe! Look how cute they are as gift bags. They might be cuter than the intended present...)

Happy Crafting.

2x4 Basket Tutorial


Everyone needs a sweet basket filled with Spring treasures!
Grab a few supplies and you can make your own.

Here's what you'll need:


2x4 block cut to 3 inches tall
standard paint stick
brown cardstock
brown ink
sisal rope
Embellishments/Basket Filler

Standard Supplies:
Scissors
Sand paper
Drill
Glue Gun
Mod Podge


Sand the edges smooth on the block.
 Cut the paint stick to 4 inches-I just used my scissors, but  cut slowly.
If you plan on adding flowers, drill a few holes into the block to anchor the stems.


Use the mod podge to paper cover the paint stick.
 Cut the remaining card stock into strips, 1/2 inch wide, running the length of the paper.
Once dry, distress edges on paint stick as well as each strip.
 
Make your paper mat...

Start by gluing 2 strips together forming an "L" shape.
Glue additional strips onto the horizontal piece, alternating front and back...


Weave the remaining strips into the mat alternating rows of "over, under, over, under..."


Secure all the ends into place with glue and then glue the mat onto the block.


Trim away the excess paper and glue the ends down.
Glue the paint stick onto the block.


Glue the end of the rope into place behind the lip of the basket topper...


Repeat on other side...
(I doubled the rope on both of my wood baskets but kept it single on the gift bag I made)


Add your fillers, grass, eggs, flowers, etc. and your basket is finished!


Here's a  peak at the gift bags I made using this tutorial and the chick one as well...
(the chick will post later today)

Happy Crafting!


Wednesday, April 6, 2011

OMTWI Final Project...Power Hour!!!

Visit thecsiproject.com


Well, it's over. So much fun, but so much work! But SO totally worth it.
I learned a lot, laughed a lot, and was so impressed and inspired by the other ladies in this contest. I've added a bunch of their projects to my list of must-haves.
And, cherry on top moment-I finished in 2nd!
So here's my last project  for the Season 1 finals of One Month to Win It!
The theme was "Power Hour" meaning our projects had to be done start to finish in an hour.
I  have to tell you, this was the hardest one for me-it took 4 projects before I found one that would  fit in an hour time frame.
But all was well, as this one ended up my favorite!
 I got all the slat boards at a construction site near my home. Hurray for re-proposing!!!
They were the lot markers that had been pulled once the lots were sold and the nice man at the toss pile couldn't give me enough of them...seriously, I think he was trying to put the entire pile in my van!
But then, one shouldn't complain when things are free!

Anyway, here you go my Slat Board Flower box...
(the how-to's follow the original post)


Supplies...ready.
 Stop watch...ready.
Children...
safely locked inside the house with instructions NOT to open the door unless someone is bleeding or on fire. Me...
quietly repeating "you can do this, you can do this, you can do this...an hour is plenty of time..."  
Ready, set, (say a little prayer) GO!


15 minutes in...we have a flower box! 20 minutes in...stencils applied and ready for paint! 37 minutes gone by and we are painted, sanded,and stained.
(Children open door-being the good mom I am, I tell them I will be there in precisely 23 minutes!)
 
Line the planter, fill the planter, add the flowers, check the stop watch.....
48 minutes!!!!
47 min.and 56 sec. to be exact.
WA-HOO!!! I did it, I did it!
 (insert very happy dance here, ignore on-looking neighbors)


One Wood Slat Flower Box done, start to finish in under an hour.
One completely relieved and happy crafter...ready for a nap!


**editor's note: No children were hurt or in danger during the making of this project. Their father was also locked safely inside, and they did in fact only open the door to let me know that they weren't bleeding or on fire...aren't they sweet?
Okay, here's my supply list:
*Let me know if you have questions, I didn't think to take pictures...
7 wood slat boards, cut into 14, 18" pieces
  1x6 board cut into two 6x8 inch blocks, and one 18" long board
nails and a hammer
spray paint
stain
sand paper
stencils
(I cut mine from vinyl with my Cri-Cut)
plastic garbage bag
chunky mulch
soil
flowers

I used the 6x8 inch blocks as the box ends, (the 8 inch side for the length and the 6 inch side for the height) and the 18 inch board as the bottom of the box. Then 5 slats made up the front and 5 slats on the back sides of the box.
The four remaining slats were used as the legs.
*there is about a 1 inch gap on each side of the bottom of the box for drainage.

Lay out your stencils and paint away!
Then distress as you please...

Line the inside of the box with the garbage bag, cut down to fit the box.
Staple the lining into place.
Add a few slits into the bottom of the lining for drainage.
Fill the bottom third of the box with mulch and then top with soil.
Add in your flowers, step back and enjoy!


Happy Crafting!

Tuesday, April 5, 2011

Rabbit Romp Easter Basket Exchange!!!

Oh, yes!  It's that time again!!!
Time for another holiday gift exchange here at Craft Goodies, and I could not be more excited!
I LOVE hosting exchanges.
I  LOVE that you join me in my crazy fun.
And I LOVE to see how amazingly creative you all are-it just makes me so happy!!!
 
So ladies, (and gents if any) I officially invite you to join me in my
 
Rabbit Romp! Easter Basket Exchange!

Craft Goodies


Why a rabbit?
Polka Dot Basket with Bunny
 Because you can't have Easter without the bunny!
Why a basket?
Wire Baskets
Because bunny's and baskets go together like peanut butter and jelly!
So what do you get to do?
 Put together a basket full of goodies that you can send to a friend. It can contain candy, a handmade treasure, your favorite things, her favorite things, anything you'd like to send her way BUT...(here's the catch) it has to contain a RABBIT somewhere!
Bunny Basket
It could be on a card, the basket could be a rabbit, include a chocolate one, create a masterpiece with the letters R-A-B-B-I-T, sew a cute little hopper...
you get the idea?
 
So let's play!
 Here's the exchange 411...

·         If you commit to participate in this exchange, you will need to make one Easter Basket for a new friend and have it post marked by April 18, 2011. In return, you will receive one Easter Basket from a fellow new friend in the mail sometime around Easter!.
{You DO NOT need a blog to participate just an email address!}
·          Email me at { wmgar@comcast.net } to officially sign up. Sign ups will be open until
April 14, 2011.
I will then email you a short participant's questionnaire to fill out and return to me.
·          I will personally email you with your "Rabbit Romp Exchange Partner's" mailing address, email address, and questionnaire info as soon as I have a partner  for you!
·         Create a basket for your assigned partner..
·         Have your gift post marked no later than April18, 2011. It is very important that you have your gift post marked by April 18th. If you can get your handmade gift in the mail earlier, that's even better! 
·         There is no skill level required. A handmade gift is always wonderful, no matter how technical it is! The fun is in making a new friend.  
·         There is no price minimum on the handmade gift. Please limit your spending to no more than $20. Shipping charges are up to the sender-flat rate boxes are a great way to go! 
·         I have no way of patrolling every one's participation....but usually, people are honest and do their part. I will send out email reminders. And with this exchange, you will have your partner's info so you can help remind them as needed ;o)
If you wish to play{come on! you know you want to} just drop me an email and you're in! You can also add the exchange button to your blog so others know how fun and completely awesome you are!
Craft Goodies


 Let's get these rabbits romping!


Related Posts Plugin for WordPress, Blogger...