Hi there! And welcome to Craft Goodies. I'm thrilled that you've stopped by and hope you find something here that makes your visit a great one...
Showing posts with label guest posting. Show all posts

Thursday, December 6, 2012

4x4 "No-Melt" Snowman!!!

I was asked to do a guest post last year for Missy over at So You Think You're Crafty. She was in between competition seasons and needed a few pre-holiday filler posts. It was so much fun! And my first real introduction to her great blog.
I have been asked several times since then about this little guy and realized I never re-posted the tutorial here on Craft Goodies. Well the timing couldn't be better to do so, so let me introduce you to my 4x4 No-Melt Snowman!


Tell me that doesn't make you smile?
Even better he was super quick and easy to put together.
You'll need just a few things to roll out one of these guys:

4x4 post cut into 5 pieces
bottom piece measures 11.5 inches long
middle piece is 9 inches long
shoulder piece is 6.5 inches long
head is 3.5 inches long
and hat is 4.5 inches long
small piece of 1x6 inch pine
cut to 5.5 x 5.5 inches (should be a nice little square)
wood glue
paint and brushes
white, black, and orange
sandpaper
2 twigs for the arms
fun snowman-y accessories
fabric scarf, ribbon, buttons, holly, snowflakes, etc
Tools needed:
Miter Saw to cut the 4x4
*you can get the post cut to size at Home Depot or Lowe's if you don't have access to a saw
Drill and Drill bit
*drill bit should be just wider than your twigs


Start by painting the blocks. All body pieces white, the hat and square base pieces black.
Once they are dry, rough them up with your sandpaper.
Remove any dust. Using the wood glue to hold everything together, start making your snowman. Glue the hat pieces together, being sure to center the block piece onto the square piece and set aside to dry.
(I found it was easier to create the face if I left the hat off until the very end.)
Glue the body and head pieces together, centering each block onto the larger on below it then set aside to dry.


Once the body is dry, you're going to drill the holes for the arms. One on each end of the "shoulder" block drilled on an angle so the arms don't stick straight out!


From there you're ready to make your snowman yours.
I set the twig arms in place with a hot glue gun, and then painted the rosy cheeks. The nose came next, it's a small wood rectangle cut from a paint stick, and last I drew on the eyes with a sharpie.
Once I had my face done I glued the hat into place and finished dressing my snowman.
I used a scrap of fabric for the scarf and matching ribbon for the hat band. Some fun wood stars painted black down the front instead of buttons and then some other fun odds and ends to give him a little more personality.

Get creative and enjoy making your wintry friend! Or go crazy and make a bunch, we all need a friend or two, right?
 

Enjoy your holiday season and happy crafting.
 

Tuesday, April 10, 2012

It's Pillow Week over at the CSI Project!!!

If you didn't get a chance to visit the CSI Project last week for my guest post, no worries!
Here it is:


Hey there all you CSI friends!
It's been a while since I've been here and I could not be happier to be back. My name is Wendy and most days, I can be found over at my little place in cyberspace:
 Craft Goodies.
Craft Goodies
So why am I so happy to be here this week?
One, I LOVE this blog--so many fantastic ideas to be found and two, I LOVE pillows!!!
I love that they are so versatile, such an easy way to spice up a plain old chair or sofa, and can be anything from wild and crazy to completely personal. SO, let's get busy and make one!

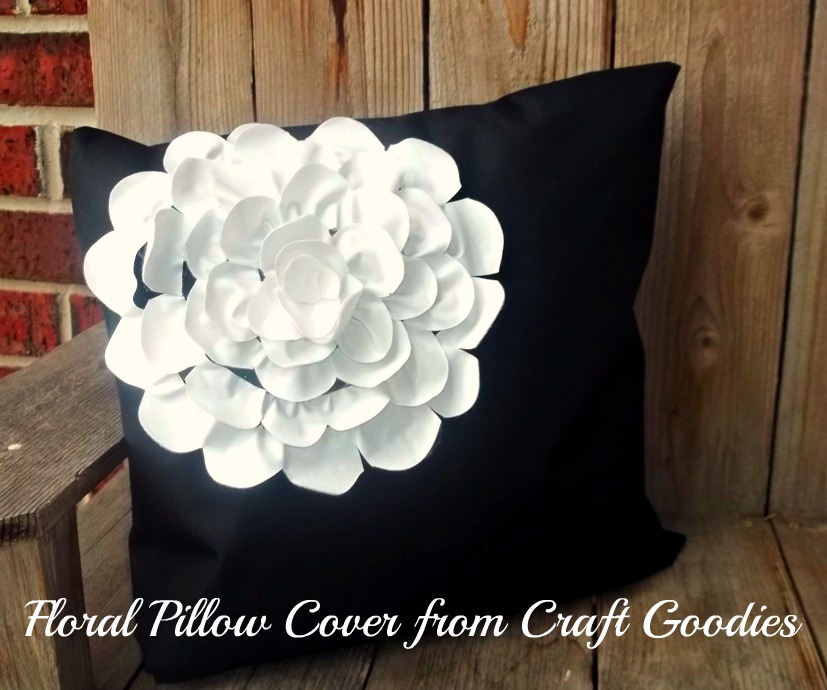
I spied a pillow a few weeks ago at Hobby Lobby that I immediately wanted, I just didn't want to pay the $35 dollars for it so I set out to copy it.

I couldn't be happier with how it came out.
{And it was so much less expensive to make.}
The key to making this pillow a stand out is to not use prints. The ones in the store were all solid, bright colors like hot pink, turquoise, lime green, etc, and then were paired with either a bright white or black flower.
Start with the pillow form size of your choice, your cover fabric, and contrasting flower fabric.
The pillows in the store used a suede type fabric for the flowers, because mine are going outside I chose felt-backed vinyl. I probably would have used this if I were using these inside anyway. It "puckered" just like the suede, will be super easy to wipe clean, and I don't have to worry about the edges fraying.
My cover fabric is also outdoor fabric so it won't fade or mold if it gets wet. Home decor fabric would make a good choice too.

I used an envelope style pillow case to cover the form. These are fast and easy, and make it super quick to change out your pillows.
You can find a good video tutorial on how to make one HERE.

**I measured and pinned out my casing, but didn't sew it together until the flower was on. This made it easier to sew the flower on without having to try and avoid sewing my pillow case shut!**

To make the flower cut the vinyl into 2 inch wide strips.
 {I used a total of 3, so you don't need much fabric at all...}

Once you have your strips, go back and add a scalloped edge to each of them.

Pinning comes next. I used a soup bowl to give me a starting point. I pinned around the bowl really loosely, about every other petal. 

Continue to spiral the petals toward the center, pinning as you go. the go back and sew the petals into place, catching the "puckers" as you go. 

See the gaps between each layer? This made it super easy get in between each layer with my sewing machine. I used the machine to sew everything but the last two petals, they got fabric glue.

From there I finished up the envelope casing, stuffed in my form and sat back and smiled!

All in all, a yard of each fabric was enough to make two 14x14 casings and oodles and gobs of flowers--a 1/4 yd of vinyl would have been plenty.

I hope you like it as much as I do, and will give it a try. I can't wait to see all the submissions that come in this week, it's sure to be a mega-source of ideas and things to try!

And thanks too for letting me stop by today. It's always such a treat.
Happy Crafting.


Wednesday, April 4, 2012

Out of the Office...But Still Crafting!!! Guest Posting at The CSI Project...

So clearly I can't read a calendar! My guest post actually went up today...sorry if I lead you astray, but it really is there now if you'd like to go check it out.

Today I'm over at the CSI Project sharing how I made this:

 It's Pillow week at CSI and I'm thrilled to be a part of it {and super excited to find a ton of new and fun ideas} so come on over and say hi!
Happy Crafting.


Friday, December 2, 2011

Guest Posting at So You Think You're Crafty!!!

Hello! And happy Friday to you all.
Just a quick note that I'm over at
So You Think You're Crafty? today sharing a little winter magic...


If you're not familiar with Missy's blog you should go give it a look. TONS of fun ideas, it's very worth a peek...and I'd love it if you'd say hi!

Have a great weekend-


Friday, October 21, 2011

Guest Posting for Howl-oween Tidbits at the Rhinestone Beagle!!!

This is the post I shared at the Howl-oween Tidbits Series on the Rhinestone Beagle...enjoy!!!


Hello and Happy Halloween to all you Beagle buddies out there! I'm so excited to be here today sharing a little bit of Halloween magic.
My name is Wendy and you can find me crafting away my days over at Craft Goodies...
Craft Goodies

I am thrilled to be included in this group of Halloween-loving ladies but must make a small confession-I HATE being scared!!!
So yes, I am one of those lovers of "cute" Halloween goodies because basically, I'm a total wimp. 
My project isn't the spookiest but it sure was a lot of fun and best yet SUPER EASY!!!

Here's what you'll need to make one yourself:


A large clear holiday ornament
thick craft wire *16 gauge
(I used a thinner wire on my first attempt and while do-able it was a lot harder because the wire didn't hold it's shape as well as the thicker stuff)
wire cutters

Get started by twisting the end of your wire through the ornament topper to keep it in place:


From there, start wrapping the wire around and around the ornament-like making a ball of yarn!
Top too bottom, side to side, keep going until it's as covered as you like it.


Once you're done wrapping the wire, snip the end with your cutters and tuck it around another piece of wrapped wire to keep it in place.

Next cut 8 long strips of your wire to make the legs. Mine were about 24 inches long. Thread the end of the wire under the wrapped wires and pinch in half. Then Twist the two ends together tightly to  form a leg. Do this 4 times on each side of the ornament:


Make the head by forming another smaller ball of wire. I wrapped the wire around three of my fingers to get a good size started and then just kept wrapping until I liked the size and shape. Again, just like you would do to make a ball of yarn. Clip the end when you reach your desired size.
Cut another small piece of wire and use it to "tie" the head to the body.


Bend and shape the legs. You can use your cutters to gently pinch the folded ends tighter to hold the legs in a more "crawly" position.
Tie a length of thread through the ornament hanger and dangle your new little friends where they'll definitely get noticed:


Not to creepy, right? My girls think they are pretty awesome!
I still have a few left over ornaments and am thinking it would be fun to color the ornaments a bright shade of red or green before wrapping them...see, I'm slowly edging toward scary.

Thanks so much Rhinestone Gals for having over, and Beagle friends, don't be shy-
drop by Craft Goodies any time for a visit.


Until then have a wonderful, SPOOK-tacular HOWL-oween!!!
Happy Crafting.


Wednesday, October 19, 2011

Happy HOWL-oween!!!

I'm over at the Rhinestone Beagle today taking part in their Howl-oween Craft-a-Thon series.
Rhinestone Beagle
Stop by, say "BOO!", and check out how I made this...

See you there...


Tuesday, September 6, 2011

September WYLTC Project...{sneak peak}!!!

Hey all you crafty friends out there!
wood you like to craft?
Just a heads up Wood You Like to Craft is back from a quick summer vacation and we are making some SHELVES!
I'm over there today sharing how I made this super FANTASTIC numbered cubby shelf...

You'll find all 4 projects and tutorials on the WYLTC? site this week, as well as the themed linky party starting on Friday.
Krystal shared a darling mason jar shelf yesterday, I'm there today, Melinda tomorrow, and the sisters on Thursday...you're not going to want to miss all the fun!
Remember anything goes, whether you build a shelf, finish a craft store shelf or repurpose a shelf, we want to see it!

Thursday, August 18, 2011

(Re-Run #3!!!) Guest Post from Belle's Bazaar!

Last of the re-runs! Hope you enjoyed them, and I'll see you tomorrow for our
 TGIF {thank GOODIES it's friday} linky party...

Hello to you all! It's Wendy from Craft Goodies here-
Craft Goodies
 (to say thank you to Heather for helping me out with my blog while on vacation last month!)
I have been revisiting a few of my older posts over the last little while and ran across this one.
Since writing this, my girls have added quite a few drawings to their collections and I'm in need of this post so I thought it would be perfect to share with Heather and her readers.
Hope you enjoy it, and hey, stop by and visit me anytime!
Enjoy...
 
 I have challenged myself to bring color into my house. This is an extension of that challenge. My girls rooms are very white-walled and in need of decor.
I want to add a photo frame collage onto the main wall of my 7 yr old's room, but wasn't sure how to fill the frames until she brought me a few of her drawings.
She has plans to be an astronaut and own her own spaceship when she's older. This is what it's going to look like...


This is very important to her and so I wanted a way to make sure the picture lasted for as long as possible.
I had her color the picture with regular crayons and then I ironed the image onto a piece of cotton muslin.


The image transfers easily onto the fabric and leaves a reverse print of the original picture.
I then backed the fabric with a thin piece of felt and using black embroidery floss, back stitched around the entire image, being sure to follow her lines and details.


The result is a permanent work of her art that we framed and will add to her room.
She loves it, and it so proud that her picture is on the wall. I love that I don't have to hang on to every piece of paper that she colors on.
And here's the sappy mommy moment:
when my little girl is one day off, soaring through the stars to Jupiter, I'll be able to look at her picture and still have a piece of her close by...
No budding artist in your home, or are they dead set on having Dora on the wall and you don't draw?
Problem solved!
I ran across a fantastic tutorial earlier.
Nora from over at Handmade and Heavenly
shares how she got some of her son's favorite cartoon characters onto their pillows.
A similar process to what I did, but a lot more details and pictures!
Check out her tutorial here...
 
Happy Crafting!


Guest Post Clean Out...

I am needing to publish a few of my recent guest posts to get them out of "draft" state on my posting page. Thanks for enduring the re-runs...
(Fireflies and Jellybeans/Christmas in July Series)
As a die hard lover of all things Christmas, there was no way I was passing up the opportunity to start celebrating it in July! If Fawnda says it's okay, I'm totally believing her.
Hi! my name is Wendy and I am here today from my blog

Craft Goodies
My blog is my escape from my real life of running 5 little girls around town and trying to keep up with my husbands crazy busy work/school schedule. On it you'll find everything I love-recipes to try and share, sewing projects and quick fixes, remakes and re-dos, and TONS of wood related craftiness! 
You see, I'm a bit of a power tool junkie.
They make me happy, very happy.
 
I started my blog last fall, just in time for all the change of season, holiday fun. I spent the month of November highlighting one of my favorite Christmas holiday treasures...Handmade Ornaments!!!
In fact, I shared a different handmade ornament everyday that month as well as hosted an amazing ornament exchange.
(And I'm itching to do it again this year.)
 
Handmade ornaments just scream LOVE and the memories they produce are irreplaceable. So, on that note, let me share one of mine and my girls favorites with you...
 
Polymer Clay Teddy Bear Ornament!!!
I LOVE play-dough! Everything about it makes me happy, the colors, the smell, the texture, and the oh so many things you can make with it. It is indeed a wonderful thing-unless it gets stuck in your carpet but that's a whole other issue.

I truly believe polymer clay is a grown up version of play dough and it too makes me happy. So today, I'm breaking out my secret stash {yep, my girls love it to, I have to hide it!} to show you how to make this little guy.

Here's what you'll need:
Polymer Clay
1 pkg of the color you want to use for the body
1 pkg red (hat and scarf)
1 pkg white (hat band and puff)
1 pkg black (nose)
Small black seed beads
floral wire or a small paper clip
Ribbon to hang

Tools Needed:
Scissors
Straight Pin-the kind with the colored ball on the end
pencil
wire cutters

**Just a few things to note when working with clay. It's very forgiving, if you don't like it, roll it back up and try again. It picks up EVERYTHING! Be sure your work space is super clean-hands
too! The red clay has a tendency to bleed onto your hands more than the others, use it first, or last-either way wash your hands before you move on to another color especially the white! And last clay is very therapeutic, relax and make a dozen of these, think how amazing you'll feel when you're done!
Here we go...


First, you're going to break up the body color clay. You will need a total of 5 pieces to form the body. The head, tummy, 2 arms and 2 legs. Roll your pieces into balls to check the sizing. The body should be about an 1 1/2" round ball, the head and legs about 1" round, and the arms should be just a bit smaller.
Lay out the pieces like the picture to your right to help check your sizing. It should all look proportional.
*You should have some clay left over, it doesn't take the entire package*
Next, you're going to shape the pieces. They're all going to be rolled into a "tear drop" shape- smaller on one end than the other. To do this place your hand on one end of the rolled ball and roll it back and forth, applying slight pressure so that it elongates. Keep in mind that the arms should match each other in size and length, legs too, and that the arms should be a bit longer and thinner than the legs.
The overall dimensions should be:{about}
Body height: just over 2"
Arm length: 1 1/2"
Leg length: 1 1/4"
Get the arms and legs to the length you like, then push the larger tip down onto your work surface to create a flat edge.
To shape the head I hold the clay in the finger tips of my left hand and pinch and pull gently with my right. You don't want the head to "grow" so much as just take shape.
The good news is, if you don't like it-roll it back up and start over! Play with the shape until you get it where you like it.

Once you like the shape of your parts, start building the whole! Set the body piece upright and sandwich it between the two leg pieces. Blend the clay at the back of the legs into the body piece until there are no seams and the 3 pieces are now 1 across the back.


Place the arm pieces on next. Because they are a bit longer, curve them in so they wrap around the belly a bit. Then repeat the same blending process for the arms. Again it should be one solid piece across the back.

The head piece goes on next. Center it on top of the body piece with the smaller end pointing directly front. This is where his nose and eyes will go. Gently blend the back of the neck into the body.

You then want to create a flat spot on the head piece where the bridge of the nose would be. Gently press on the clay with your thumb to create this area.
The base of your teddy is done! Now we move on the accessories!
You will need to roll out another 1 1/2" red ball for the hat.
Roll out a "snake" of red about 4-5" long for the scarf.
Another snake about 3-4" long of white for the hat band and a small white ball for the puff on the hat.
And 2 small balls {1/4"} of body color for the ears.
To make the hat, roll out a ball of red clay about 1 1/2" round. Press it against your work surface to flatten one end, then pull at the other end and flip the tip down to make a Hershey's kiss shape. Place the hat on
top of the bear's head. Very gently press the edges of the hat into the head piece.
Press the white ball onto the tip of the hat. Be sure it rests on the base of the hat as well. Place the white snake onto the brim of the hat, gently pressing it as you go. Be sure the seam of the band is on the back of the hat. Blend to join the seam.
Press one of the round brown balls on each side of the hat for ears.


Using the pencil, flatten out the red snake until it's not quite half an inch wide. Wrap the scarf around the bear's neck to your liking. Pinch the scarf together where it touches in front. Roll a small ball of red clay and press it over the pinch to make the knot. Using your scissors cut the clay so your tails are as long/short as you want and then cut the ends into fringe.

Last are the details. Using the ball end of the straight pin create the indents in the ears and on the paws. Press the straight end of the pin into the face clay to make the mouth line. Roll a small ball of black clay for the nose, press it into place.

Place one seed bead-these are the eyes, onto the end of your straight pin and press it into place on the face. Be sure the bead goes into the clay. Your pin will leave a small mark on the clay, add another one just above it to form eyelashes. Repeat for the second eye. If you want, you can add powdered blush at this point. Use a q-tip and apply it to the cheeks, ears, and paws.

Make your hanger next. If you have floral wire twist it into a loop with a 1 1/2" long tail. If your using a paper clip, open it up so it forms and "S" and cut off the smaller end so you end up with a 1 inch "U". Slide the tail ends into the back of the hat piece until only the loop or 1/4 " of paper clip are showing. Press the clay back around the hanger to seal it in.
Follow the directions on the packaging for baking instructions. Once your little guy has cooled, thread a piece of ribbon through the hanger and add him to your tree!


Happy Crafting!
Just for fun, here's a few more of my favorites from last year...
   
(Click the photo for the link)
Memory Block *** Paint Stick Toy Soldier *** I Spy Ornament

Thanks so much Fawnda, for letting me be here and for letting me start my celebrating!
Please, stop by for a visit anytime and be sure to join me again this November for round 2 of
An Ornament a Day at Craft Goodies.

Merry Christmas and Happy (upcoming) Holidays to you all!!!

Related Posts Plugin for WordPress, Blogger...