Hi there! And welcome to Craft Goodies. I'm thrilled that you've stopped by and hope you find something here that makes your visit a great one...
Showing posts with label Spring. Show all posts

Tuesday, April 17, 2012

WYLTC...April Showers Umbrella Planter from Craft Goodies!!!

May's Wood You Like to Craft is just around the corner and I'm sure it will be fantastic. Until then, here's my April project and all the how to's! Enjoy...


I love Spring! So when my month to host WYLTC ended up being April I was nothing but smiles.
I love the sight of all the color coming back, the grass and tree, the birds that sing endlessly, and the flowers!!! Those first little sprouts of soon-to-be tulips and daffodils are pure joy to me and I wanted a way to show them off. My project for this month was the perfect way to do that... 

Here's what I used to make my umbrella planter:

1/2 inch and 1/4 inch MDF
Wood Glue and Staples
PAINT in bright spring colors!
1/2 inch eye screw
Sandpaper
Glitter, Ribbons, Puffy Paint
Tulip bunch and greenery

I started by drawing out the umbrella parts and figuring out the planter. The planter sits on a slight angle so that it wouldn't stick out to far off of my door and is on the smaller side because I only wanted a few flowers tucked inside there.

Then I traced the patterns onto the wood and cut them out with my jigsaw. The handle and planter pieces are each cut on the 1/2 inch MDF. The umbrella and panel pieces are cut from 1/4 inch MDF.


I painted everything next, just base coats--no detail yet, distressed the edges and then glued the planter box pieces together and the umbrella pieces together.
 {I aded a few staples to the plant box just to be safe, but really, they weren't needed.}

Once the planter box was good and dry, I glued it to the umbrella pieces and then ran and did a load of dishes while it dried.

At that point the "hard" stuff was over and it was time to decorate!
I added the line details with white puff paint, drew on the little circles with the puff paint and loaded them up with iridescent glitter. Once everything was dry it got a good coat of sealer.


I added the eye screw into the back of the handle, ran a ribbon through it to hang it up. And then added my bow to the front of the planter.

And last...


Added the greenery and flowers and hung my little umbrella on the door.
It's so fun to see this when I pull into my driveway--totally makes me smile.
 
I hope your spring is full of fun and flowers and even a shower or two.
 I can't wait to see what the other ladies have made to go long with
this month's theme of
April Showers.
 
I can't wait to see what all of you come up with either, be sure to check back all week. You're sure to find something to inspire you...
 
Happy Crafting!


Thursday, April 28, 2011

It's Officially Spring...over my Dining Table!

My little house is slowly becoming more me.
When you can't paint you have to look elsewhere for color.
I was given this idea by an amazingly talented woman at church...


...I forgot to take the boring "before" picture. Just imagine the lonely little light, naked and cold...

Can I just tell you how big of a difference this this makes! I love it!
It adds a little distinction to the dinning area (our floor plan is VERY open)
and  actually makes eating a little more intimate even for my family of seven!


I started with a grapevine wreath form, wired in the ivy and bead garland, then added the individual hydrangea, Persian rose, red berry stems, and grass picks.
I tied the wreath to the chandelier using burlap ribbon, leaving the ties a little long, and last used craft wire to add a handle to the glass globes and then tied those to the light with a green sheer ribbon.
 
The tea lights are battery operated-I don't trust my 3 yr old with fire! And they are so fun. I'm thinking I need one more globe and a filler of sorts to hide the tea lights a bit.
 But aside from that, I'm a happy girl!
(AND, my husband didn't even complain that it was in the way-success!!!)
 
Happy Crafting.
 
Wreaths and Door Decor...

Visit thecsiproject.com


Monday, April 25, 2011

Monday Munchies...What to do with all those EGGS!


Oh my look at the time!
I had to get my holiday company out the door and on the road to home before I could tackle a post, thanks for your patience!
 
Did you have a great weekend and Easter? Did the bunny find you?
He did us, and left a TON of hard boiled eggs in his wake, so now what do we do with them...


Deviled Eggs anyone? Always a hit at my house (and a quick and easy way to get rid of a bunch of the little buggers fast!).

ingredients


  • 6 Hard-Cooked Eggs
  • 1/4 cup mayonnaise or salad dressing
  • 1 teaspoon prepared mustard
  • 1 teaspoon vinegar
  • Paprika or parsley sprigs (optional)

directions

  1. Halve hard-cooked eggs lengthwise and remove yolks. Set whites aside. Place yolks in a small bowl; mash with a fork. Add mayonnaise, mustard, and vinegar; mix well. If desired, season with salt and black pepper. Stuff egg white halves with yolk mixture. Cover and chill until serving time (up to 24 hours). If desired, garnish with paprika or parsley.
  2. Makes 12 servings
Now get crazy and mix it up with a variation or two...that way when you're still eating eggs a week from now, you won't hate them quite so much!
  1. Italian-Style Deviled Eggs: Prepare as above, except omit mayonnaise or salad dressing, mustard, and vinegar. Stir 1/4 cup creamy Italian salad dressing and 2 tablespoons grated Parmesan cheese into mashed yolks; mix well.
  2. Greek-Style Deviled Eggs: Prepare as above, except fold 2 tablespoons crumbled feta cheese, 1 tablespoon finely chopped pitted kalamata olives or other pitted ripe olives, and 2 teaspoons snipped fresh oregano into yolk mixture. If desired, season with black pepper.
  3. Curry and Crab Deviled Eggs: Prepare as above, except omit mustard and vinegar. Stir the mayonnaise, 2 teaspoons Dijon-style mustard, 1 teaspoon snipped fresh chives, and 1/2 teaspoon curry powder into mashed yolks; mix well. Fold in 1/4 cup drained, flaked canned crabmeat.
  4. Chipotle Deviled Eggs: Prepare as above, except omit mayonnaise, mustard and vinegar. Stir 1/4 cup dairy sour cream, 1 tablespoon finely chopped green onion, and 1 teaspoon finely chopped canned chipotle peppers in adobo sauce into yolk mixture.

If that's not getting you "egg"cited, give this one a try...

Egg Salad Sandwiches

ingredients


  • 4 hard-cooked eggs, chopped
  • 2 tablespoons sweet or dill pickle relish
  • 2 tablespoons finely chopped red sweet pepper
  • 1/4 cup mayonnaise or salad dressing
  • 1-1/2 teaspoons yellow mustard
  • 4 croissants, split
  • 4 leaves red-tipped leaf lettuce
  • 4 to 8 slices Colby and Monterey Jack cheese or cheddar cheese (4 to 8 ounce)

directions

  1. For egg salad, in a medium bowl stir together eggs, pickle relish, sweet pepper, mayonnaise, and mustard. If desired, cover and chill for up to 6 hours.
  2. To assemble sandwiches, layer the bottom halves of the croissants with lettuce leaves. Spread egg salad over lettuce; top with 1 or 2 cheese slices. Add top halves of croissants. If necessary, use wooden toothpicks to secure sandwiches. Makes 4 sandwiches.
  3. Curried Egg Salad: Add 1/2 to 1 teaspoon curry powder to the egg salad. Cover and chill for 2 to 6 hours.
  4. Honey-Dill Egg Salad: Substitute honey mustard for yellow mustard and add 1 teaspoon dried dillweed to the egg salad.
  5. Egg Salad Wraps: Prepare egg salad as directed. Substitute four 8-inch flour tortillas for croissants. Lay lettuce leaves on tortillas; top with egg salad and roll up.

recipe source BGH.com


Don't forget to keep adding your recipes to the Simple Salads link! Maybe by summer, we'll have an entire Summer's worth!
Happy Crafting.

Tuesday, April 12, 2011

Tuesday Treats featuring...Measured by the Heart & Easter Printables!!!

Hi everyone *waves* I’m excited to be here at Craft Goodies.  Isn’t Wendy the greatest!!
Let me introduce myself.


My name is Connie and I blog over at Measured by the Heart.  My blog is a big jumble of everything because well, isn’t that life.  I do some furniture make overs, hair tutorials, blog design, crochet patterns and book club.
Wait, did you just say book club on your crafty mommie blog?
Why yes, yes I did.  Thanks for asking.  I host a monthly book club on my blog and I am so super excited about April’s book club selection!!  I would love it if you would come over and check it out.   Even if you don’t participate in book club, you have to read this book.  Yes, I love it that much and so will you!!
For all you Craft Goodies readers I made some Easter Printables.
easter printable 4easter printable 3easter printable 2easter printable 1
easter printable
Click on each picture to download a high quality print!!     
{Once the website opens, hover over the picture and then you can click file-download}
These would be super cute framed in a row down a hallway or up the stairs.  Even way cute as a four square above a desk.  So many possibilities!!
It’s been great spending time with you guys today.  I hope you’ll stop by my blog and take a look around!! 
A BIG thanks to Wendy for being such an awesome chicky!!
{get it Easter theme hehe}
Photobucket

Connie is awesome!
 I'm so glad I've gotten to know her a bit better. She has a fun blog with lots of great "mommy" ideas, and she gets bonus points for having all girls too!
I'm excited to be a part of her book club, (more excuses to read a good book!) If you're interested in participating there is a permenant link to the club on my sidebar.
Go check her out, be sure to say Hi!
And thank her for these SUPER CUTE printables, I'm off to Walgreen's to print mine...
Thanks Connie!!!

Happy Crafting!

Thursday, April 7, 2011

Wood You Like to Craft? the Craft Goodies way...April Project!


Hey friends,
Just a quick reminder that this month's Wood You Like to Craft? linky party starts Friday 4/8 at Sassy Sanctuary and will remain open for one week!
If you played along or plan to be sure to link up your project. 5 will be high-lighted with the top pick winning a super fun prize.
All 4 versions are up over at Krysal's blog, go check them out if you need some inspiration...here's mine...
 
I'm linking this project to the CSI Easter Challenge


Visit thecsiproject.com
 
 
"I'm so excited to be here to share with you my take on Krystal's Candlestick Rabbits.
I knew what I wanted to do the minute I saw them...


So what did I do different? Let's find out...


First, I didn't use candlesticks!
 (I think I have an issue with size, maybe it's my awesome-not-quite 5'2" stature that makes me feel the need to up-size, but once again I went BIG!)
I purchased two 29 inch table legs from Lowe's.
They had quite a few to choose from, ranging in height from 9 inches to 36 inches.
 And in several different styles, some more rounded, some a lot less ornate.
The cool part is the ends are all finished with a sphere-ish end and a squared flat end-perfect for a rabbit head and a base to stand up on!
I didn't need any other wood pieces because of the shape of the legs.
 I did cut the base on one to shorten it a bit and cut off the extra "bump" from the tops.
I painted and sanded and then got to decorate...


The cheeks are "blushed" with pink ink. The nose and carrots are polymer clay. Black thread for the whiskers, painted eyes, and drawn on mouth and freckles.

The ears are cut and sewn muslin-stitching on the outside and ruffled a bit for shape. Blushed with ink in the inner ear, and slipped over a wire loop to help hold them up.

I used a "boring bit" to make a 3/4 inch tunnel in the top of the piece to give the ears a place to sit.  Everything is hot glued into the tunnel so the ends don't stick out and it helps to give a strong support to the ears. Sorry, forgot to take a picture of that...

Then it was just raffia, some ribbon, and a few flowers to finish them off and TA! DA!
2 super cute, slightly tall, adorable rabbits!
{Even my not-so-in-favor-of-my-projects daughter walked by and said,
"GOSH! Those are cute mom!" BIG TIME compliment...}


Thanks Krystal, for a great project and for letting me be here today!
I can't wait to see what other ideas you've inspired...
Happy Crafting!"


2x4 Spring Chick Tutorial


This one's quick and easy, and super cute when finished-all fluffy and soft!
(except for the wood block part...)
 
Here's what you'll need:
 
 
2x4 block cut to 5 inches tall
a handful of yellow feathers, I used 12
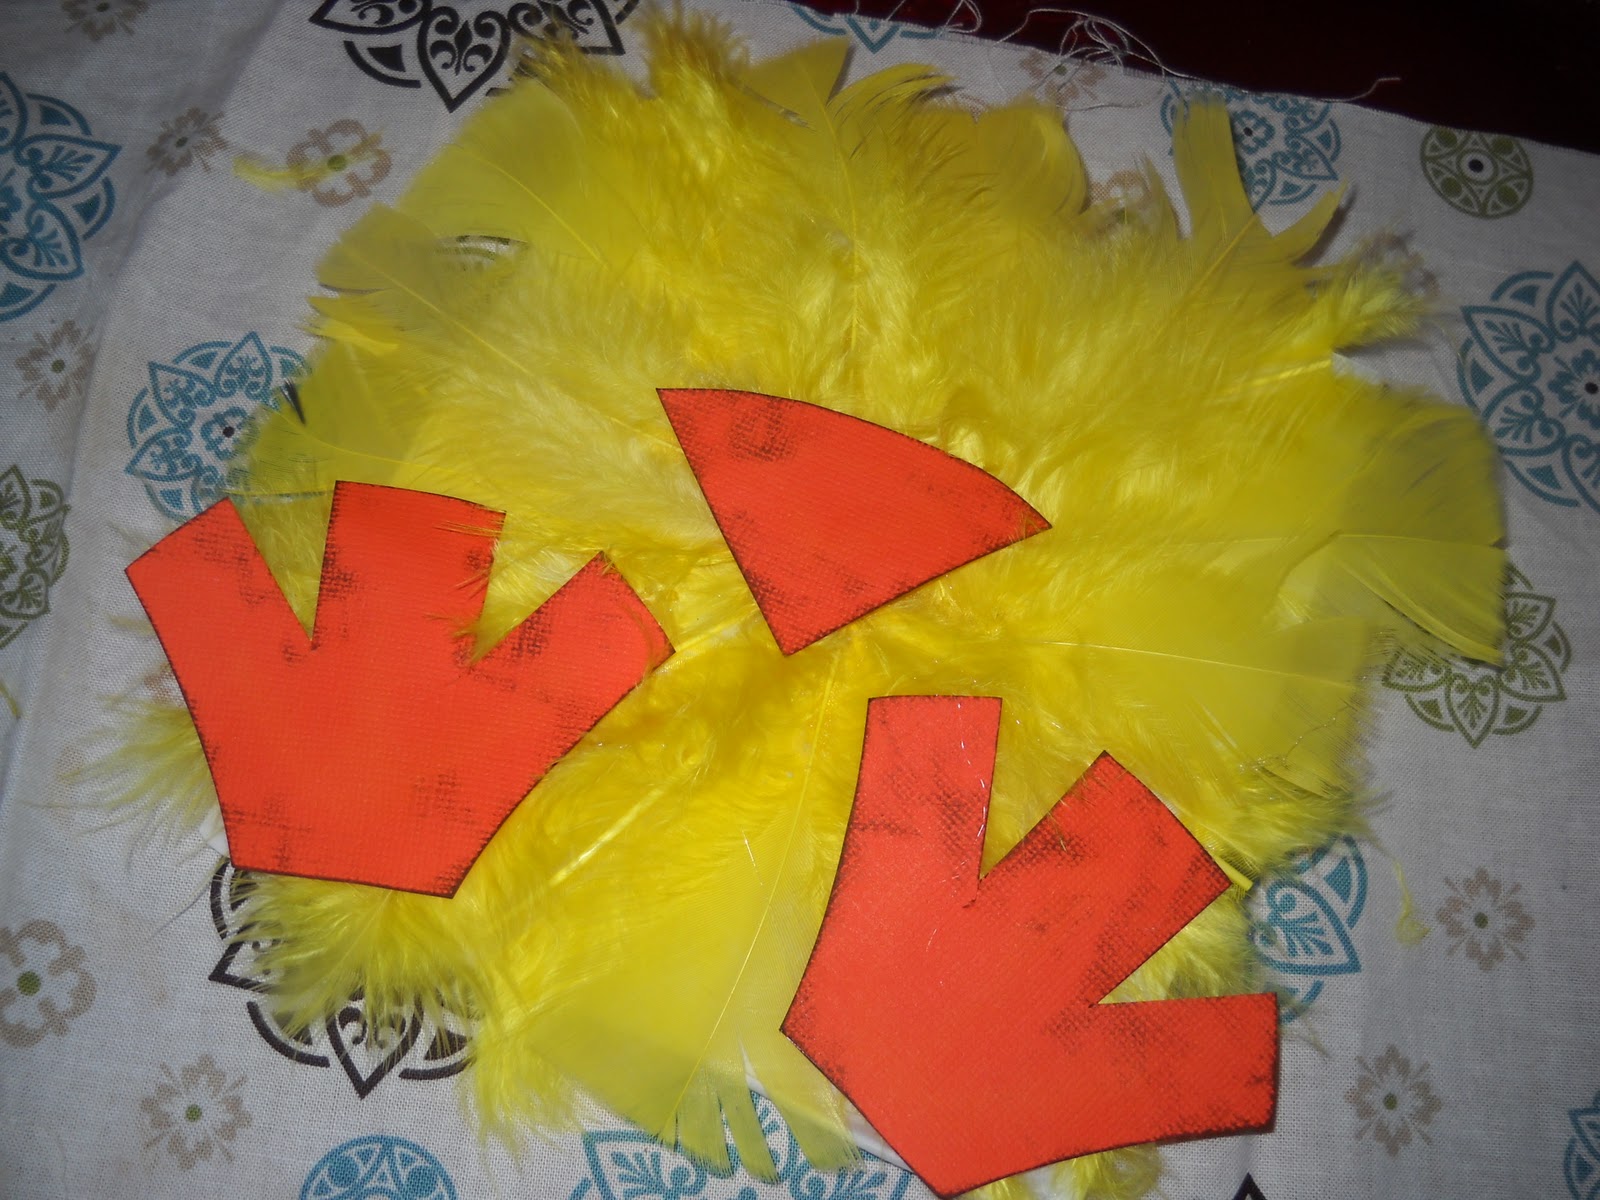
beak and feet cutouts
(mine are 1/2 inch MDF, you could use foam, chipboard, or paper)
orange paint and brush
2 black furniture tacks
ribbon
 
General Supplies:
glue gun
scissors
hammer
sandpaper
 
*I needed a gift bag for a baby shower so you'll notice I'm not using a block, but a paper bag. The process is the same, just lighter...)
 
Start  by sanding the edges smooth on the block and your cutout pieces.
You can paint the block yellow if you wish, I didn't cause well, unless you're looking at the back side, you can't see it!
 

Using your glue gun, attach the feathers.
 Think of your block as a clock, start at 12 o'clock and work your way all the way around. Use the scissors to shorten the feathers as needed, be sure to save the cut pieces!
They work perfectly to fill in gaps.


The feather ends should all meet in the middle, just above the center of the block.
You'll cover them up with the beak piece...


Paint the beak and feet pieces orange. Sand or ink the edges and then glue them into place.


The beak will cover the feather ends and the feet should sit off center just a bit up from the bottom edge of the block.

Using the hammer, set the eyes into place...


Add a sweet little bow and your little chicky is done!
*I slipped a little flower under the "wing" in the top picture*
SO "TWEET!"

(Hehe! Look how cute they are as gift bags. They might be cuter than the intended present...)

Happy Crafting.

2x4 Basket Tutorial


Everyone needs a sweet basket filled with Spring treasures!
Grab a few supplies and you can make your own.

Here's what you'll need:


2x4 block cut to 3 inches tall
standard paint stick
brown cardstock
brown ink
sisal rope
Embellishments/Basket Filler

Standard Supplies:
Scissors
Sand paper
Drill
Glue Gun
Mod Podge


Sand the edges smooth on the block.
 Cut the paint stick to 4 inches-I just used my scissors, but  cut slowly.
If you plan on adding flowers, drill a few holes into the block to anchor the stems.


Use the mod podge to paper cover the paint stick.
 Cut the remaining card stock into strips, 1/2 inch wide, running the length of the paper.
Once dry, distress edges on paint stick as well as each strip.
 
Make your paper mat...

Start by gluing 2 strips together forming an "L" shape.
Glue additional strips onto the horizontal piece, alternating front and back...


Weave the remaining strips into the mat alternating rows of "over, under, over, under..."


Secure all the ends into place with glue and then glue the mat onto the block.


Trim away the excess paper and glue the ends down.
Glue the paint stick onto the block.


Glue the end of the rope into place behind the lip of the basket topper...


Repeat on other side...
(I doubled the rope on both of my wood baskets but kept it single on the gift bag I made)


Add your fillers, grass, eggs, flowers, etc. and your basket is finished!


Here's a  peak at the gift bags I made using this tutorial and the chick one as well...
(the chick will post later today)

Happy Crafting!

Related Posts Plugin for WordPress, Blogger...