Hi there! And welcome to Craft Goodies. I'm thrilled that you've stopped by and hope you find something here that makes your visit a great one...
Showing posts with label Valentines. Show all posts

Friday, February 10, 2012

Classroom Valentines x 4!!!

Okay, so I was hoping to have these up no later than noon, but it's been that kind of a day!
So early evening  it is, but they're still in time for a weekend project or two.

These are the Valentine's my girls will be sharing with their classes this year...

Nothing amazing, but they are sure excited so I think I did okay.

So here's the dirt on making these things:
My husband scored an amazing deal on packages of silly bands...like the FREE kind of deal so I was determined to find a way to not have them at my house. Enter Valentine's Day--oh, I love it even more!

My 2nd grader has a friend with a severe nut allergy in her class so these were perfect. I made up a fun little tag to fit over the top of each bag, I taped it into place on the bag and done!
If you'd like it, you can have it!

Click on it, save it to your computer and then print this baby out-I went with the standard 4x6 and unclicked the fit to frame button so it wouldn't cut off the flowers!

The little airplane I first saw at my sisters house. She whips them out as thank you gifts for her primary substitute teachers. Since then, I've seen them all over pinterest so I new I had a winner!

You need smarties, a stick of gum, two lifesavers, and an elastic.
The elastic goes through the lifesavers and then loops up onto the wings.
Place the smarties between the two lifesavers, but under the elastic and you just became an airplane mechanic!
Here's what I learned, wrap the gum in paper because the elastics pulls it down and don't use the candy lifesavers--go with the mint ones. The candy ones get really sticky and nasty...

my preschooler is taking these:

Perfect for pre-k, right! The pencil is a roll of sprees candy wrapped in yellow paper. A Heshey's kiss made up the point and pink and gray paper made up the eraser end.

For the tags on both the plane and pencil I just used the textbox options in microsoft word.

And last, this is my favorite! It fits my 6 yr olds personality to a T!

Inside each little bag are two gumballs and chocolate lips. The tag reads:
I only "BLOW KISSES" to people I like!
You could substitute Hershey's kisses here to but te lips were to cute to pass up. I found them at my local Dollar Tree.
I'm going to use the same tag but fill a larger container for her teacher.

Here's the tag if you'd like it, same deal as before.
Click, save, print.
I wet wallet sized again unclick the fit to frame button.


I have a few more to finish so I'm off to the papercutter and tape!
Have a great weekend-
Happy Crafting.

Wednesday, February 8, 2012

It's Oh "SO TWEET!" at WYLTC plus an extra little something...

Happy middle of the week! Hope it's shaping up to be a good one.
It's my day to shine over at Wood You Like to Craft?
Want to see what I'm sharing...

The theme this month is "LOVE" so I made a set of Love Birds and a tree for them to hang out by.
Jump on over to WYLTC to check out the particulars!

Do you like them? Do you want some of your own?
You're so in luck, cause I'm sharing the patterns.

**I cut my birds and the tree trunk from a pine 2 x 6 and the wings, feet, and tree leaves from 1/4 inch MDF. The detail pieces are all paper covered while the chunky stuff is painted.

**To create the round base for the leaves I traced a 9" dinner plate.

Just click on the image, save to your computer and then print!
Have fun and happy crafting.


Wednesday, February 9, 2011

Homemade Valentines, Fun Printables, and My Re-Vamped Valentine...{What Wendy did Wednesday}

Now that's a title!
I really haven't been that creative, more like re-creating to suite my needs.
My two little girls have their Pre-K Valentines Party today and we needed treats.
Their class is very small-only 6 little munchkins, so I feel okay going a little overboard. But in reality, these weren't that bad. They both went together quickly once I had everything I needed. I am seriously thinking about making more for my bigger girls...


I know these pop up around Christmas a lot, but thought they would make a fun Valentine.
The tutorial I found listed a 5 pack of gum and a roll of lifesavers to form the body of the train.
After 4 different stores and only being able to find gum sold in the new "slim" packs and lifesavers individually wrapped in a bag, I had to improvise. And you know what, I like how they turned out! And better yet, my girlies think they rock.
I ended up using a snack size kit kat for the base {wrapped in v-day paper} and starbursts "Reds" for the body. Peppermint Swirls for wheels, a lollipop smoke stack, and Palmer's Double Crisp bars for the back compartment. I left everything in it's wrapper except the peppermints-I learned from our candy cane hunt that none of them like peppermints so no need in keeping them edible, and hot glued it together.
Just in case you can't see it, the tag says,
 "I Choo-Choose You, Valentine!" 

I have a serious love affair with vintage valentines going on, if I can find a way to use one I will. I downloaded and saved a bunch of them {google search "free vintage valentine images"}just hoping I'd find a purpose. I ran across a valentine made from puzzle pieces that said,
"You're My Missing Piece"
and new I had found my excuse!

Because I'm not good with photoshop, I probably went about this the hard way, but it worked. I took my downloaded images to my local Walgreens, cropped, edited, added the text, and a border, and then had them printed into 4x6 photos.
I mod podged the photos onto 1/4 inch MDF and then went to work with my saw.
 {I did first draw out a puzzle pattern onto paper then traced it onto the back of each piece as a guide}
I cut each photo into 5 chunky puzzle pieces, then bagged and tagged 'em.
SO CUTE! A fun little vintage puzzle for each of them.
You could easily do this with chipboard or a cereal box to mass produce quickly.

So while I was at Walgreens I decided to print up a few of the free printables that are all over blogger-wonderland of late.

These two came from Sprik Space.
She has so many more printables available for anything you could think of, in several different color combos, and you can print them off in any size you want! And, they're free-amazing! The ABC's are an 8x10 and the Blessings is an 11x14. Such a bang for my buck, and aside from sticking them in a frame-no effort on my part what so ever. Love it!

If you exchanged valentines with me, hurry, close your eyes! Kidding-you can peek...
Just wanted to share my re-vamped project.
{Well one of them anyway-I went from having no exchange buddy due to an odd # to getting two partners due to lost emails! I've never been so happy to have had emails misplaced!}
My gal pal neighbor and I worked on these together. We re-designed a recipe box, made non-matching recipe cards matching, turned an empty frame into a magnetic recipe holder, and made a cute little magnet to hold the recipes in place. We had a riot-hope our new friends enjoy them.

And last just because I think this is hilarious, I share this... 

This makes me wish I had a son! So FUNNY!
You can find instructions on  how this valentine was made at

{I might make my girls do this anyway, they too would think it awesome...}
Well, there you go, a few ideas for some last minute Valentines and a good chuckle!
Happy Wednesday and Happy Crafting!


Monday, February 7, 2011

Chicken Fajita Tortilla Soup & Cupcakes with a Heart!

Monday Munchies...
My very sweet neighbor fed me dinner the other night-
{she was watching my daughter for me and when I went to get her, my neighbor had just finished making this soup and insisted I try a bowl...}well it ended up being a bowl for me and 2 for my daughter, an hour of fun conversation, and a traded recipe.
It's a Rachel Ray and it was fantastic! Going to try it on my own later this week...
Chicken Fajita Tortilla Soup
Picture of Chicken Fajita Tortilla Soup Recipe
photo via Food Network

Ingredients

  • 2 tablespoons extra-virgin olive oil
  • 2 packages chicken tenders, 1 1/2 to 2 pounds
  • 1 tablespoon coriander, a palm full
  • 2 tablespoons chopped fresh thyme leaves, 5 to 6 sprigs
  • Salt and freshly ground black pepper
  • 1 large onion, quartered and thinly sliced
  • 1 large bell pepper, quartered and thinly sliced
  • 1 jalapeno, seeded and thinly sliced
  • 1 (28-ounce) can fire roasted diced tomatoes
  • 1 quart chicken stock
  • 1 bag white corn tortilla chips
  • 1 cup shredded pepper Jack or sharp white Cheddar
  • 1 ripe avocado, diced
  • 1 lime, juiced
  • 4 scallions, chopped
  • Handful fresh cilantro leaves or fresh flat-leaf parsley, chopped

Directions

Heat a large skillet with extra-virgin olive oil, 2 turns of the pan, over medium-high heat. Add chicken, begin to brown 4 minutes, add coriander, thyme, salt and pepper, to taste, onions, bell pepper and jalapeno, season with salt and pepper, to taste. Cook 8 to 10 minutes, stirring frequently. Add tomatoes and stock, heat through.

While the soup is working, lightly crush some tortilla chips and divide among 4 bowls. You need a couple of handfuls per bowl. Top the chips with a little cheese. Toss the avocado with lime juice. Top the chips with ladles of soup. Garnish soup with avocado, scallions and cilantro or parsley.


With Valentine's Day quickly approaching I've been on the hunt for a fun treat for my girls' classes.
I think I found the one...


How CA-UTE are these? And they look SOOOO yummy!
Alison's Wonder Scraporium
has the recipes for the cupcakes and frosting, {as wells links to print them!}
and a beautiful picture tutorial of the entire baking process, start to tasty finish.
My kids are going to think I'm so cool...

Happy Eating!

Wednesday, February 2, 2011

Re-Vamped Valentines Show Off...

Hey there Re-Vampers!


Thank you, thank you so much for playing along.
 

Craft Goodies 


I totally {HEART} everyone of you for helping to make my holiday more fun.
I hope the treasures you receive make you smile and feel loved,
and just maybe, you've found a new friend.


I learned a lesson from my Christmas Exchange-you ladies need a place to show off the AMAZING goodies you've created!
{And I selfishly want to see every single one of them!}

Here you go, this post is all about you...
Take a picture of the goodies you've re-vamped and link 'em up for all to see.
If you're linking from a blog, please be sure to link to the specific post.
If you don't blog, email me your picture and I'll add it to the list for you.

Also, please add your name, not your partners, to the link so we know who made what.
Again, thank you ladies!
 I hope you had fun and will join me again in late March/early April for a
"Rabbit Romp!" exchange.
Until then...
Happy Crafting!
  Re-Vamps without a link...  


From Kim J. and Amy T.
 
From Tiffany C.

From Wendy G.


Saturday, January 29, 2011

Squeezes & Smooches Valentine Decor

I just wanted to share this love- day cuteness, cause well, I think it turned out pretty darn cute!
I never order vinyl, I spent way too much money on my cricut! But I couldn't pass this piece up.
I love that it is a bit traditional {XOXO}
with a twist of different {sqeezes and smooches instead of hugs and kisses}.
I also chose to display it with a few frames instead of just wood...
kinda want to squeeze and smooch it myself!
You can find this and a lot of other fun vinyl pieces by visiting
The Market via Poppies at Play
 
Happy Crafting!

Friday, January 28, 2011

Valentine Re-Vamped Examples, Part One...

Okay, I'm about half way through my pile and ready to share...
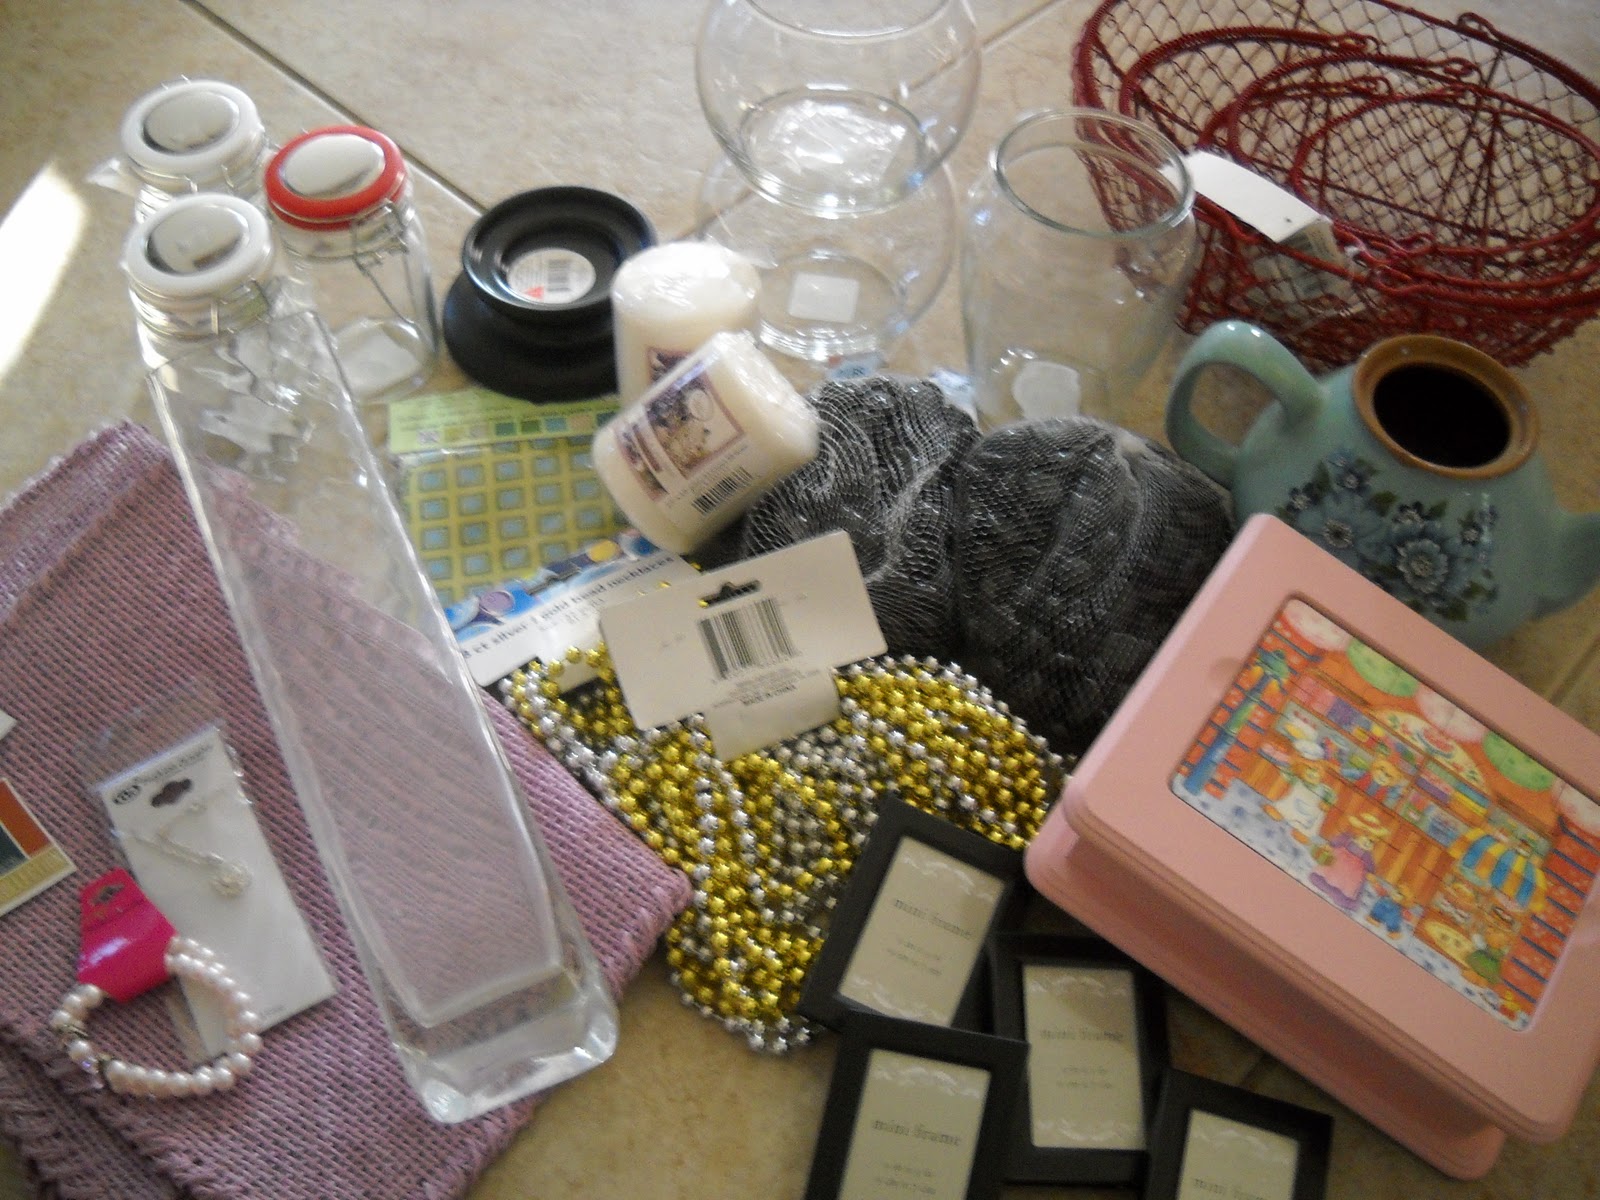
First though, a reminder of what I started with


 First I upgraded the candles with some paper, ribbon, and rhinestones,
{pretend that both candles are on a stand and that one didn't  fall out and then get ran over by your car!}
next I used the black rocks and necklaces to recover the vases. Added a little ribbon there to, and holy cow do I LOVE the black one!
Last I used another left over piece of wire crate, added some paper and a chipboard letter and made a glittery monogram.


For the next batch, I turned the two placemats into a little tote, and blinged up a few bottles and filled them with treats!

Still have the jewelry, jewelry box, and baskets to go! Here's a few close ups of each piece...

 candle stands...

Black Marbled Vase...

White Pearled Vase...

Monogram...

Placemat Purse...

Candy Jars...

See you in a bit with a few more ideas,
Happy Crafting!
**Just a quick side note, Brenda from Hall or Nothing {one of the exchange sponsors}has some more fantastic andbeautiful ideas onher blog HERE! Completely worthy of a look...


linkingpartybadge copy

Tuesday, January 11, 2011

Tuesday Treats featuring...YOU!

I wanted to send out a HUGE thank you to those of you who linked up your projects to my first
T.G.I.F.
{thank GOODIES it's Friday}
linky party.
You made my weekend so much better by helping me to reach and move beyond my goal, and I got to  visit some super projects and blogs along the way.
So thank you, thank you, thank you...
{Let's see if we can grow even bigger this weekend! Get your projects ready, the link will be up Friday.}
 
All of them amazing, here's a few of my favs in case you missed it...
 
Not just one, but two free printables...


 This super sweet and encouraging piece by
 Beckham and Bloom
{LOVE the color scheme!}


and this one! Perfect for a Valentine Craft from
While He was Napping
 
Feeding my need for pillows was this...


Is it to cheesy to say that I LOVE it!
You'll find the tutorial at Ameroonie Designs

And last, one 2x4 gal has to appreciate another...

This little gem made it's way  over from
and will soon appear on my book shelf!

Thanks again all!
Please, grab my featured button and do a little bragging, you deserve it!

Craft Goodies


Happy Crafting!

Re-Vamped Valentine Exchange!!!

It's time for another exchange party here at Craft Goodies!
If you missed out on the


Far-Away Friends Ornament Exchange, here's your second chance to join in the fun.
{I think you'll be glad you do!}
 
This time around I'll be hosting a Valentine exchange with a few added twists...
First big twist, I've added a friend.
I'm teaming up with Sarah from Scissors and a Whisk to bring you
 
"A Re-Vamped Valentine Exchange!"
Second big twist, if you want to play along you'll be automatically entered into an exclusive
 
"Exchangers Only Giveaway"
{only participants in the exchange are eligible for this giveaway}
Sponsored by:

hall or nothing
and...


One participant will be selected to receive these little goodies:

Cupcake Pin Cushion from Hall or Nothing
Winner will receive 1 in the style of their choice!
and...


Finished Sweet {Heart} set from ...Well Good!

The winner will be announced on February 7th!
The twist? The winner's exchange partner will win a set too!!!
 Want a few extra ways to enter?
{Keep reading. They are listed after the entry rules...}
So what's a Re-vamped Valentine and how do you play?
Take an ordinary box of chocolates and re-design the lid-BAM! it's re-vamped!
Try an empty Pringles Can and redo the label and fill it with a sweet treat-Tada! that's re-vamped!
Have a super cute vintage valentine? Give it a new home on a handmade handbag and Voila! it's re-vamped!
Get the idea? Take something ordinary and make it extraordinary!

Here's how to play...
·         If you commit to participate in this exchange, you will need to make one Handmade Valentine for a new  friend and have it post marked by February 7, 2011. In return, you will receive one Handmade Valentine from a fellow new friend in the mail sometime in February.
{You DO NOT need a blog to participate just an email address!}
·          Email me at { wmgar@comcast.net } to officially sign up. Sign up will be open until
January 29, 2011.
I will then email you a participant's questionnaire to fill out and return to me.
·         After sign up closes, I will personally email you with your "Valentine Exchange Partner's" mailing address, email address, and questionnaire info.
·         Make a valentine for your assigned partner..
·         Have your gift post marked no later than February 7, 2011. It is very important that you have your gift post marked by February 7. If you can get your handmade gift in the mail earlier, that's even better! 
·         There is no skill level required. A handmade gift is always wonderful, no matter how technical it is! 
·         There is no price minimum on the handmade gift. If shipping costs are an issue, you can make a gift that is light weight and fits inside an envelope. 
·         I have no way of patrolling every one's participation....but usually, people are honest and do their part. I will send out email reminders. And with this exchange, you will have your partner's info so you can help remind them as needed ;o)
If you wish to play{come on! you know you want to} just drop me an email and you're in! You can also add the exchange button to your blog so others know how fun and completely awesome you are!

Craft Goodies


So about those extra entries...
{Just leave me a comment on this post for each entry you complete}

1. Be or become a public follower of my blog.
2. Be or become a public follower of Scissors and a Whisk
3. Check out the sponsors! Visit the shops and let me know what you like...
Hall or Nothing
...Well Good!
4. Visit Brenda's Blog
{She's the amazing talent behind Hall or Nothing.
Her blog is beautiful, inspiring and very worth the trip. It's also one of my personal favorites!
You can have another entry if you choose to follow her as well.}
5. Get a friend to play along! Have them let me know you sent them in their entry email.

Okay, that's it! A lot of words to say
 "This Party's Gonna Rock!"
Can't wait to hear from you, remember sign ups are open until January 29, 2011.

Happy Crafting!


Related Posts Plugin for WordPress, Blogger...