Hi there! And welcome to Craft Goodies. I'm thrilled that you've stopped by and hope you find something here that makes your visit a great one...
Showing posts with label tasty treats. Show all posts

Monday, October 24, 2011

Monday Munchies...Pecan-Caramel Spiders!!!


I ran across this recipe over the weekend while trying to find a fun treat for my girls. While they wouldn't eat this because of the pecans, I certainly would...I think.
How about you?
 Can you handle eating a spider, even the chocolaty variety? It might be worth a try...

Pecan-Caramel Spiders

From Food Network Kitchens

Ingredients

Directions

Line 2 baking sheets with waxed paper and lightly spray with nonstick spray. Mound 30 small clusters of pecans, about 3 or 4 pecans each, spaced a couple inches apart on the pan.
Make caramel: Warm the cream over low heat and keep warm while you cook the sugar.
Put the sugar and corn syrup and in a deep, heavy-bottomed large saucepan. Cook over medium heat, stirring occasionally until the sugar dissolves. Stop stirring, raise heat to medium-high, and simmer until the sugar reaches the hard crack stage, or 305 degrees F on a candy thermometer, about 7 minutes.
Whisk the butter and salt into the sugar mixture. Gradually pour in the cream and vanilla taking care since the mixture will bubble up. Reduce the heat to medium and continue to cook, stirring occasionally, until the sugar reaches soft ball stage, 240 degrees F on the thermometer, about 5 minutes more. Immediately remove from the heat and cool for a minute.
Ladle a couple tablespoons of warm caramel over some of the nut clusters, to make the spider bodies. Then press 6 pieces of licorice into the warm caramel to make the legs. Repeat with the remaining caramel and licorice. (It's helpful to have an extra hand here, since the caramel can set quickly. If caramel hardens, warm over very low heat. ) Let spiders cool 15 minutes.
Meanwhile, put the chocolates in a medium heatproof bowl. Bring a saucepan filled with 1-inch or so of water to a very slow simmer; set the bowl over, but not touching, the water. Stir the chocolate occasionally until melted and smooth. (Alternatively, put the chocolate in a medium microwave-safe bowl. Melt at 50 percent power in the microwave until soft, about 1 minute. Stir, and continue heat until completely melted, 2 to 3 minutes more.)
Spoon about 1 tablespoon of melted chocolate on top of each spider. Sprinkle with jimmies or chocolate curls, if desired. Let cool until firm.


Let me know if you were braver than me!!!
Happy Crafting.

Monday, July 18, 2011

Meet my Friend...Brooke Anna from Mommy Does!!!

Hey Y'all!
My name is Brooke Anna, 
and I blog at the little place called Mommy Does...

(Don't you love my Southern Draawwwl?)
Button
I'm so glad to be over here today, and I'm hoping you will enjoy my company for a bit!
I'm more of a Crafty person, but like to dabble in recipes.
With having two little ones, and a full-time college career
 I can't very well devote a gazillion hours to my hand mixer, pots or pans, can I?

So, today I want to share a QUICK, family friendly, happy tummy maker.
 I have absolutely drooled over this "recipe" since I was a little girl.
What is it you may ask?

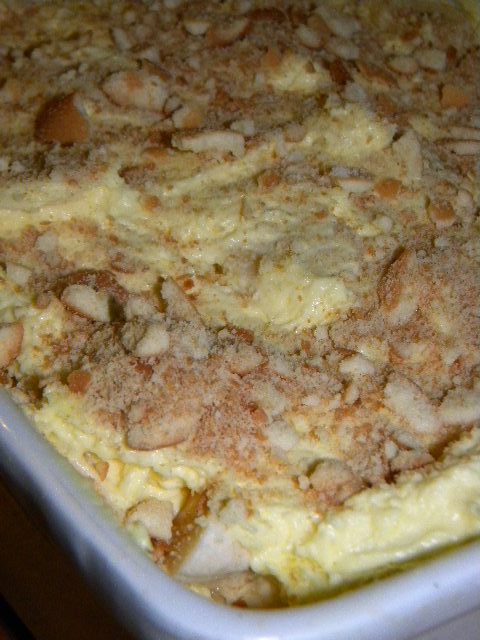
{Aunt Nana's Southern Banana Puddin'}
 of course!
Since I was knee-high to a grasshopper
 my Daddy's sister,
 my Aunt
(say it with me... ANT)
 Anna
 {^see the name sake?^}
has made the most delicious banana pudding.
The recipe isn't really a family recipe, but I hope it sticks with our family for years to come.
B's family absolutely loves my Aunt Nana's Southern Banana Puddin'
I know, I know... I'm putting my family heirlooms business all out there right?
Well, when you Guest Post @ Craft Goodies,
you have to BRING IT!

{Items Needed}
-A little more than a half-gallon of Whole Milk or 2%
-1 pint Heavy Whipping Cream
-1 Box Vanilla Wafers
(or two for the perfect cookie-puddin' ratio)
-2 boxes each-
  Regular sized Instant French Vanilla & Banana Creme pudding
-1 Bunch Bananas
(or to taste)
-Large Mixing Bowl
-Serving Pan/Storing Bowl
-Handheld Mixer, or Standing Mixer
-Whisk (optional, haha!)

Since I like to be done with it, I use instant puddings.
Using instant just makes the process easier!
In case you couldn't tell from the picture above...
I buy store brands... :D

Step 1-
Pour all 4 boxes of your pudding mix into a bowl.
Normally the milk/pudding mix ratio is 2 cups per regular sized box... scratch that!
This is "Southern" remember?

Step 2-
Add the entire pint of Heavy Whipping Cream.
Yes, for real! Add it all!
See? that pint gives you a little more than two cups of cream.
Step 3-
Add 5 cups of whole milk.
Step 4-
Mix the pudding mixture until all the lumps and bumps are gone.
Continue mixing until its "wrapping" around the mixer.
Now stop.
I like my pudding to be fluffy and thick,
 but if it is too think I just add about a quarter cup more of milk.
Step 5-
While you let that rest, cut all your bananas you want to use into "wheels."
For the layering...
Step 6-
Place a thin layer of pudding on the bottom of the pan or bowl you are using to serve or store.
Step 7-
Get your Vanilla Wafers and layer on top of the pudding.
Step 8-
For the third layer, spread sliced bananas on top of the cookies.
Repeat Steps 6-8 until all the bananas, cookies, and pudding are gone. 
(I use two boxes of Vanilla Wafers, so I always make sure I have cookies left...)
Step 9-
Just crumble the leftover cookies on top!
And there you have it!
"Aunt Nana's Southern Banana Pudding!"
Step 10-
ENJOY!
It's thick, it's indulgent, it's NOT Guilt Free!
This is great for cook-outs (just keep chilled,) family dinners,
Church or Community Suppers.
Whatever occasion!
I also like making it in food storage containers and giving them to family and friends.


I hope you enjoyed my hap-hazard tutorial, and I'm sorry there aren't more photos!
But, I hope you'll still check me out at
Thanks so much for allowing me to visit, Wendy!


Thank you! I know what I'll be making at my dad's this week-Y.U.M.!!!
And super easy to boot, thanks for sharing, (and thank you for always being so great to me)!
Happy Crafting.

Sunday, April 10, 2011

More Super Salads...Keep them Coming!!!


  I'm still in a summer sort of mind and really want to create a great recipe link for all those amazing salads out there, so I've found a few more to add to the collection!
 
I've also reposted the link if you've got a great salad you want to share. I've tried a few of the already linked ones...haven't been disappointed yet!
Thanks ladies for sharing your goodies! 
Unbelievable Chicken Salad

Unbelievable Chicken Salad

4 skinless, boneless chicken breasts
1/2 cup cranraisins (dried cranberries)
Mayonnaise
1 small package chopped walnuts
1 tall stalk celery, chopped small
Salt and pepper to taste
Boil chicken breasts until tender; drain and cool completely. Dice chicken into small bits. Stir in cranraisins, walnuts and celery. Mix in enough mayonnaise to make salad spreadable, using 4-5 tablespoons. Salt and pepper lightly. Refrigerate about 1 hour; stir again before serving with butter crackers.
Nancys Layered Fruit Salad Recipe

 Layered Fruit Salad

20-oz. pineapple chunks or tidbits (undrained)
22-oz. mandarin oranges (drained)
One small box instant vanilla pudding
2 or 3 bananas sliced diagonally (optional)
1 pint fresh blueberries
12-oz. whipping cream (lite or plain free may also be used)
1 pint fresh strawberries (sliced)


Place pineapple with the juice in 3 quart glass bowl. Add the oranges & sprinkle dry pudding mix over fruit and stir well. Refrigerate for 20 minutes until set. Layer bananas then layer blueberries, 1/2 of the container of whipping cream and then layer strawberries. Add remaining whipping cream over the top and garnish with mandarin oranges, blueberries & strawberries. Refrigerate for 2 hours
 
Happy Crafting!


Monday, February 28, 2011

Peanut Butter & Jelly Cupcakes from Simple Sweetness!

Hi Everyone!  I'm Leslie from Simple Sweetness.

Simple Sweetness

Wendy has been kind enough to let me guest blog today to tell you about a yummy recipe I made.
Peanut Butter & Jelly Mini Cupcakes.
Of course you can make full size cupcakes with this recipe too.

Supplies:
*Yellow or White Cake Mix & Ingredients to Make Mix
*Vanilla Frosting
For the 5 dozen Mini Cupcakes I made, I used almost 2 cans of Vanilla Frosting
*Creamy Peanut Butter
*Jelly
*Filling Tip
*Decorating Tip
*Mini Cupcake Liners
Not everything is pictured here, sorry!

I first made the cake mix and lined my mini cupcake pan.  Then popped the pan in the oven.  I followed the box directions for oven temp and cooking time. 
FYI: Because I made mini cupcakes, they took less than the 20 minutes for full size cupcakes.  Just keep an eye on yours while they bake.

 I used my new Dessert Decorator Plus for filling and frosting the cupcakes.
I bought mine for $14.99 at Michael's.  Well worth the $15 because it had a filling tip and the decorating tips.  Plus you just wash out the tube, no messy frosting bags, no frosting coming out the bottom.

Filled with Grape Jelly. 

While I was baking and waiting for the cupcakes to cool, I mixed my Peanut Butter Frosting.

I took the lazy easy way out.  I just used vanilla frosting and mixed peanut butter into it.  There are tons of from scratch peanut butter frosting recipes on the internet so google that if you want to do it homemade. 
If you go the method I used, melt your peanut butter in the microwave for 15 seconds.  I had to do mine another 10 seconds, just be careful because you can burn the peanut butter.
I mixed in about 1 tablespoon of peanut butter at time until I got the right flavor.  Don't worry about doing too much or too little, mix in until you have the peanut butter flavor you want.
I did about 3 tablespoons to 1 can of Vanilla Frosting.


 Filling the cupcakes were super easy with my dessert decorater.  I let the cupcakes cool for about 5 to 10 minutes.  These being mini cupcakes, they cooled down super fast.  With larger cupcakes you might have to wait a bit longer.

  The directions said to insert the fill tip about 1 inch but as there were mini cupcakes, I didn't quite go down that far.  These were the first ones I filled and about halfway through I learned that if I pulled the plunger back a bit before I removed the tip from the cupcake then it wouldn't leave the bubble of jelly at the top you see in the picture below.  The ones with no jelly on top have not been filled yet. 

 The bummer about having only one Dessert Decorater tube is that I had to wait for all 5 batches of cupcakes to cook, cool and fill with jelly before I could switch over to my Peanut Butter Frosting.

I'm not a great froster so I tried to do a smooth "bubble" or "dot" of frosting.  To do this, hold your tube at a 90 degree angle in the center of your cupcake and frost until you have the size frosting you desire.  I think if I had backed off the tube a little before removing I wouldn't have had such a wispy tail on the end of the cupcakes.

Ta Da!  Peanut Butter & Jelly Cupcakes.

They are just like they sound, a sweet peanut butter & jelly sandwich in cupcake form.
  Delicious!


Hey C.G. friends, just a quick note from me-
My girls and I  made these over the weekend, Leslie isn't kidding when she says "DELICIOUS". They were so yummy and my girls had a blast stuffing the centers with jelly!

Thanks so much Leslie for sharing  your goodie with us! Happy Munching to you all-

Monday, February 21, 2011

Strawberries on My Mind...

Monday Munchies...
I am having a serious problem.
One I can't seem to get away from-I have been crazing strawberries like no tomorrow!
{NO, not preggers, I think I'm just ready for summer!!!}
I was enjoying some alone time in the garden center at Lowe's Saturday {yes, I really do just hang out at Lowe's when I'm alone!} and ran across all the new fruit and veggie plants.  
I adopted 30 of the little strawberry beauties and came home a happy gal!
 
I am clearly not the only one in this predicament!
So many things to try once my babies are full grown...
 
{just because it's who I am, I go to dessert first}
The Blackberry Vine
 shares the recipe for this delicious looking piece of heaven!
Yeah, I'm thinking this will for sure be my b-day cake this year...
And how about these?
My husband is the only non-strawberry lover in our house but even he wouldn't turn these down.
Why? Because the are cake-pops! Check out the how to's at
 Cute As A Fox
 
These babies are calling my name! {LOUDLY}
Dark Chocolate cupcakes and Strawberry Meringue Butter cream frosting!
My mouth is watering at the title, you can find these recipes at
Food, Folks, and Fun
 
And this is my favorite strawberry pie ever!
Strawberries are on sale this week, so yep, this is our FHE treat tonight...
Picture of Strawberry and Cream Pie Recipe
 
Really, can Paula Dean do wrong? This is so easy and SOOOO yummy.
The recipe can be found HERE.
 
...and just in case that's not enough, check out this "BERRY SWEET" party at
 Giggles Galore
This is one awesome momma!
{and my kind of party}
 
 
So go grab a tub of cool ship and some red-ripe strawberry goodness and have a delicious day!
Happy Munching!


Monday, February 14, 2011

Love Note Pancakes &

Monday Munchies...
HAPPY VALENTINE'S DAY!
 HERE'S A BIG HUG FOR EACH OF YOU...
 
The hubster is out of town for Valentine's Days...{insert sad face here}
so it's up to the girls and I to celebrate.
While they would be content with a box of chocolates for dinner, my mommy guilt might kick in on that one! I think I've mentioned before that we are totally breakfast-for-dinner eaters, so our not so romantic Valentine dinner is gonna be these...
 
 
Aren't these just FUN!! You can get all the how-to's over at
Random Thoughts of a Supermom!
 
And for dessert....
that afore mentioned box of chocolates and homemade marshmallows!
This recipe was published at Christmas and used candy canes to give the mallows a super yummy, minty flavor! SO GOOD!!! We loved them. Thought they'd be fun in a sweeter flavor for V-day.
I tested out strawberry and cherry-strawberry was the winner at our house. I just swapped out the crushed candy canes for crushed hard candies.
You'll find this delicious little treat at
Little Birdie Secrets.
 
To those of you that were super awesome and linked up to Friday's T.G.I.F. Party-
THANK YOU!!!
We did it! 25+ links, I'm a happy girl.
{The button not working was my fault-didn't copy all of the code! OOPS!}
Stay tuned till tomorrow to find out your prize...
 

Wednesday, February 9, 2011

Homemade Valentines, Fun Printables, and My Re-Vamped Valentine...{What Wendy did Wednesday}

Now that's a title!
I really haven't been that creative, more like re-creating to suite my needs.
My two little girls have their Pre-K Valentines Party today and we needed treats.
Their class is very small-only 6 little munchkins, so I feel okay going a little overboard. But in reality, these weren't that bad. They both went together quickly once I had everything I needed. I am seriously thinking about making more for my bigger girls...


I know these pop up around Christmas a lot, but thought they would make a fun Valentine.
The tutorial I found listed a 5 pack of gum and a roll of lifesavers to form the body of the train.
After 4 different stores and only being able to find gum sold in the new "slim" packs and lifesavers individually wrapped in a bag, I had to improvise. And you know what, I like how they turned out! And better yet, my girlies think they rock.
I ended up using a snack size kit kat for the base {wrapped in v-day paper} and starbursts "Reds" for the body. Peppermint Swirls for wheels, a lollipop smoke stack, and Palmer's Double Crisp bars for the back compartment. I left everything in it's wrapper except the peppermints-I learned from our candy cane hunt that none of them like peppermints so no need in keeping them edible, and hot glued it together.
Just in case you can't see it, the tag says,
 "I Choo-Choose You, Valentine!" 

I have a serious love affair with vintage valentines going on, if I can find a way to use one I will. I downloaded and saved a bunch of them {google search "free vintage valentine images"}just hoping I'd find a purpose. I ran across a valentine made from puzzle pieces that said,
"You're My Missing Piece"
and new I had found my excuse!

Because I'm not good with photoshop, I probably went about this the hard way, but it worked. I took my downloaded images to my local Walgreens, cropped, edited, added the text, and a border, and then had them printed into 4x6 photos.
I mod podged the photos onto 1/4 inch MDF and then went to work with my saw.
 {I did first draw out a puzzle pattern onto paper then traced it onto the back of each piece as a guide}
I cut each photo into 5 chunky puzzle pieces, then bagged and tagged 'em.
SO CUTE! A fun little vintage puzzle for each of them.
You could easily do this with chipboard or a cereal box to mass produce quickly.

So while I was at Walgreens I decided to print up a few of the free printables that are all over blogger-wonderland of late.

These two came from Sprik Space.
She has so many more printables available for anything you could think of, in several different color combos, and you can print them off in any size you want! And, they're free-amazing! The ABC's are an 8x10 and the Blessings is an 11x14. Such a bang for my buck, and aside from sticking them in a frame-no effort on my part what so ever. Love it!

If you exchanged valentines with me, hurry, close your eyes! Kidding-you can peek...
Just wanted to share my re-vamped project.
{Well one of them anyway-I went from having no exchange buddy due to an odd # to getting two partners due to lost emails! I've never been so happy to have had emails misplaced!}
My gal pal neighbor and I worked on these together. We re-designed a recipe box, made non-matching recipe cards matching, turned an empty frame into a magnetic recipe holder, and made a cute little magnet to hold the recipes in place. We had a riot-hope our new friends enjoy them.

And last just because I think this is hilarious, I share this... 

This makes me wish I had a son! So FUNNY!
You can find instructions on  how this valentine was made at

{I might make my girls do this anyway, they too would think it awesome...}
Well, there you go, a few ideas for some last minute Valentines and a good chuckle!
Happy Wednesday and Happy Crafting!


Monday, January 31, 2011

Birthdays and Buttercream Frosting!

Monday Munchies...
 
My sweet little #4 daughter turned 5 over the weekend. We had a lot of fun celebrating her birthday together, and then I secretly cried in the bathroom at the thought of this sweet little thing heading off to kindergarten in a few months! Why do they have to grow up?
Anyway, instead of a main dish and dessert recipe I'm going straight to the cake!
 
This has become the standard b-day cake at our house, 4 layers decorated in the colors and flavors of the birthday-ee. Halli chose a "cookies and candy" cake this year, so that's what she got.
I am not by any means a great cake decorator,  but I enjoy the adventure and so do my girls. I've learned along the way that your frosting can completely make or break the cake so today I share my very favorite frosting recipe...

Classic Buttercream Frosting Recipe:
Ingredients:
1 cup butter (2 sticks or 1/2 pound), softened
3-4 cups confectioners (powdered) sugar, SIFTED
1/2 teaspoon table salt
1 tablespoon vanilla extract
up to 4 tablespoons milk or heavy cream
Directions:
Beat butter for a few minutes with a mixer on medium speed.  Add 3 cups of powdered sugar and turn your mixer on the lowest speed (so the sugar doesn’t blow everywhere) until the sugar has been incorporated with the butter.  Increase mixer speed to medium and add vanilla extract, salt, and 2 tablespoons of milk/cream and beat for for 3 minutes.  If your frosting needs a more stiff consistency, add remaining sugar.  If your frosting needs to be thinned out, add remaining milk 1 tablespoons at a time. 

Enjoy!

Monday, January 17, 2011

Sausage Pasta and {Easy} Mini Apple Pies

Monday Munchies...


Winter always makes me crazy for those warm and hearty comfort foods. You know the kind that make you feel at home. The ones you've shared with family and have built memories around, just plain, old, good food.
 
These are two of those for me:


Creamy Sausage Pasta
{ Recipe serves 4 generously, I always double it-my girls LOVE this! }
 
8 oz ground sweet italian sausage
2 C sliced white mushrooms
1 tsp Worchestershire sauce
2/3 C evaporated milk (not sweetened condensed!)
1 tbs dried basil
1/4 tsp ground pepper
1 (10oz) pkg frozen peas
4 C of a chunky pasta, we like penne or rigatoni, cooked and drained
1/4 C grated Parmesan cheese
 
1. brown the sausage in a med sized pan. remove sausage and set aside, reserving the drippings.
2. add in the mushrooms and saute until lightly browned, about 3-4 min. add in the Worchestershire sauce then stir inthe milk, bring this to a simmer.
3. stir in the basil and pepper and return to simmer for 3-4 min. stir in the peas and sausage then cook until heated through.
4. toss the sauce with hot pasta, sprinkle on a little parmesan, and serve. 
*this is one of the few things I will eat as leftovers, it tastes even better the next day!*
 
and for dessert, skip the hassel of making a traditional apple pie with these {easy}little cuties:


Mini Apple Pies
{from the Great American Home Baking Cookbook/Recipe makes 8}
the easy way...
 
CRUST
3/4 cup all purpose flour
1/4 cup butter
1 tbs sugar
1tsp baking powder
1 egg
2 tbs milk
 
FILLING & TOPPING
1 large apple
1 tsp ground ginger
1 egg, lightly beaten
1-2 tsp sugar
 
for crust: place flour in a large bowl, cut in the butter until course crumbs form. stir in the sugar and baking powder.
 
combine the egg and milk in a small bowl and mix well. add to the flour mixture, stir until a dough forms. cover and set aside.
 
for filiing: peel, core, and coursely grate the apple. place in a small bowl, stir in the ginger.
 
roll out the dough into a large rectangle{about 16x8 in.} cut into 8 equal squares. spoon a tbs. of the apple mix onto the center of each square. brush the edges of the dough with the beaten egg. fold in the corners to the center and pinch to seal. place on an ungreased baking sheet.


brush the tops with the remaining egg mix and sprinkle with sugar. bake until lightly browned, 8-10 min. cool for 1-2 minutes before serving.
 
the easier way...
 
roll out a pre-made crust and cut into squares. spoon a tbs of APPLE SAUCE into the centers.
follow same directions for sealing, topping, and baking.
then enjoy {with a scoop  of vanilla ice cream!} easy-peasy and YUM!
 
Happy Munching!

Monday, January 10, 2011

Beef Stroganoff &

Monday Munchies...
My hubster, when home, always cooks over the weekends. It's fantastic for me, and great for him too. He is a grilling kind of guy and LOVES to be outside smoking or BBQ-ing something.
He grills the best steaks, so I had him throw on a few extras to help me out with dinner tonight...
 
Beef Stroganoff
{I know there are a million of these out there, but I promise, this is a goodie!
Especially when the steak is already cooked.}
Daria's Slow Cooker Beef Stroganoff Recipe
Recipe serves 4 but is easily doubled
 
1 pound beef sirloin, thinly sliced
1 tbs oil {I like Olive!}
1/2 C finely chopped onion
2 tsp minced, fresh garlic
2 1/2 C sliced mushrooms
1 can Cream of Mushroom soup, undiluted
1/4 C water
1/2 C sour cream
black pepper to taste
 
1. in a large skillet, heat the oil over med heat. add the onions, garlic, and mushrooms.
 cook 3-4 min, or until softened. Stir in the meat strips and heat through.
{ if you need to cook the beef, remove the veggies from the pan, increase the heat a bit and cook until brown} 
2. reduce the heat to low. stir in the soup and water. cover and simmer  for 5 min.
stir and pepper to taste.
3. remove from heat, stir in the sour cream and serve right away.
 
We like to eat this over linguine noodles with a side of steamed broccoli.  
The sauce over white rice or egg noodles is good too!
 
 
and how about a quick and easy, family friendly dessert?
I found this while blog-hopping and am giving it a try...
 
Homemade Twix Bars
 
You'll find the recipe and directions for these at Santa's Gift Shoppe.
I dare say these won't make it to tomorrow!
 
Happy Munching!
 
Related Posts Plugin for WordPress, Blogger...