Hi there! And welcome to Craft Goodies. I'm thrilled that you've stopped by and hope you find something here that makes your visit a great one...

Tuesday, November 12, 2013

2013 Craft Goodies Ornament Exchange is HERE!!!

CG Ornament Exchange is BACK!!!
Are you ready?
I've had so many of you email me asking if it was going to happen again this year, how could I say no? In fact, I must say THANK YOU for helping me to see that it has become a part of more than just my holiday season, but yours too. That was my goal in the beginning, it makes my heart swell to know that that is what has happened. So, let's get this party started...
 
Craft Goodies Christmas Ornament Exchange
sign ups are now OPEN...
Want to play along? Here's what you need to know:
Sign ups are open from today 11/12 through Saturday 11/23.
To officially "sign-up" send me an email with your mailing address and full name as well as the number of ornaments {1-10} that you want to exchange.
 
 
Ornaments can be hand made or store bought, which ever fits your style and schedule. If you would prefer to receive only handmade ornaments just leave me a little note when you email me your contact info.
You will receive* the same number of ornaments back that you send out. Please also include a card or note with your ornament to introduce yourself and pass along a little holiday cheer.
{It's kind of fun to include a small treat with your ornament but not necessary.}
 
*I cannot police this, I go purely on blind faith that you will get your ornaments to the people waiting for them. I can however send a lot of annoying reminder emails...
 
You will receive an email by 11/25 with the names and addresses of those that you send your ornaments to--one ornament per name.
The names will all be different so making the same ornament is totally okay!
 
MAIL DEADLINE IS  Wednesday, 12/4!!!
How you ship the ornaments is up to you, but please pack them as best you can so that they don't break! If you need packing ideas, give me a holler,  but please don't miss the deadline so that they arrive in time to hang them on the tree.

And last, I'd LOVE it if you'd email me a picture of your ornaments before you send them out. Last year I received so many notes back saying how cute the ornaments were and I had no idea what they looked like! So I'm just putting it out there...I WANT TO SEE ALL THE ORNAMENTS! And, I'm pretty sure everyone else does too...that way I can also share an exchange post high lighting all your awesome-ness.

**If you participated last year and still have pictures, I'd love you forever if you resent them. My computer crashed last December and ate almost all the pictures I had saved for future posts!


***check my archives from Nov 2010 or  Nov 2011 for ideas from the past
Ornament-A-Day series***

That's it! Super simple and tons of fun! I'd love to have you join me. You can email me at { wmgar@comcast.net } to get on the list.

Happy Crafting.
 

Hey...I Caught a Turkey!

Hello friends!
Just a little notice that I'm kicking off the week over at Wood You Like to Craft?
Our theme this week is Thanksgiving Décor so stay tuned all week for some great ideas and inspiration!
 
 
And, because I totally forgot {life's been a little crazy!} here's my October project...

 
It was super fun and my girls LOVED it.
 It was a race to the front porch each morning to see who got to change the countdown numbers. In fact, we had so much fun with it, we're making a Christmas version..
HO HO HO! I can hardly wait!
 
Happy Crafting...

Wednesday, October 9, 2013

How Many Days 'til Halloween?


Holy Moly! I just about missed the entire day.
I had my project ready days ago but long morning appointments and a missing camera didn't help me to get it up and posted.
 
{Forgive me, please.}
 
I LOVE this project. Here let me show you...
 
Isn't it fun?
In all honesty, I stumbled across a similar project last year on pinterest--it only took a year to bring it to life OH! but it was worth it. I would credit the designer but it was only pinned as a google picture, so if you know who please tell!
It was pretty easy to put together.
I started with a bunch of scrap wood cut to different lengths, laid them out in a random pattern, and then glued/nailed them onto 2 1x2 that are about 5 feet tall. {picture top right}
 
From there I painted the base an off white and then gave it a good sanding once it was dry.
I free handed the letters using black, orange, and gray paints. You could use a word document to type the words and then trace them onto the board or even use vinyl. {middle picture}
 
I cut small rectangles from 1/4 inch MDF, drilled a hole in the top center, paper covered them, and then added numbers on both sides for the countdown pieces. I drilled two small screws into the sign base. And tied ribbons through the holes in the tiles to hang them. {bottom right picture}
 
From there I added a few extras...the crow and spider, and the paper pennant banner across the top.
Sheer Halloween happiness going on here!
 
The excitement just builds as we change out the numbers each day, we can't wait for Halloween!!!
Thanks to Candace and Nicole for a super fun theme {and for getting one more project off my "To Make" board!}
 
Happy Crafting-


Thursday, September 12, 2013

Wood You Like to Craft September...Kitchen Projects!

Holy postings Batman! She's still alive!
It's been so long, and I could go into details but you'd be here forever.
I do want to share this little bit of info with you...it's a Wood You Like to Craft week! Our theme was kitchen projects, and like always there are some really great ideas being shared.
I'm excited to share mine here and would love it if you'd check out the other ladies too...
{The tablet went missing right at picture time so you get my phone! Too many little helpers in this kitchen...}
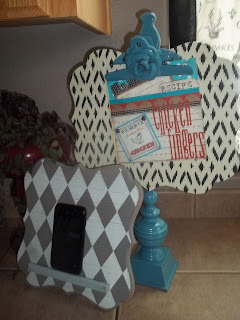
 I love to cook. And more and more I find myself pulling recipes from online sources, there are so many good ones out there! It's so easy to pull something up on my tablet and not have to dig through my cookbooks. The problem is that my tablet is then very much in danger of becoming part of the recipe! I needed somewhere to put it where it would be safe from flying flour but I could still read the directions, a tablet stand was definitely needed!


I had every intention of cutting a base board out but happened to be in Hobby Lobby a few weeks back and found this little cutie. Perfect size, already painted to match my kitchen, and it was half off!
 (It's cut from 1/4 inch MDF if you wanted to cut your own)

To make the shelf, I cut a piece from a square dowel--just wider than my tablet, and then a thin strip of MDF just taller than the dowel to make a little "lip" to hold the tablet in place.
{I've see others that use Scrabble tile holders for the shelf if you don't have access to a saw}...

 
...glued them together (use wood glue!), gave it a few coats of gray paint...
 
 
...and then glued it into place.

 
The stand on back is made from 2 pieces of 1x2 hinged together and then glued to the back of the base board. And done! So cute, and just what I needed!

 
The bonus was while I was in Hobby Lobby I found the cute clip board stand too! Perfect for the paper recipes that I still use, granted it was HOT PINK {and oh so cute, could I get away with a hot pink kitchen?} but that was easily fixed with a screwdriver and a can of spray paint.
So, thank you Krystal for a fun and needed theme, this little corner of my kitchen is  now so much cuter and user friendly. My tablet will live a much happier and cleaner life!
Here's hoping your kitchen project makes your life a bit happier too. Until next month, 
Happy Crafting!

Friday, May 24, 2013

Blog Wars Week 1...Sponsored by Provo Craft

Week one of Blog wars has come and gone and I'm happy to report that I am still around for week two! {The supplies we used this week were seriously drool worthy so be sure to go check out all the projects and vote for your favorite three!}
 
My project last week was a big hit with my 14 year old, probably because it was for her! But it was pretty easy and looks great in her room. The vinyl we were given was a lot of fun to work with and super easy too. Here's my week one project and write up....

It's been a bit like Christmas over the past week...fun little packages arriving  in the mail holding goodies of all kinds. This contest is going to be a lot of fun!  My oldest daughter has been asking me for a bulletin board for her room for what seems like forever, with this week's "mystery " ingredient it was the perfect time to do it.
 
 
I used a poster frame as my starting point and then set to work with my cricut and the fun, glittery iron on vinyl. It came together really easily-this stuff is super great to work with. The best part is she now has a calendar to keep on top of important dates and events and a place to jot down little reminders of things she has going on during the week. She can change out the design easily and get as artsy as she wants and then wipe it away.
{Cheesy moustache humor was a bonus, she LOVES it!}

Friday, May 17, 2013

My BIG project and the Polls are Open!!!

So, if you have by any chance been wondering what in the world happened to me and this little blog over the past few months, it can be summed up here:
 
 
Shortly after moving back to Washington, we found out we were expecting. Now, you should know I have been incredibly blessed when it came to being pregnant. 5 babies and not one problem--no sickness, no swelling, no heartburn, gained very little weight, and had energy to spare.
My doctor would tell me that I was meant to be pregnant. Not so this time!!!
Whatever I missed out on before, I made up for this time and thus I have spent the past 39 weeks sleeping, because that was the only thing I had energy for...
But, our beautiful baby is here and healthy and perfect and now, maybe I  can get back to crafting every now and then. I sure have missed it!


Speaking of crafting, this couldn't have come at a better time for me. The Blog Wars contest officially starts today. All of the first round projects are in and awaiting your votes.
So please, go vote
Projects are anonymous so vote your favorite and I'll cross my fingers that I get to keep playing.
Polls are open until Sunday night.
 
Thank you, have a great weekend, and happy crafting!


Monday, May 13, 2013

May WYLTC...Chalkboard Paint Projects!!!

It's Wood You Like to Craft? time again and this month I got to choose the theme.
Oh! What's a girl to do? So many projects on the to-do list...
 
I have been dying to get a bit more organized in my kitchen, particularly in  my pantry so
{selfishly} I opted for CHALKBOARD PAINT PROJECTS for May's theme.
 
I love chalkboard paint, my girls LOVE chalkboard paint, and as I searched for the perfect idea I found that lots of people like chalkboard paint too! My project list only grew as I kept searching.
 But, in the end I found my inspiration and here's what I came up with...
  
I LOVE it!
I adore clocks of all shapes and sizes and adding one to this fun little chalkboard just makes my heart smile.
I started with the intention of building a simple frame and then opened up the closet and found one there, the perfect size, just waiting to be used. So I swapped out the glass for a thin piece of MDF cut to fit the frame.
I used my chalkboard paint on the MDF--probably 4 layers, maybe 5.
{Not sure, I was catching up on Dance Moms while I worked...}
 
Once that was done and drying I turned to the frame. Some white paint there and a bit of sandpaper gave it the look I wanted, and then I re-assembled my frame/chalkboard.
 
On to the clock...I found this little gem at Goodwill, only $2! It was bright red and said "Happy Holidays!". The cashier thought I was crazy for buying it, you should have seen the look she gave me. But it was the perfect size and had all the hardware.
I pulled the hardware off, painted it black and then white, and then sanded it to match the frame. I covered up the holiday greeting with some scrapbook paper, added a few numbers, and then put it all back together again.
 
I added a few small wooden blocks to the frame to help support the clock and then glued it onto the top of the frame. **Be sure to set the clock high enough that you can still get to the battery compartment**
 
And last, I tied a piece of ribbon around the frame and added a few small clothespins to hold pictures, notes, recipes, etc.
Isn't it just SO cute!
Right now, it's still in the "LOOK! Mom put a chalkboard on the pantry for us to color on" stage so grocery/to-do lists might have to wait a few more days. But, once the novelty wears off I will be one step closer to my organized goal.
 
I am thrilled with my project and cannot wait to see what the other WYLTC gals have come up with. Check back all week for some great ideas on how to use your stash of chalkboard paint {cause I know you have some...}
 
Have a great week and as always, happy crafting!
Related Posts Plugin for WordPress, Blogger...