Hi there! And welcome to Craft Goodies. I'm thrilled that you've stopped by and hope you find something here that makes your visit a great one...
Showing posts with label home decor. Show all posts

Monday, May 13, 2013

May WYLTC...Chalkboard Paint Projects!!!

It's Wood You Like to Craft? time again and this month I got to choose the theme.
Oh! What's a girl to do? So many projects on the to-do list...
 
I have been dying to get a bit more organized in my kitchen, particularly in  my pantry so
{selfishly} I opted for CHALKBOARD PAINT PROJECTS for May's theme.
 
I love chalkboard paint, my girls LOVE chalkboard paint, and as I searched for the perfect idea I found that lots of people like chalkboard paint too! My project list only grew as I kept searching.
 But, in the end I found my inspiration and here's what I came up with...
  
I LOVE it!
I adore clocks of all shapes and sizes and adding one to this fun little chalkboard just makes my heart smile.
I started with the intention of building a simple frame and then opened up the closet and found one there, the perfect size, just waiting to be used. So I swapped out the glass for a thin piece of MDF cut to fit the frame.
I used my chalkboard paint on the MDF--probably 4 layers, maybe 5.
{Not sure, I was catching up on Dance Moms while I worked...}
 
Once that was done and drying I turned to the frame. Some white paint there and a bit of sandpaper gave it the look I wanted, and then I re-assembled my frame/chalkboard.
 
On to the clock...I found this little gem at Goodwill, only $2! It was bright red and said "Happy Holidays!". The cashier thought I was crazy for buying it, you should have seen the look she gave me. But it was the perfect size and had all the hardware.
I pulled the hardware off, painted it black and then white, and then sanded it to match the frame. I covered up the holiday greeting with some scrapbook paper, added a few numbers, and then put it all back together again.
 
I added a few small wooden blocks to the frame to help support the clock and then glued it onto the top of the frame. **Be sure to set the clock high enough that you can still get to the battery compartment**
 
And last, I tied a piece of ribbon around the frame and added a few small clothespins to hold pictures, notes, recipes, etc.
Isn't it just SO cute!
Right now, it's still in the "LOOK! Mom put a chalkboard on the pantry for us to color on" stage so grocery/to-do lists might have to wait a few more days. But, once the novelty wears off I will be one step closer to my organized goal.
 
I am thrilled with my project and cannot wait to see what the other WYLTC gals have come up with. Check back all week for some great ideas on how to use your stash of chalkboard paint {cause I know you have some...}
 
Have a great week and as always, happy crafting!

Friday, May 4, 2012

So You Think You're Crafty Week 2..Thrift!!!

Hey there--I'm hanging out in Utah with my family and realized I still needed to post my SYTYC projects. Hope you enjoy them...

To be honest, thrift isn't really my thing...{can you hear my husband yelling a loud "NO KIDDING!"} I just enjoy being able to make things so I don't always pay attention to the final cost. That made this challenge at first very daunting but in the end especially rewarding. I came up with something that I LOVE and didn't spend a thing!!!

How's that for a freebie?
It started with a phone call from a sweet friend and a delivery of this:

We had already saved it once, thus the pink covered cork board where the screen once was, but it was in sad shape. Three of the corner pieces were broken and it was barely staying together. So I completely took it apart, cleaned it, cut it down a bit, and then with a few treasures from around my house,re-made it into a "country-esque" serving shelf for my back patio.

It's perfect for holding books and a drink, or even a side dish or two this summer when we get to eat outside. There's even a few hooks along the bottom that could hold a few small lanterns for a romantic late-night snuggle...

All I can say is HOORAY for THRIFTING!!!


Tuesday, April 17, 2012

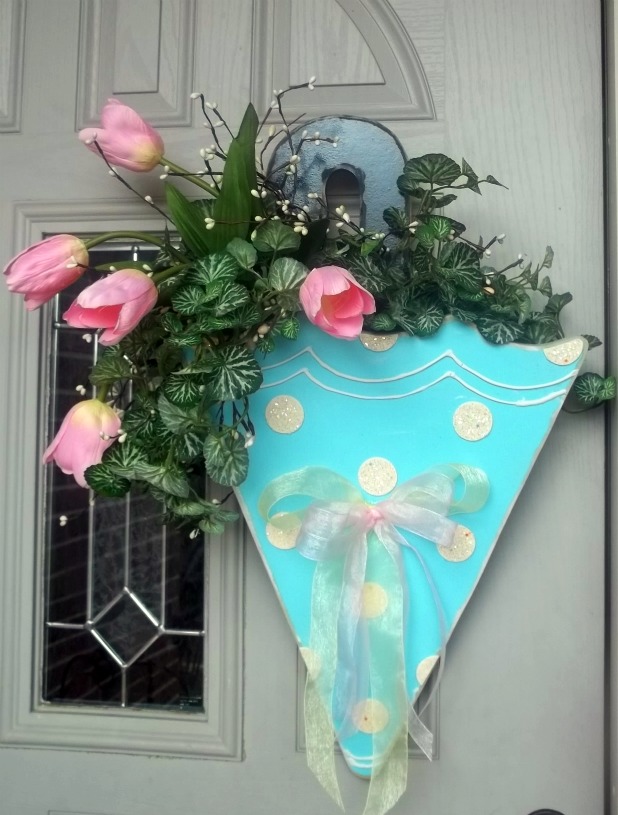
WYLTC...April Showers Umbrella Planter from Craft Goodies!!!

May's Wood You Like to Craft is just around the corner and I'm sure it will be fantastic. Until then, here's my April project and all the how to's! Enjoy...


I love Spring! So when my month to host WYLTC ended up being April I was nothing but smiles.
I love the sight of all the color coming back, the grass and tree, the birds that sing endlessly, and the flowers!!! Those first little sprouts of soon-to-be tulips and daffodils are pure joy to me and I wanted a way to show them off. My project for this month was the perfect way to do that... 

Here's what I used to make my umbrella planter:

1/2 inch and 1/4 inch MDF
Wood Glue and Staples
PAINT in bright spring colors!
1/2 inch eye screw
Sandpaper
Glitter, Ribbons, Puffy Paint
Tulip bunch and greenery

I started by drawing out the umbrella parts and figuring out the planter. The planter sits on a slight angle so that it wouldn't stick out to far off of my door and is on the smaller side because I only wanted a few flowers tucked inside there.

Then I traced the patterns onto the wood and cut them out with my jigsaw. The handle and planter pieces are each cut on the 1/2 inch MDF. The umbrella and panel pieces are cut from 1/4 inch MDF.


I painted everything next, just base coats--no detail yet, distressed the edges and then glued the planter box pieces together and the umbrella pieces together.
 {I aded a few staples to the plant box just to be safe, but really, they weren't needed.}

Once the planter box was good and dry, I glued it to the umbrella pieces and then ran and did a load of dishes while it dried.

At that point the "hard" stuff was over and it was time to decorate!
I added the line details with white puff paint, drew on the little circles with the puff paint and loaded them up with iridescent glitter. Once everything was dry it got a good coat of sealer.


I added the eye screw into the back of the handle, ran a ribbon through it to hang it up. And then added my bow to the front of the planter.

And last...


Added the greenery and flowers and hung my little umbrella on the door.
It's so fun to see this when I pull into my driveway--totally makes me smile.
 
I hope your spring is full of fun and flowers and even a shower or two.
 I can't wait to see what the other ladies have made to go long with
this month's theme of
April Showers.
 
I can't wait to see what all of you come up with either, be sure to check back all week. You're sure to find something to inspire you...
 
Happy Crafting!


Friday, March 30, 2012

Wood You Like to Craft...March 2012 Projects!!!

Here's a quick re-cap of my WYLTC post! And a quick heads up, I'm hosting next month and the theme will be "April Showers".
Hehe! Ignore that it's not centered on the door, I guess I need to go get a wreath hanger!
I'm sharing an umbrella for my front door {with all the rain we've had lately I may need an ark!} If you're interested, the kits will be available from my shop starting Monday, otherwise,
get your projects going now so you can share them at the linky party...enjoy!


So, funny enough, this wasn't my original plan. I wanted to do classic silhouette cutouts of my girls on these curvy little frames but I ran into a few problems.
 1-- I couldn't get them to sit still long enough to trace a descent image. 2-- once I got it small enough to fit inside the frame I was afraid I'd loose the detail of the image to the saw blade, and 3--I'd already cut the frame out so enlarging it wasn't an option.
So what to do...cut  a carrot instead! But don't you just love it?


I cut the blue part of the frame from 3/4 inch MDF and the insert from bead board. I used the skill saw to cut both. And the carrot is 1/4 inch MDF.
{Completely off track but as I was finishing this piece it kind of reminded me of the very first project we ever did here on WYLTC? And then I realized that that was ONE YEAR ago!!! Holy cow--Happy Birthday WYLTC!!! We're officially one!}

My little carrot needed a buddy to fill up the shelf and what goes better with carrots than bunnies?


I was obsessed with the idea of a big, fluffy bunny tail. So the idea of a silhouette was perfect because what do you really see? That big, fluffy bunny's tail!
She too is cut from 3/4 inch MDF and then mounted onto a chunk of 2x4.
The tail is a tan tulle, scrapbook paper on the 2x4 and a sharpie to apply the lettering.

The whole thing makes me very "HOPPY".
Hooray for ideas that go astray!!!


If you didn't see the other projects, jump on over to Wood You Like to Craft and check them out!
Happy Crafting.


Monday, March 19, 2012

I'm In!!! Did you guess which was mine...

Thanks to your votes, I get to officially play in Season 11 of So You Think You're Crafty!
THANK YOU!!! THANK YOU!!!
I love taking part in these comtests, they provide a fun challenge that I just can't give myself.
The season doesn't start until April but I have the list of themes and will be anxiously working away on some fun projects.

Th auditon process is crafter's choice, here's what I choose to do:
My audition project was quite literally staring me in the face. Every time I sat on the couch, it just sat there, seeming to say, "Please help me to be pretty!"
It's was small train table that my kiddos had long outgrown. I couldn't stand the idea of tossing it and one day had the brilliant idea to convert it into a coffe table/ottoman thing--great idea, wrong approach. Long story short, my plan failed and I had since been staring at this poor thing:
The {new} plans all came together when my sweet neighbor rebuilt a section of her fence and had all these beautiful aged cedar planks heading for the trash pile.
I asked for a few (yes, she looked at me like I'm super crazy!), re-painted the table sides a smokey black, and used the planks to resurface the top.
It's sealed with several layers of polyurathane to prevent slivers and keep the cool aged coloring of the wood. I love it! The wood adds such warmth to the dark coloring.
{I think she finally feels pretty...}

It makes me smile every time I see it now and even better I can look at it and know that it sealed the deal for me to play along with some other really great and crafty ladies!

I'll let you know when the season starts cause you're not goig to want to miss it!
An really, thanks again for your votes!

Friday, March 9, 2012

Bunny Tales and Carrots!!!

Happy Friday all!
We here at my house are on the cusp of SPRING BREAK and I could not be more excited.
Pretty much just because I won't have to turn the alarm on-but I do have a lot of "plans" for the upcoming break. Hopefully my girls will still like me when it's over...

So do you need a project or two for the weekend?
Well, jump on over to Wood You Like to Craft! It's been a fun week the ladies I hang with have once again put up some terrific ideas.
I posted today, want a peek?

The theme this month is silhouettes and the linky party starts tomorrow and runs through next Friday so there's plenty of time to play along.

If I can figure out what is wrong with my scanner I'll post the patterns...
have a great weekend and happy crafting.


Friday, October 14, 2011

House of Order...American Crafter Round 2!!!

You wonderful ladies got me through to round two of American Crafter!!! I can't thank you enough because I seriously can't stomach the thought of being the first cast out! So horribly vain I know, but it's like a childhood fear coming to life all over again...so thank you, thank you, thank you!!!

This week's theme is House of Order and any organizational thing goes. I made this...

{If you like it, I'd LOVE it if you'd go VOTE for it! voting opens at 1 o'clock MST}
One super-sized, super visible all-in-one family message center!  No more clutter on the fridge! No more matching up calendars! No more trying to remember where all my children are because it will be written on the chalkboard!!!!
Loving it already.
It fits right onto my pantry door so you really cannot miss it. It breaks the week down by days, as well as tackles the weekend events and still leaves room for the big days during the entire month-you know like birthdays, big tests, holiday breaks, etc. The board itself is chalkboard so no more paper!!!
Saving trees and my sanity...feeling calmer already.  
 
{PLUS...it gives my 4 yr old a  "safe" place to take out her artistic flares.}
So the quick how to...I painted a few glued together pieces of backing board with chalkboard paint. Hit the miter box with a hand saw and a few pieces of trim to make it pretty. Gave the trim some love with a few coats of spray paint and then ever so NOT patiently waited for it all to dry. Glued and nailed the trim into place and then spent some quality time with my cricut figuring out the vinyl. All said and done, a morning well spent, a family that much more put together and a rockin' new decor piece! I am happy...

Happy {organized} Crafting.

Thursday, September 8, 2011

Numbered Cubby Shelf !!! September WYLTC? Project

Hello to you all!
Did you see that Wood You Like to Craft? is back and well, crafting!
This month's theme was shelves. Who can't use a fun shelf? There were some great ideas shared, can't wait to give a few of them a try, until then here's my little number...

I love shelves, so when Krystal announced this month's theme I knew exactly what I wanted to tackle...
Number Cubby Shelf

I wanted one of these little P.B. Kids cubby shelves!!!
You see my kids have this problem, they can't seem to figure out that their shoes do not belong in the middle of the entry way, and why it would drive me crazy to continually trip over them every time I come in the front door.
Hopefully, with our new cubby shelf in place, we have fixed that problem.

So first, I must tell you this was a try as you go project, so I failed miserably to take a lot of pictures-I was a little to focused on making it all fit together as I didn't draw it out first. {Sorry}
But the good news is, it was really easy!

Here's what I used:
* 1/2 inch MDF board cut to 12 inches wide by 48 inches long for the back piece
*1/4 inch piece of MDF cut to 9 1/4 inches by 48 inches for the front panel
*1/4 inch MDF piece cut to 5 inches by 48 inches for the bottom
6 divider pieces cut like this:

I nailed and glued the end dividers into place on the back panel and then measured in 9 inches and put up the next set of dividers, measured in 9 inches and then set the last dividers into place.
Be sure to measure both the top and bottom of the pieces to be sure you nail them in straight! Then nail and glue the bottom panel on.


I wanted mine on the wall before I put the front panel on, so next I painted a fun shade of red.
And then I screwed this bad boy into place...


I thought I was saving myself some painting-clearly you wouldn't see the bottom once the front was on right? WRONG!

From there, I painted the front panel, red first, and then stenciled in the numbers. Sanded everything, roughed up the edges, and then added a layer of stain...


Nail the front panel into place and there you go!


The cutest little shoe organizer ever!
My girls have already laid claim to their cubbies and have started moving in...let's just hope they save room for the shoes!!!

So much fun! Thanks Krystal for the great theme, can't wait to see what you all enter into the linky party...
Happy Crafting.
 
 I'm linking this post to:
 
Visit thecsiproject.com
Knock Off Challenge!
Related Posts Plugin for WordPress, Blogger...