Hi there! And welcome to Craft Goodies. I'm thrilled that you've stopped by and hope you find something here that makes your visit a great one...

Wednesday, August 17, 2011

Ruffled Cinch Bag {Mini} Tutorial...Cutest bags EVER!!!


It's okay, take a minute and just enjoy the cuteness of it all! I still giggle every time I see my girls sporting one of these.
Best part???
Each bag cost me less than $1.50 to make.

So here's the story quickly...
Attended a Thirty-One Party and saw this...


Loved it, ordered it. OH! Happy me.
Had a trip to Sea World with my two super-cute nieces planned, thought "How cute would it be to have those little munchkins running around Sea World with their own little ruffled bag to tote a few goodies in?"

Loved the idea-so excited, got all the supplies needed...ran out of time before the trip to get them made...bad aunt and mom!
Did however get them made after we got home. Perfect for toting around our new friends...
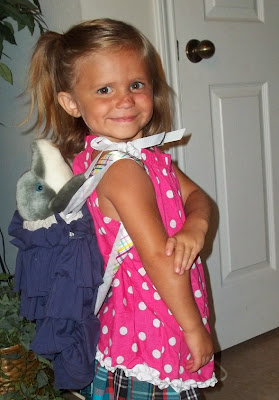
Do you love the outfit? She's so in the I can dress myself phase...

Seriously, super easy, and the compliments we get! Makes me a happy "Yes, I made those," mama.

Here's the skinny on making one for your little munchkin:

Small piece of muslin to make the bag
*Mine were 20 x 14 inches

1 XL plain T-shirt for the Ruffles
*I bought X-LG t-shirts from my local Dollar Tree, one shirt easily covered one bag in the size I cut. I just bought a few different colored t-shirts and the girls picked their designs.

Matching ribbon for the ties
*I used about 8 ft of ribbon per bag

That's it! So let's make one of these cuties...
I checked out this tutorial
 to learn the basics of how to make a cinch bag.

 And made my bag...


From there, I cut the t-shirt into 2 1/2 inch wide strips. I cut the strips across the width of the shirt-from one side seam to the other, so that it made a great big loop. And NO HEMMING! 
 Hooray for jersey knit!


Then I marked out my guide lines on my bag (1 inch up from the bottom and then every 2 inches) and started sewing the loops into place...


I didn't pre-pull my ruffles, I just tuck the fabric up under my presser foot as I go-there is no rule that says you can't pre-make the ruffles, I'm just a bit lazy that way!

Keep adding those ruffles until you reach the top...


Thread your ribbons through the top of the bag and then sew them into place on the bottom of the bag.


Pack your bag, cinch it up, and you're on your way!


You can finish the top in a few different ways, in fact if you look really closely at this picture, you might notice that I finished three of the five bags in a different way.
{I didn't take any pics of them individually, sorry. I'll add some in in a bit.}

 I love how the pink one came out but it was by far the hardest-probably just me.
I cut a strip of pink 4 inches wide and folded it over the top of the bag being sure that when I started sewing I would be below the pocket that the ribbon would run through.
And then I ruffled.
 It was probably hard because I was so paranoid that I was going to sew my ribbon channel shut and then there would be no "cinch"!
I also had to cut a slit into each of the sides so that the ribbon could come out.

Method 2 (the purple bag) was just to add another ruffle right over the seam line of my ribbon channel. Easy, cute, but you can see the different color of the bag along the cinched up edge.

And Method 3 ( the white & coral bag) I like this one best overall. When making the bag, I left the top alone-I didn't sew a channel for the ribbon. Instead, I folded one of the long loops in half, long side to long side, and sewed the edges closed to form the channel.
I then sewed on all my ruffles, making sure the last ruffle lined up with the top edge of the bag.
I then sewed the channel piece onto the edge of the top ruffle, seams together, so that when the ribbon was threaded through, all you see is a matching, finished edge.

What ever you choose, have fun and enjoy your ruffles!
Happy Crafting.
 

You can find this post at the CSI Project Knock Off Challenge!
Visit thecsiproject.com

Tuesday, August 16, 2011

WYLTC July 2011 Project...Super-Sized Bird House!!!!

*Did you notice there was no August "Wood You Like to Craft?" project?
Our lives all got a little crazy this month so we decided to take a break until September.
If you follow along with WYLTC you'll need to know that all the action will now take place on the main site page-no more hopping from blog to blog trying to find a project!
If you don't follow us, you should!
It's a ton of fun and so many great ideas are shared there.
Just a head's up, September's theme is "SHELVES". If you've got one, built one, redone one or want to create one we'd love to have you share it with us. Stay tuned to the Wood You Like to Craft? site for all the fun, and until then here's a recap of my July project for our bird house theme...

Hey there!
 It's Wendy here, visiting my buddy Melinda all the way from Texas!
I'm so happy to be back at her place, just hanging out, sharing a  little girl talk, conjuring up a little something...we used to do it daily, now we have to do it through our blogs.
But I'm so glad we do!
 I personally think Melinda is one of the most creative people I've ever met and being able to share in her talents, in-person or on-line, I'll take any day.
On that note, let me introduce you to my take on Melinda's bird house project...


Once again, I went large.
 (I seriously think I have a size problem!)
I'm working on creating a fun, relaxing space on my back patio and needed a piece that would fit in, so the Super-sized bird house was born!

Super easy to make, and better I had all the supplies lying around my house.
(Yeah, that might not be a "better" thing...)

Anyway I used a few scrap pieces of 1x6 for the "house" part, a chunk of 2x3 for the base, and a few pieces of 1x3 for the roof line.


I took a page from Melinda's book and officially measured nothing, totally eyeballed it!
I started by mitering the ends of my 1x6 boards. Two at a solid 45 degrees and for the center piece, I found the middle and did a 45 degree cut out from there to create the point.
From there I laid the pieces side by side lining up the cuts of the roof and decided how big I wanted the house to be and cut the boards off there.


I sat and stared at the pieces for a while and decided I didn't like the house that square. So I marked off a slight angle on the two outside boards and cut it with my scroll saw.
Much better!


Here she is all cut and ready to get pretty.
The base is just a bit bigger than the 1x6's.
 To get the roof pieces, I lined up the 1x3 even with the top of the roof line on one side and cut it.
 I then laid that cut piece back into place and put another piece of 1x3 on the other side of the roof so that the top point was squared and then cut it.
(The second piece should be about 3/4 of an inch bigger than the first)

I painted and sanded each piece next.
I really wanted to emphasis that it was pieced together so I hit the edges pretty hard.


From there I nailed her all together and she was looking kind of house-y.
Big! and house-y, she stands just over 2 feet tall!

I wanted a display piece so I simple added an eye screw to the base so I could change my decor with the season or my mood.
Right now she's sporting a pretty heart bucket filled with flowers to match my patio color scheme.
I just ran a length of ribbon through the eye screw for easy changing.


There we go! One really big, chippy, happy bird house!
Start to finish in just over an hour.

Super fun and super easy. Thanks Mel for the play date! Let's do it again soon-
Feel free to stop on over at my neck of the woods anytime.

Craft Goodies

Happy Crafting.


Monday, August 15, 2011

Guest Posting at Belle's Bazaar!!!

Hello and happy Monday! Hope your weekend was amazing.
I'm working on a few fun things to share with you this week, (hopefully by later today) but until then feel free to jump on over to Belle's Bazaar to check out my guest post!

Thanks for stopping by, check back in soon and have a GREAT day-
Happy Crafting. 

Thursday, August 11, 2011

T.G.I.F.-Thank GOODIES it's Friday Linky PaRtY!!!


As summer is winding down I'm finding myself seriously craving fall.
 It has been so crazy hot, I'm anxious for cool(er) crisp nights and brisk morning walks to school.
I even pulled out a few of my fall decor pieces-crazy I know!

So what have you been craving in the craft department these days? With two weeks of no party I'm sure you've all got oodles to share and I'm so ready to see it.
-That, and I'm hoping a few of you remember that I even host this little party...

So let's go! It's the weekend, time to sit and surf your greatness...

No rules, just fun. Be nice to others and keep it friendly-that's all I ask.
Please visit each other and comment where you can, we all need a pat on the back sometimes!
Get the word out that this is the place to go and let's see this party grow, grow, grow!
Share whatcha got cause we want to see it...
By linking you allow me to feature your greatness at a later date giving all credit to you with a link back to your post of course.

Craft Goodies
Have fun, can't wait to see what you've been working on and...
Happy Crafting!!!


I'm Home!!!

Hey there to you all!
So I am officially back and in charge of posting.
 (Notice the lack there of...)

I just wanted to send out a huge THANK YOU!!!! to all the wonderful ladies that shared their talents here with all of us while I was gone and enjoying some time with my family.

I cannot tell you enough how grateful I am for all the guest posts you shared. More importantly how much it meant that when I asked, you all responded so nicely! And so many of you, I honestly was hoping to get at least a week's worth and instead I got 3.
 Blog friends ROCK!!!!

Anyway, I'll post the linky party later today-yeah, I noticed I kind of forgot to do that a few times. In my own defense, I was having a great time with my family and just forgot.

I'm excited to be back-might still be a bit spacey for a few days, we have a week to get ready for school. All 5 of my babies will be gone and I'm having a bit of a hard time with it. How did they get that old?

Anyway, again thank you ladies for sharing your fantastic talents, you are the reason I like doing this so much! Have a great day-


Wednesday, August 10, 2011

Meet My Friend...Lois from Auntie LoLo Crafts

Hi! My name is Lois but you might know me by "Auntie Lolo". I started my blog Auntie Lolo Crafts about a year ago to post all the fun craft ideas I see on the web and projects I do as well. I am so excited to be guest posting for Wendy while she is gone! I just love her blog and always find the greatest ideas on it.
We always have at least 3 socks that don't end up having matches after doing the laundry. It drives my husband crazy. He was thrilled when I decided to make a "home" for these lost socks until they find their mate.
For this tutorial I am going to do something a little different, I am going to feature TIPS! along the way so that your project turns out better/easier than mine did. :)
First I started out with a little board I got at Hobby Lobby for a little over a $1.00, it's about 12 by 6 inches. (This was before I knew about Habitat for Humanity Stores where wood is 50 cents or less)
I thought at first I would paint it....
But then I thought it needed something else. Oh and please know the yellow wasn't that bright but I cannot figure out my camera settings to save my life, keep this in mind throughout all the other photos...
So I modge podged my favorite paper onto the board,
right over the paint. It's called Bo Bunny Double Dot Paper, Sunflower. You may not be able to see, but there are cute little dots on the paper.
How to Modge Podge:
  1. Apply a medium amount of modge podge with a brush (i use those super cheap foam ones) to the board. Make sure that the board is COMPLETELY covered. But don't take so long that the modge podge starts to dry.
  2. Put paper on top of modge podge. Use an old credit card or bone folder to smooth down all of the paper. You may have some modge podge come out on the sides, that's okay, just wipe down with a paper towel. Keep smoothing until there are no bubbles.
  3. Let dry for approx. 10 minutes. Then you can put vinyl on top of the paper.
  4. If you are going to "ink" the edges, this is the time to do so.
  5. After applying the vinyl, put a very thin layer of modge podge on top of the vinyl
  6. Let dry 15 minutes before handling again.
I "inked" my edges with Tim Holtz' brown ink. All you do is hold the ink pad at an angle and go along the sides of your sign. You will get a thin layer of brown on the edges. Depending on how you tilt the ink pad, you can get more or less ink around the edges. If you don't have an ink pad, you can use a brown marker!
I used the program SCAL and my Cricut to cut the brown vinyl. Click HERE if you would like to download my SCAL file to use for your own sign.
After modge podging, inking and putting the vinyl on the sign, I whipped out my hot glue gun to attach the clothespins.
TIP! Measure the distance between clothespins before you hot glue them so you don't end up with some being closer than others and being super annoyed.
While you have your hot glue gun out, use it to attach the picture hanger to the back of your piece of wood.
TIP! Do not use the little nails they give you on this thin of a board, they will go through the board.
(btw, this is the real coloring of the sign and my laundry room walls)
Your done! Now go collect your lost socks and give them a new home. They (and your husband) will be thrilled!
(see the difference in coloring? crazy camera!)
Thanks again Wendy for letting me guest post for you. I hope you will all stop by and say hi on Auntie Lolo Crafts and for all the latest craft ideas, feel free to follow me on facebook!

post signature


Lois!!! I need like 10 of these! Lost socks are a specialty at my house. Thanks for such a super fun and easy idea, those are my favorite kind of projects.
Happy Crafting!

Tuesday, August 9, 2011

Meet My Friend...Leigh Ann from This and That!!!

Hi! I'm Leigh Ann. I write a blog I call "This and That". It's about all the mommish things I do - sewing, recipes, kiddo boredom busters etc. Here's one of my favorite projects I recently did.


A friend gave me this Gap skirt but it was too short for my modesty. It was sitting in my Goodwill bin but I just couldn't get rid of it. Then my I found this XL shirt my dad had given me and decided to use the fabric to put a ruffle on the bottom!

I found a pattern for this flower here. I really think it ties together with the ruffle well!I measured the bottom of the front and back of the skirt x2 (you need to have double the fabric to ruffle it) and my desired length to figure out how much fabric I needed for the ruffle and then I cut that shirt to shreds!The finished product! Click on the picture to see it bigger. I just LOVE it! I've gotten so many comments on this skirt!

Such a great idea, I love ruffles on grown up girls too!
Leigh Ann is an amazing crafter and home schooling momma. She shares a ton of her lessons and projects on her blog.
In her words...
"My kids and I have had a lot of fun studying World Geography this past year.  Take a look at some of what we've done!"

Thanks so much Leigh Ann!
Happy Crafting.

Related Posts Plugin for WordPress, Blogger...