Hi there! And welcome to Craft Goodies. I'm thrilled that you've stopped by and hope you find something here that makes your visit a great one...

Wednesday, March 16, 2011

Sweater Easter Basket...by Stuff by Ash!

Today, I'm passing the posting baton over to Ashlie.
 This gal is awesome, super nice, and SO creative! She has come up with a darling project you're not going to be disappointed with...

Hello my fellow Craft Goodies friends.  I am so excited (and lets be honest, a tad bit nervous) to be sharing on Wendy’s wonderful blog today.  I am always in awe of Wendy’s incredible creativity.  I have been an avid follower since she shared her adorable 2x4 turkeys.
My name is Ashlie, I can usually be found blogging over at Stuff by Ash
image
As the title of my blog implies, I blog about “stuff”, everything from kids crafts and sewing to recipes and power tools.  I love my Cricut and probably have permanent brain damage from inhaling too many Modge Podge fumes. 
I live in what is technically a dessert.  You think sun, heat, lots of sand, but no, we are still experiencing snow storms in the middle of March!  Most likely we will still be experiencing snow storms until May.  Needless to say, I am soo ready for spring!  So even though St. Patrick’s day is just around the corner, I decided to take the Easter route with my project today. 
Two of my most favorite crafting past times are, using things I already have to create something, also know as being frugal, also know as having a teeny tiny crafting budget.  My second most favorite crafting past time is sewing, it is great because mistakes are fixable.  If you mess up terribly, you just rip it out and try again.  (Just make sure you don’t cut something that’s not supposed to be cut, there’s no going back from that!)  With those two things in mind I ventured out to make an Easter basket for my little one out of an old sweater. 
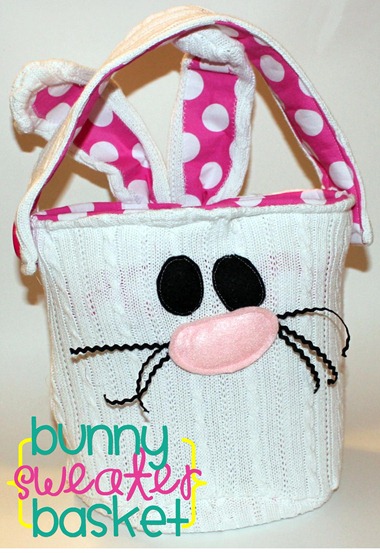
This is what I came up with:
Bunny Sweater
To make your own adorable cuddly Bunny Sweater Basket you will need:
White sweater (mine was a woman’s medium)
1/2 yard lining fabric
1/2 yard fusible fleece
Small scraps of double sided fusible interfacing
Pink and black felt scraps
21 ish inches of Baby Black Ric Rac
Wire hanger
Piece of cardboard
2 jumbo buttons
scissors, needle, thread, sewing machine, tape measure, pins, marking pen

Once you’ve gathered your supplies, you are ready to get started!

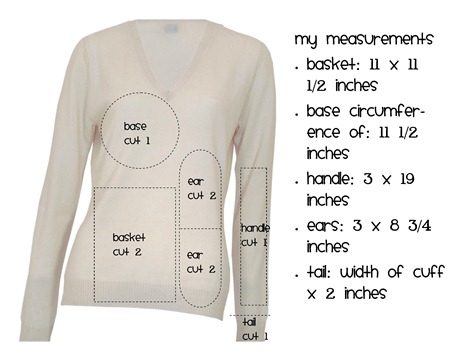
First step cut out all your pieces.
From your white sweater cut: 
(Please note, these are not exactly to scale . . . I’m not the most mathematical person in the world, but you get the gist.)
Bunny5
Helps to go slow and have some really sharp scissors.  Also to get a mostly perfect circle with the right circumference for the base of the basket I cut a piece of yarn that was 11 1/2 inches long (the length of the bottom of my basket) and started measuring round objects in my kitchen.  I ended up using a medium sized round Tupperware.  Really scientific huh.  My engineer husband was totally disgusted.
While you are in circle mode, cut a circle from a thin piece of cardboard (like say a Diet Mt. Dew 24 pack, not that I had an empty one lying around the house or anything . . .).  Make the cardboard circle about 1/2 inch smaller than your base so you won’t have to try to sew through your material and the cardboard. 

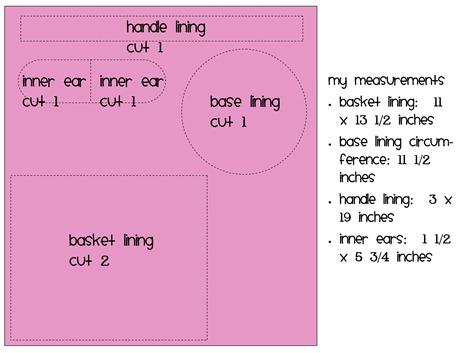
From your lining fabric cut:
bunny6

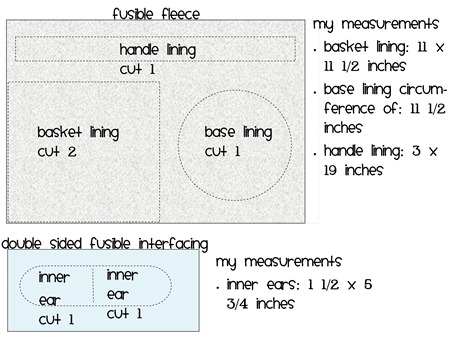
From your fusible fleece and double sided fusible interfacing cut:
Bunny7
The fusible fleece is going to help the basket be a little more sturdy.  The fusible interfacing is going to help the inside of your ear not fray and stick to the ears. 

Take a quick break from all this cutting and go turn on your iron so you’ll be ready to jump right into ironing together your fusible stuff and your fabrics . . . . Continue cutting.

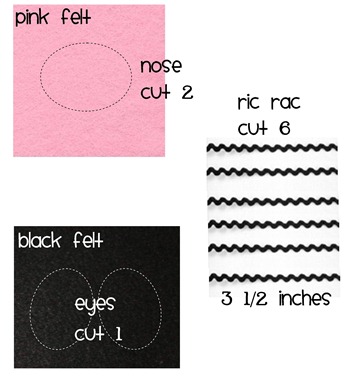
Last cut out the face details:
Bunny8

Next step is to iron on your fleece to your lining pieces.  Just follow the instructions that came with your fleece.  But if you can’t read them because your toddler has ripped them to smithereens, you could use these online instructions. 
Bunny9

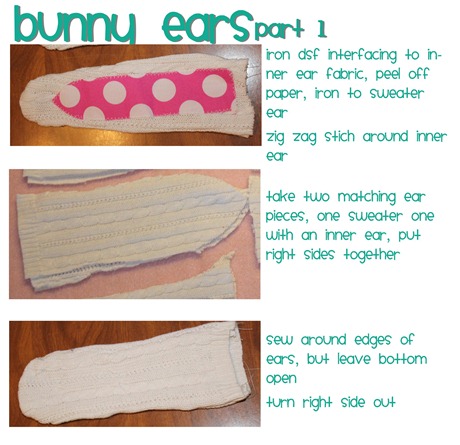
I like to have all the extras and details mostly assembled so they are ready to put on when I’m ready to pull everything together.  So next I made some bunny ears.
You should have 4 ear pieces from your sweater.  To cut mine I just laid out my sweater and eyeballed it, cutting through both the front and the back.  Then moved it up and cut around it, cutting through two layers again.  And wha-la you have your four pieces. 
Bunny Ears

Now to make the ears a little sturdier I added some wire.  This step is optional.
Bunny Ears2I did not use my machine to sew in the wire or pinch the ears, the black lines are where there is stitching.  It should now be starting to look like a bunny ear . . . if not call me!  Set your ears aside.

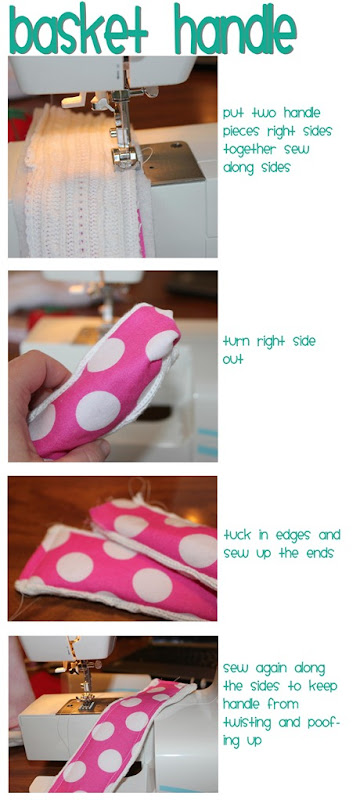
Next to make, the handle for your basket.
Bunny Handle

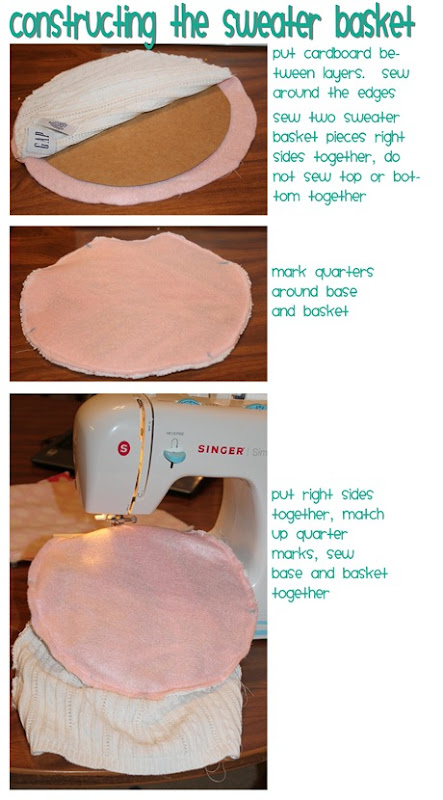
Now we’re ready to construct the basket part.  We are going to make two baskets, one out of the sweater, and one out of the lining.  Both follow basically the same steps.
Bunny Sweater Basket
I added a piece of felt to my base because I ran out of fusible fleece.  I would highly recommend putting in a piece of cardboard to give your floppy sweater some stability.

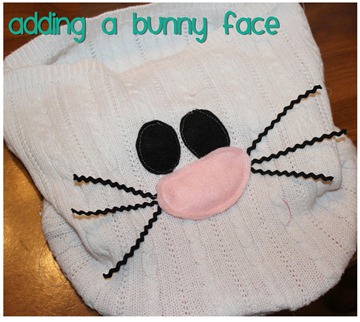
Bunny Face
Now that we have the outer part of the basket constructed, it is the perfect time to add a cute little face.  I sewed on the eyes with the sewing machine.  Sewed the two nose pieces of felt together with a little stuffing in the middle.  Last I sewed on by hand the nose and ric rac whiskers, each whisker is about 3 1/2 inches long.

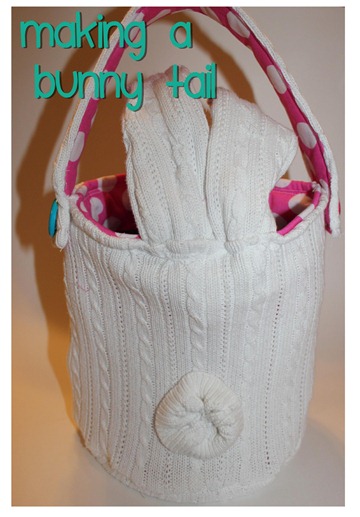
Bunny Tail
This is also where I added my bunny tail, but didn’t take a picture of it til the end, sorry.  To make the bunny tail I hacked of the cuff of my sweater, about 2 inches from the end of the sleeve.  Then hand sewed like a little yo yo ruffly thing along the hacked edge.  This way the tail won’t fray, but I didn’t have to hem anything.  Then attached the tail on the back of the basket.
Now we are ready to move onto the lining of the basket.   
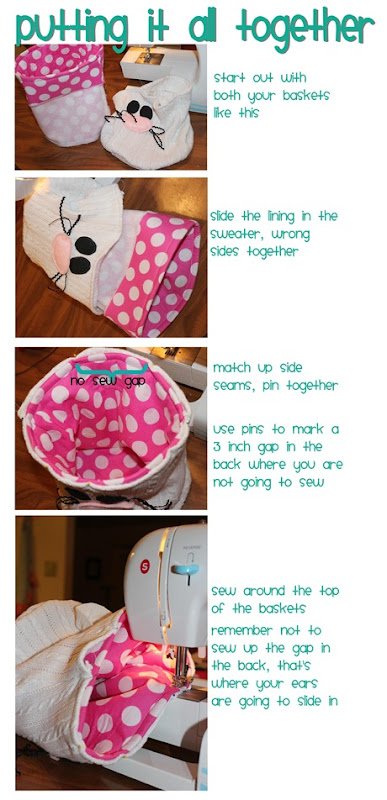
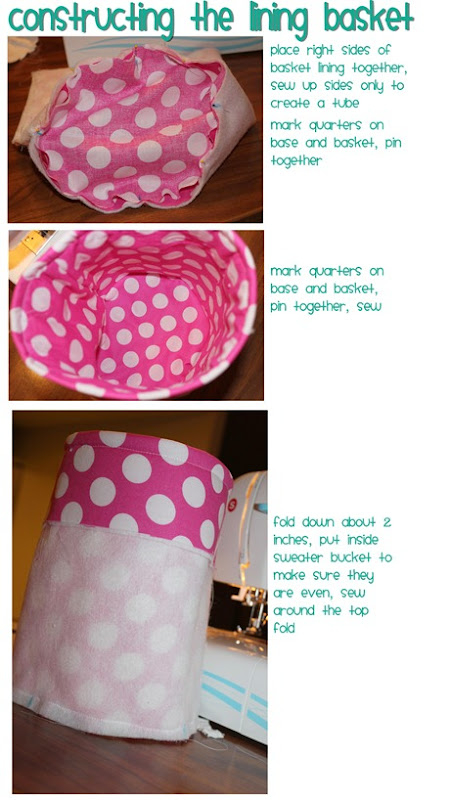
Bunny Basket Lining
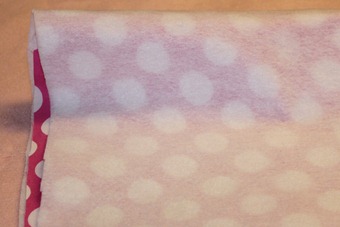
I choose to fold over the edge here to create a clean edge/hem for when I put my two pieces together.  I did this because in the past when I’ve tried make purses with straps it always takes me ten tries to get the lining facing the right way and the strap on the outside.  This way you can just put the two baskets inside each other and slip in the ears and add the strap. 

Bunny All Together

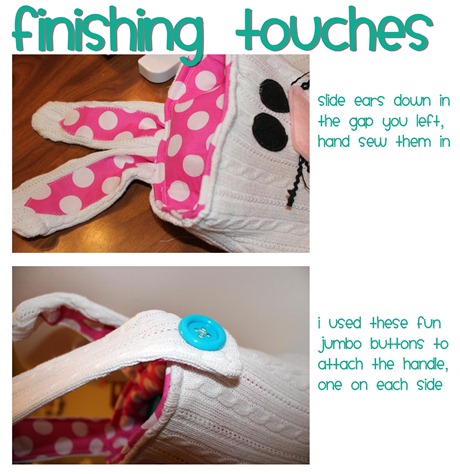
Last thing you are going to do is add the finishing touches, grab the handle and the ears that you made and the beginning.
Bunny Finishing Touches

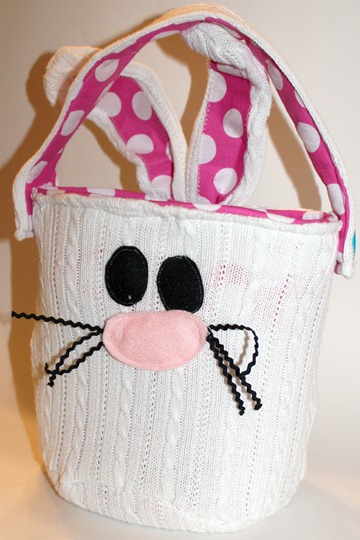
And the finished basket:
Bunny Finished
My Little Miss has been carrying it around all day!  I can’t wait till Easter so we can fill it with lots of nummy goodies!  Finished it is about as tall as a 40 oz jar of peanut butter and will fit two jars side by side, made it nice and roomy to fit lots of candy “for the kiddo”.
Thank you ladies (and gentlemen if you are out there) for putting up with me today!  Easter and Spring stuff is already starting to pop up, I can’t wait to see what you all have created!


...amazing right?
Thanks Ashlie, so much for sharing this, I will infact be making 5 of these.
Love it...
Happy Crafting!

Monday, March 14, 2011

Wood You Like to Craft? Craft Goodies style!


I'm linking up my pillows from this post here:


Visit thecsiproject.com
You'll have to scroll down a bit but, just fyi...
I made them from canvas. Love this stuff!
Used vinyl stencils and (spray paint) for the design.
And last added a little ribbon love.
 
Guess what? My pillows made the top ten!!!
WA-HOO!!!
Visit thecsiproject.com
Happy{almost} Tuesday all!
I'm loving the Spring Break life-still in my jammies and oh so happy about it.
Just wanted to put a little bug in your ear about our blogger craft club aka Wood You Like to Craft?
The first project series was launched last week over at Under My Umbrella,
{I'm sharing my guest  post here in case you  didn't get a chance to see it}.
Also wanted to let you know if you did participate the linky party is open throughout the week,
be sure to link! We will highlight our favorite projects on Sunday
{you'll get a super cool button to display on your blog}
 and the top pick wins a prize donated by next month's hostess.
{Krystal of Sassy Sanctuary}
See you there...
I'm just going to start by saying, "This was SO much fun! And you all need to play along!


Being given a place to start + the instructions to add a piece of you to the project = a good time!!!"
 
Okay, now that that's out of the way I'll say Hello to you all.
Melinda did an amazing job with this first project and had the idea not been to re-create it, I may well have just copied it! But I did run into a small glitch...


The subdivision I live in places the house numbers on these big stones. They are then found on either the mailbox, or the house front. Mine of course is on the house front.
Therefore, no house number needed.
 But I did want something to display it outside, so what to do?
I walked outside and sat staring at my front porch waiting for a light bulb moment...
...and it came. My old, lonely bench needed a friend!


Here's how I changed things up...


1. I LOVED the shape of Melinda's so I kept it, just stretched  it out to a rectangle and went LARGE!
My piece is 22 x 27 from point to point.
 
2. I needed the piece to match the look of my bench...{old.}
 So I hand painted the border and then used a stencil to create the filigrees. Then I sanded like a crazy woman to make it look like it had been there for a while.


3. I built a flower box to go in the center of the piece instead of the castine. And added a happy little "Welcome" to it as well. Then everything got a good coat of sealer-just in case!


With the flowers added in...


Just for fun, I threw in some pillows for the bench, one with our family's initial, a red one for a splash of color, and one with my house number...I couldn't help it. I loved the idea of it on Melinda's piece and needed to get it into mine somehow.
 
So there you go, one slightly altered project from a great inspirational piece,
and one very happy front porch!


Thanks Melinda-
for continuing to be amazing.
I'm really looking forward to seeing what else has been created and I can't wait for the next project.
Happy Crafting!
 

Irish Stew and Shamrock Milkshake Cupcakes...

Monday Munchies...
 
My girls are all out of school this week for Spring Break so needless to say, we need a few things to keep us entertained. 
 With St Patrick's Day on the calendar it will be a week of some fun green crafting and good eating!
 We aren't real big on corned beef, so it will be beef stew instead with colcannon (smashed potatoes with cabbage) and for dessert, Shamrock Milkshake Cupcakes. YUMMY!
 
Braised Irish Stew and Colcannon
 
Recipe from allrecipes.com

Ingredients

  • Irish Stew:
  • 1 tablespoon vegetable oil
  • 1 (3 pound) beef chuck roast, trimmed of fat and cut into 1/2-inch cubes
  • 2 tablespoons all-purpose flour
  • 1 cup coarsely chopped onion
  • 1 cup coarsely chopped carrot
  • 1 (12 fluid ounce) can or bottle dark beer
  • (We don't drink alcohol at my house so I substitute beef broth)
  • 2 bay leaves
  • 1 teaspoon dried thyme
  • 1 teaspoon salt
  • 1/2 teaspoon ground black pepper
  • 2 cloves garlic, minced
  • 2 tablespoons Worcestershire sauce 
Calcannon:
3 slices bacon
2 pounds russet potatoes, peeled and cut into chunks
2 cups thinly sliced cabbage
1/4 cup milk, warmed
2 tablespoons butter
1/2 teaspoon salt
1/4 teaspoon ground black pepper
2 tablespoons minced fresh parsley

Directions

  1. Preheat oven to 325 degrees F (165 degrees C).
  2. Heat the vegetable oil in a large Dutch oven over medium-high heat until very hot, and brown the meat in 2 batches, stirring to brown the cubes on all sides. Return all the meat to the Dutch oven, sprinkle with flour, and stir lightly to coat the meat with flour. Stir in onion, carrots, dark beer, bay leaves, thyme, 1 teaspoon salt, 1/2 teaspoon pepper, garlic, and Worcestershire sauce. Bring the mixture to a boil, and cover.
  3. Place the Dutch oven into the preheated oven, and cook for 45 minutes; uncover, stir the stew, and cook until the beef is very tender and the liquid is reduced by half, about 45 more minutes.
  4. Place the bacon in a large, deep skillet, and cook over medium-high heat, turning occasionally, until evenly browned, about 10 minutes. Drain the bacon slices on a paper towel-lined plate. Crumble the bacon and set aside.
  5. About 30 minutes before the stew is ready, make the colcannon. Place the potatoes into a large pot and cover with salted water. Bring to a boil, then reduce heat to medium-low, cover, and simmer until tender, about 20 minutes. Drain and allow to steam dry for a minute or two.
  6. Place the cabbage into a microwave-safe bowl, and add 1 or 2 tablespoons of water. Cover and microwave on High for about 2 1/2 minutes; uncover (watch out for steam) and stir the cabbage. Cover and microwave for about 2 1/2 more minutes, until the cabbage is slightly tender but not mushy. Drain excess liquid, and set the cabbage aside, covered.
  7. Place the potatoes into a large bowl, and add milk, butter, 1/2 teaspoon of salt, and 1/4 teaspoon of pepper. Beat the potatoes with an electric mixer until smooth and creamy. Stir in the cabbage, crumbled bacon, and parsley until well combined.
  8. To serve, place a scoop of colcannon onto a plate, make a hollow, and fill with braised beef stew.
Shamrock Milkshake Cupcakes

Shamrock Milkshake Cupcakes
Recipe from Better Homes & Gardens

Prep: 50 minutesBake: 15 minutesCool: 45 minutesStand: 30 minutes
 
Ingredients:
4    egg whites
2  cups  all-purpose flour
1  teaspoon  baking powder
1/2  teaspoon  baking soda
1/2  teaspoon  salt
1  cup  buttermilk or sour milk*
1/4  cup  green creme de menthe**
1/2  cup  shortening
1-3/4  cups  sugar
1  teaspoon  vanilla
1  recipe  White Chocolate Frosting
 Green food coloring

Directions

1. Allow egg whites to stand at room temperature for 30 minutes. Meanwhile, line twenty to twenty-two 2-1/2-inch muffin cups with paper bake cups. In a medium bowl stir together flour, baking powder, baking soda, and salt. In a 2-cup glass measuring cup combine the buttermilk and the creme de menthe. Set aside.
2. Preheat oven to 350 degrees F. In a large mixing bowl beat shortening with an electric mixer on medium to high speed for 30 seconds. Gradually add sugar, about 1/4 cup at a time, beating on medium speed until light and fluffy. Beat in vanilla. Add egg whites, one at a time, beating well after each addition. Alternately add flour mixture and buttermilk mixture to shortening mixture, beating on low speed after each addition just until mixture is combined.
3. Spoon batter into prepared muffin cups, filling each about two-thirds full. Use the back of a spoon to smooth out batter in cups.
4. Bake for 15 to 18 minutes or until tops spring back when lightly touched. Cool cupcakes in muffin cups on wire racks for 5 minutes. Remove cupcakes from muffin cups. Cool completely on wire racks.
5. Divide White Chocolate Frosting between two bowls. Tint one portion with green food coloring. Spoon each frosting into a pastry bag fitted with a large star tip. Pipe white and green frosting onto tops of cupcakes to resemble four-leaf clovers. Makes 20 to 22 (2-1/2 inch) cupcakes.
White Chocolate Frosting: Allow 1 cup butter, cut up, to stand at room temperature for 30 minutes. In a large mixing bowl place 6 ounces white baking chocolate with cocoa butter, chopped; set aside. In a small saucepan heat 1/3 cup whipping cream just until simmering. Pour over white baking chocolate; let stand, without stirring, for 5 minutes. Stir until smooth; let stand for 15 minutes. Gradually beat butter into melted white chocolate mixture with an electric mixer on medium to high speed, beating until combined. Gradually beat in 1-1/2 to 2 cups powdered sugar until frosting reaches piping or spreading consistency. Makes 3-1/2 cups.
*Test Kitchen Tip: For each 1 cup sour milk, place 1 tablespoon lemon juice or vinegar in a glass measuring cup. Add enough milk to make 1 cup total liquid; stir. Let stand for 5 minutes before using.
**Test Kitchen Tip: If you prefer not to use creme de menthe, substitute a mixture of 1/4 cup milk, 1 teaspoon mint extract, and several drops green food coloring. 


Thursday, March 10, 2011

T.G.I.F.-Thank GOODIES it's Friday #9


Did you get a chance to check out last week's party?
 I was amazed- no blown away by the participation! You people ROCK!
I didn't get to comment on many (I was borrowing a computer) but I did visit them all.
Again, AMAZING! Thank you to all of you that linked up.
Here's a few of my favorites...
 
 
I am very quickly becoming a fan of specimen art!
{I think it might be taking over the subway art craze}
This piece is just awesome. It was made by The Pike Family using a cricut and foam tape,
she's got a lot of fun stuff going on-go check her out.
 
I secretly want to sneak into this bedroom and "borrow" the bedding...
 
Just gorgeous, my oldest needs a new comforter, just might have to give it a try!
Check it out over at Fast Daze
 
and one more before we PARTY!!!
I'm a sucker for positive reinforcement, I have little sayings, words, and quotes all over my house.
So this really speaks to me.
Clean & Scentsible shares a great tutorial.
 
Again, thanks to all that linked, let's do it BIGGER and BETTER.
Here's the weekly reminders:
T.G.I.F.-Thank GOODIES it's Friday!
 I love to see what your brilliant and creative minds are thinking so let's get to the sharing...
Enter up to 4 links...


 tips, ideas, recipes, projects, contests, giveaways, whatever, just share yourself with us!
 Visit others. Leave comments.
PLEASE NO ETSY SHOPS!
{Unless you offer a tutorial with the product} 
Grab a button from below and help spread the "GOOD" word!
Come back again over the weekend and check out the links.
Visit a few, comment a lot!
We all need a little LOVE.
 Link will be open until 11:59pm Monday night. 
**By linking you give me full permission to feature your links, tutorial, photos and blog giving credit back to you of course!
 
Craft Goodies


Thanks for stopping by and for joining the party! It's always more fun when you're here...
Happy Crafting!

OMTWI Week One Challenge...Trash to Treasure

Thanks to all of  my amazing friends for voting! It was fun to read your emails-even more fun to know you know me well enough to pick out my project! I'll find out tomorrow if I still get to play, either way, it was a ton of fun and very flattering to even make the finals. {Sounds like I'm giving an Oscar speech...}

Here's my week one project from One Month to Win It...auditions for season 2 are open now! Go for it girlies, you can do it! The prizes are awesome-a $50 gift card to Target!!! Seriously, small slice of heaven right there. Good luck...

 
Here's the inspiration story... 
"This project took on a whole new direction about half way through, {but I love the end result!}
 I started by building the frame and then painting it. I was half-way through adding a bunch of lettering and small sayings like "take the time to LAUGH & PLAY. Sing and dance! Smell the flowers..." when I decided I didn't love it. I was going to start a completely different project when my phone rang! After a great "you can do this" chat with my bestie, I decided to stick with it but knew it needed something. It wasn't until I was sitting at my daughter's ball practice that it hit me. It needed texture! It needed fabric...
so back to Goodwill I went and found a sheet in the perfect shade of blue, and it was only $4!
 

Here's how she came together...
 I started with a soft blue king size sheet and a handful of plastic frames from my local Goodwill and then scored big time at a near by construction site...
 Free wood!!!
The clock parts came from a left-over project and everything else I had here at home.
I used the wood to create a 30x30 frame then
I tore up the sheets into 4 inch strips and wove them across the wood frame to add some fun texture to the piece. 


Clock parts came next to help with the frame/number spacing.
I then painted the frames, added some vinyl numbers and then glued them into place.


All said and done this trash to treasure came in at just under $12! 
Fantastic!" 
 

Wednesday, March 9, 2011

Out of the Office...Guest Posting at "Under My Umbrella"

Hello all my C.G. Friends!
under my umbrella
 I'm over at Under My Umbrella today sharing my Wood You Like to Craft? project.
 
Wood you like to craft?
I am so pleased with how it came out,
want a peak...


You can find the rest of my design at

Check it out,
 get a few ideas for your own piece from myself, Melinda,
Krystal, Candace or Nicole, and then be sure to link up your project this weekend!
5 projects will be awarded with special recognition buttons for your blog
 and 1 overall pick will  receive a mystery prize {Ohhhh!}

We can't wait to see what you were inspired to make...

wood you like to craft?

Linky Party opens Friday 3/11 on Under My Umbrella.
 We'll see you there!


Tuesday, March 8, 2011

Tuesday Treats featuring...a cup of water, can of stain & a mischievious little girl!

I'm a bit behind schedule, this is why...
 

I adore this little munchkin of mine but she is a turkey! She got upset at her sister Friday morning, her sister just happened to be playing on my laptop, so my little miss decided to teach her sister a lesson by dumping a full glass of water on her head...and all over my laptop!
I screamed, I cried, I begged my husband to perform a miracle and save my now lifeless laptop. He just looked at me like "who exactly do you think I am? An technical God?"

 I think he might be...after working on it off and on all weekend and late into last night he brought my baby back from the brink of electronic wasteland! He IS a miracle worker....but never the less I don't have a post ready for today. I'm playing catch up to a bunch of orders that came in while I was incommunicado. So instead I'm sharing with you another of my daughter's adventures, I promise, it's a good one...

***this was posted on my family blog 10/10...
"Oh this little girl.
 This beautiful, sweet, little girl is driving me CRAZY!!!
Someone please, tell me how it is possible for one little thing to reek such utter devastation on such a regular basis?
Here is today's big event...so far anyway, bedtime is still a long way off!
Cute isn't she? But wait, what's that on her face you ask? Chocolate maybe? Dirt perhaps? Oh no, that would be far to ordinary. ANY child can find their way into those simple things, but this is Reegan. And there is nothing ordinary about what Reegan can find to get into.

Reegan is wearing a brand new can of Minwax Liquid Stain in Dark Walnut. It's a good color on her, don't you think? Really brings out the color of her eyes, and adds just the right touch to her eye brows. And best yet, it can color your hair and dye your outfit all to match! What a bargain product!

And that doesn't even begin to cover the fantastic perfume that it makes. I mean come on, who doesn't want to smell like a furniture shop all day long?

Oh people, leave it to this little thing to find a new use for anything! She's got skills, amazing, un-equalled by any other skills.

Just in case you were wondering how she came upon a can of stain {yes, Jaron I'm looking at you}...No it wasn't left out, opened on the table for her to just find. It was sealed-never been opened, still in the bag, on the shelf in my craft closet. Skills I tell ya...I don't even want to know how she got it open. 

My first reaction was to scream, my second to give her away, I went with the third...blog about it so that tomorrow when I re-read it I can find the humor in this and too so that whatever she does do tomorrow {and she will do something}I have something to gauge it's severity from."


Have a great day! And...
Happy Crafting!!!

Related Posts Plugin for WordPress, Blogger...