Hi there! And welcome to Craft Goodies. I'm thrilled that you've stopped by and hope you find something here that makes your visit a great one...

Friday, December 10, 2010

Reindeer Upgrade and a Sleigh!

This is what happens when the project that I want to do becomes the project I'm going to do until the first project is do-able...
 
I totally "pimped" my reindeer!


I took my 2x4 reindeer and gave him a body, legs, a girl-friend, and a ride! Yeah, I'm telling you, today I impressed myself with this one.

Want details? Here you go:


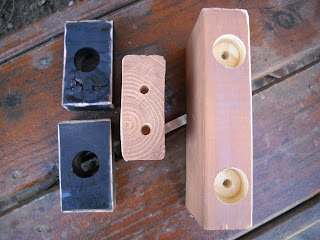
2x4 block cut to 3.5 x 3.5 inches {head}
2 2x4 blocks cut to 3.5 x 1.5 inches {hooves}
1" diameter dowel cut into two 6 inch lengths {legs}
2x6* block cut to 5 x 7 inches {body}
I used a leftover piece of paint stick for the nose piece about 2" long

*I actually used the 2x10 board that I bought for the sleigh and just split it in half,
hence 2 reindeer instead of 1!
1. Paint and sand the edges of each block.
2. Drill placement holes into body and feet, holes for antlers into head.
I used a 1/2" bit for the antlers, and a 1" boring bit for the dowels.
I drilled completely through the feet and about an inch and a half into the body.

3. Assemble the body. Glue dowels into place and let completely dry.


*Be sure to check that your reindeer is level before and after adding the glue!


4. While the body is drying finish the heads.
*I cut out an extra ear piece to use for a tail.
 

5. Glue on the tail and head pieces. If you wish, the wood is thick enough
 to use a screw or two. Just be sure to pre-drill pilot holes.

Add a fun collar and other embellishments and your reindeer is good to go!

To make the sleigh I cut down a 2x10 inch piece of  wood with my band saw.
2x4 block cut to 8 inches long
and 1" diameter dowel cut to two 3" lengths


I originally kept this really square to match the shape of the deer. Still an option if you only have a miter or jig saw. This piece of wood is to thick for a scroll saw-you'll kill your blade and it will take forever to cut!

Follow the same basic instructions for the sleigh as you did for the deer.
Paint and sand.
Drill placement holes-be sure they are in the same place on the sleigh and runner piece.
Assemble with a little glue.
Add your embellishments and your done!
*I ran a length of ribbon from the front of the sleigh to each of the deer collars to connect the pieces.

Have fun and Happy Crafting!


I linked up to these fantastic blogs! 
 

Photobucket

Photobucket


Join  us Saturdays at tatertotsandjello.com for the weekend wrap up    party!

Thursday, December 9, 2010

Pillow Issues and Patterns...

How did it get to be Thursday already? Doesn't that always seem to be what happens this time of year?
 I started working on these pillows late Monday night. After some, okay a lot of trial and mostly error I got a star that I liked figured out. The letters and holly leaves were a piece of cake. Got everything cut out and ready to sew...
Sat down Tuesday to finish them AND MY SEWING MACHINE BROKE!
 
So as I sit and wait for it to be fixed, contemplating if it would be worth trying to hand sew it, I will share the patterns and wish you better luck than I am currently having! I DO believe these will be darling so give them a try and report back, I'm dying to see some finished!
 
{I am realizing this desperatley needs pictures, I'll add them in as I can}
 
Here's what you need:
1 1/2 yds of muslin
heat and bond lite
about 1/4 yd fabric for letters
Green felt for holly leaves and snowflake
(1 square is plenty)
6 small red buttons for berries
3 yds of trim for pillow edges
 
And of course a few patterns!
 
page 1
page 2
page 3
 
So the plan from there would be to trace and cut out 5 of the star pieces. Tape them together so that they form an actual star, should be about 15 inches across when done.
 
Trace 3 stars onto doubled muslin. Cut out leaving a 1/4 in seam allowance. Set aside.
 
Iron the heat and bond onto your letter fabric and felt following the directions. Trace the letters, leaves, and snowflake onto the paper side of the heat and bond.
*Remember to trace the letters backwards*
 
Cut out and iron them into place on the star cutouts.
Add any hand/machine stitching to the letters now.
Sew on the berry buttons.
 
Turn each pillow right sides together and pin trim into place. It will sit in between the two fabric pieces with the finished edge facing in.
 
Sew the pillows together, leaving a small section open for turning and stuffing.
Turn the pillows right side out and stuff away!
 
Hand stitch the opening closed and display those babies!
 
I am determined to finish these {before Christmas!} good luck, holler if you need clarification, and
Happy Crafting!


Monday, December 6, 2010

Monday's Menu...

On today's menu are some delicious holiday throw pillows! I am SO excited to figure these out, and once I do, I'm sharing the patterns with you! Look for them {hopefully} tomorrow...
  
Until then I have to share one of my favorite holiday traditions with you.
This is one my entire family {big and small} get in on cause it's so much fun!
 
It's our annual Christmas Candy Cane Hunt!
 
My sister started this a few years ago with our family. My kiddos enjoy it so much that even though we've moved to far to be home for the big event, we hold our own.
 
You start with a bunch of these:
 
We get every participant a different colored/designed candy cane. This helps to let you know what you're looking for and to be sure everyone gets the same amount of goodies. 

 The canes are taken outside and hidden all over the yard-the older you are the harder they are to find! Once everyone is clear on what color they are looking for, the hunt begins.

I've added a bit of a twist with my own girls. I also hide a large peppermint stick. The finder of the stick gets to open the first present on Christmas Eve.
Go to fullsize image
Once all the candy canes are found we head inside for a mug of cocoa and of course- a candy cane!
It is SO much fun, I think you need to have one too!
 
Have a great Monday and Happy Crafting!


Saturday, December 4, 2010

I Need You!!!

Trying a little something crazy today. And I need you to help, actually I need your help and want you to participate. I entered my "Generations Wreath" in a weekly contest over at Poppies at Play


  This weeks theme is "Wreaths and Signs". The only entry rules are they have to be handmade. So if you've got one, go enter! {The winner gets their choice of vinyl from her shop.} If you don't have anything to enter, head on over there and check things out.
You might find an idea or two and you get to vote for your favorite {like say maybe #33}.
Next week's theme is teacher/neighbor gifts...
 
If you enter let me know, I'd LOVE to check it out!

Friday, December 3, 2010

Check it out...

Did you happen to notice the AMAZING make over my blog got last week?
{I LOVE my little mouse! Makes me smile every time I see him!}
 I cannot take an ounce of credit for it. My brain isn't even close to wired that way.
Kim from


did all the work.
 And wonderful work it is. She not only made me look good but is featuring my Itty Bitty Baker line on her craft blog today. She is one talented lady and super sweet! Thanks again Kim...
 Go check it out.

It's Begining to Look A Lot Like Christmas {Finally...}

Life has been coming at me so fast lately, at times it's felt like warp speed-so yesterday, I gave myself the day off! I did nothing I should have done and everything I wanted.
It was WONDERFUL.
 
Want to see what I did? I finally got around to getting up my tree...
 

I LOVE MY TREE!
 Not just how it looks, but literally, I love the tree. It was a "gift" from my dad a few years ago. He  upgraded to a swanky pre-lit pine and I begged for this old school blue spruce. It holds wonderful memories for me and is worth every single scratch I get while separating and installing every branch.

And if you could have heard my girls reactions when they got home from school and saw it! Worth every minute it took to put it together.

This was my little "helper" in action.
 
I also finally got around to making this...
 

Let me explain.
Christmas for me has ALWAYS been about family. My earliest memories of Christmas are filled with images of my grandparents, great-grandparents, cousins, aunts, uncles, and of course my sisters, brother, and parents~family, lots of it.
I've grown up a bit since then and have moved further away from home and further away from those big family style holidays. And my grandparents and mom are no longer here with us, but my memories still are.
 I had a bunch of my moms older, favorite ornaments just sitting in a storage box and needed to do something with them. I had sat them on  a display platter but my kiddos thought that meant they could play with them. So what to do?
I ended up having my dad track down some of his parents holiday ornaments, and I acquired a few from my mom's parents too.
I wired them into this wreath form along with a few of mine, and look what I ended up with!
A generational wreath that is FILLED with memories of wonderful holidays past. It was so fun to hear my dad tell me about some of these ornaments-he remembered hanging them up as a child himself!
The best part is that they each remind me of people that I love so much.  I am so excited at the thought of hanging this every year and adding to it as my girls grow.
{I need to see if I can get a few from my hubby's family to add to it. Hint, hint!}

So much fun, such a much needed break! A good day around, but now back to work...
Go make yourself a wreath, it will make you happy too!

Happy Crafting
 

Wednesday, December 1, 2010

Ornament WINNER!

No sense in making you wait any longer {30 days is enough!}
 
The random.org gadget says the winner should be:
 
#5 Kristen H.
Congrats Kristen! One big box of ornaments is headed your way.
 
Thank you to all of  you who entered. I have loved reading your thoughts, stories, and the traditions you have shared. It has made me realize over and over again that the holidays are all about families! The ones your blessed with and the ones you find.
 
Happy Crafting!
Related Posts Plugin for WordPress, Blogger...