Hi there! And welcome to Craft Goodies. I'm thrilled that you've stopped by and hope you find something here that makes your visit a great one...

Thursday, November 25, 2010

Day 25- Felt Lollipops!

First-HAPPY THANKSGIVING!!!
I hope you each find this day with the ones you love,
the people that make your heart happy and your life good.

I wish you safety, joy, and a day full of memories to treasure always!

Second, here's today's ornament...

Fun, yummy-looking, swirly good, felt lollipops!
So simple, and going to look so good on the afore mentioned "Candy Tree".

You need:
2 different colored felt squares
hot glue gun
Popsicle sticks
and ribbon

Cut the felt into 1 inch strips. {I used 3 of each color.}
 Glue the 3 short strips of the same color together to make 2 long strips.
 Lay the two long strips on top of each other and start rolling.
Add a little glue along the way to keep it all together.
Glue the ends down, glue the roll onto the Popsicle stick,
add some ribbon for a hanger and a bow to the stick and you're done!

Yummy, Yummy! No calorie candy...

Happy Crafting.


Wednesday, November 24, 2010

Day 24-Punched Tin Ornament

**Be sure to check in tomorrow for some great Black Friday/Cyber Monday deals in my store and to see my new
 Children's Toy Line...Bitty Bakers!**

My kidlets are home today- {yeah vacation!} and we needed something to do.
This is what jumped into my head...
Did you ever make these as a kid? I can remember doing something similar to this in elementary school, loved it then, and my girls loved it today!

Here's what we did:

Gather a small stash of canning jar lids and rings
some paper and pencils
a small nail and a hammer


First trace the lid onto the paper and cut it out. Then draw a picture inside the circle. Simple is better!
 Map out the places where you want the holes to go.


Tape the picture onto the lid.
 Then using your nail and hammer {on a scrap piece of wood!} Gently punch through the lid to create your image onto the lid.
Check the backside to make sure you hit all the holes and then remove the taped on image.


You should now have a lovely punched impression on your lid.
Glue the lid back into the ring and then add some ribbon or other embellishments to dress it up and you're done.


My {older} girls each made one-they love them and can't wait to put them on their trees. I'm just thinking I'm happy they were entertained for a while, and how cute would these look if you used soup cans and made little lanterns to hang on the tree or used them as little goodie canisters? "Food" for thought...

Happy Crafting!

Tuesday, November 23, 2010

Day 23- Country Santa

First let me start by saying to all you Grandmas and Grandpas out there-
HAPPY GRANDPARENT'S DAY!
{If you haven't called yours yet, you still have time...}

Now that that's done on to today's ornament:

Today we're making this little country Santa. He's pretty quick,
{let's just say you could make several in the time it takes me to type this tutorial!}
and pretty cute, if I do say so myself.

You're going to need:


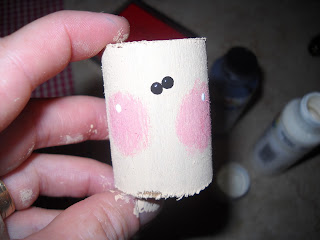
a small block or piece of 1" dowel about 2" tall
black,white, and a skin-colored paints
red ink pad
scrap pieces of muslin, ivory felt, and something Christmas-ey
a small round bead
glue gun and scissors
and a little something for Santa's hat

Start by painting be block/dowel and round bead. Once that dries, add the face details to the block/dowel. Blush the top of the bead and set it aside.
Set that aside to dry.

Next your going to make the beard pieces. I started with a scrap piece of muslin
about 12" long and 5 1/2 inches wide.

Tear the muslin into strips that are 1/2 an inch wide and 5 1/2 inches long.
You are going to need 24 strips total.

Once all your strips are torn, you are going to tie them in bundles. Lay 3 strips down side-by-side and tie a fourth strip around them in the center. You should end up with 6 bundles.

Glue the bundles onto your block/dowel next.

Hold the bundles in half at the center knot and place the glue onto the knot.
Start with the bottom level and glue them in this pattern:

X X
X X X
{You should have 1 bundle left!}

Glue on the round bead in between the top two bundles:
BEAD
X X
X X X


Glue the last bundle on HORIZONTALLY under the nose to make the mustache. Place a little dab of glue on each side of the bead and push the fabric around it.
Trim any weird, out of place looking pieces if needed.


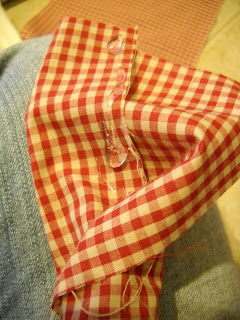
Get your scrap fabric of "Something Christmas-ey" and cut it so that it is long enough to wrap completely around the head and stand up off of the piece 6-7 inches. Run a line of glue around the top of your block/dowel and attach the fabric. Be sure the fabric overlaps in the back!

Turn the piece so that you are looking at the back of it. Open up the hat fabric so that you are looking inside it. Run a big line of glue up the fabric from block to fabric edge.
 
Quickly fold the fabric back into glue and start pinching it together. Scrunch it good! You are creating the folds in the hat, the more you scrunch the better it looks.

Cut a scrap piece of felt so that it too will wrap all the way around the head and is 1 1/2 inches wide.
Fold the long edges into the center and glue down.


This will be the hat band.
Glue this piece onto the head, starting and finishing in the back, and covering up the hat line.
Add an embellishment to the front, wrap some thread/yarn around the top of the hat, tie to make a hanger, and your Country Santa is ready to go!


Ho, Ho, Ho! Happy Crafting!

Monday, November 22, 2010

Day 22- Wisemen Came...

Here you go! The last of my hand stitched ornaments.
 And to be honest, I think this one is my favorite.
The only thing I don't love-the wiseman in the middle. Should NOT have colored his head dress brown-makes him look like a girl with long hair!
I guess that's my advise to you all, pick a different color.

All four of these kits are buy 3 get one free until the 30th of Nov in my esty shop  ...Well Good!

Happy Crafting!

Sunday, November 21, 2010

Day 21-Christmas Cookies

I'm going a bit different today. Hope you don't mind, oh, I still made an ornament for you it just came about in a different way. I've been trying to keep the weekends a bit more "kid friendly" and in trying to decide what to do today, I decided to make cookies. This is one of my favorite traditions going back to my childhood with my grandma. My girls and I do this every year on Christmas Eve, and I hope it's something they continue to do with their families in the years to come. So, here is a peek at the ornaments I made to go along with  this FANTASTIC cookie recipe...

Two chunky little cookies for your tree and some delicious cookies for your belly! This recipe comes from my sweet friend Hollie-best sugar cookies I have EVER tasted.
{Trust me, I like me a good sugar cookie!}
cream together:
1 1/2 cups butter softened but not melted
2 cups sugar
Add and mix well:
4 eggs
1 tsp vanilla extract
1 tsp almond extract
(substitute- can use only 2 tsp vanilla extract and no almond)
food coloring if you chose for the dough
Blend with:
5 1/4 cups flour
2 tsp baking powder
1 tsp salt

Chill dough in fridge for about 30-60 minutes.
Roll out manageable amounts on floured surface to desired thickness (I usually aim for about 1/4 inch or a bit less). Cut with cookie cutters.
Bake 375 degrees for 8-10 minutes. Cool on pan for a few minutes and then remove to cooling racks. Frost and enjoy!

Frosting: (the Hollie method)
1/2 bowl of powdered sugar (less for fewer cookies/frosting, more for more)
1/8 to 1/4 cup butter
splash or 2 of milk
blend and add milk in small amounts until you reach *almost* desired consistency
*add splash of vanilla or other flavor
*add color here, or separate into bowls for different colors

*vanilla and color can thin frosting further. milk can be added when necessary


Thanks Hollie and Happy Crafting!


Saturday, November 20, 2010

Day 20- Glove turned Snowman!

I have to start out this post by sharing a quick thought...
I've been keeping all of the ornaments for this give away in a mailing box in my craft closet. Once I've made it, photographed it, and then posted it, I put a little tag on it and place it in the box. Well today, I actually looked in the box-
Holy Cow! I want to win!
Actually, I just want to get a box like this in the mail one day. I wish I could be in the box when one of you opens it, just to see the look on your face! And to think we've still got 10 days to go...
{I might need a bigger box!}

Okay, on to today's addition...

This little gal is not made from the glove so much as from the middle finger of the glove-cause that's a bad finger anyway I gave it a good purpose!

I snipped off the fingers of a cheap pair of fleece white gloves-don't toss them, you can make a whole family.
And found an old baby doll sweater that had long out lived its purpose and started cutting it too. A sleeve for the hat and the ribbing for a scarf and around the bottom. Then I threw in a snippet of orange felt for a nose, some black seed beads for the face, and a few buttons just cause they looked cute.

Once you've cut the finger pieces off the glove, stuff each with a bit of "fluff" as it's called at my house-or stuffing, a cotton ball or two would work as well.
Stitch the bottom closed.
Sew or glue on your seed beads to give your snowman a face.
Cut your orange felt into a small triangle, add a bit of glue to the center and fold it in half. Once dry add it to the face too.

Sew or glue on your buttons, tie the scarf around the neck, glue a strip of ribbing onto the bottom and the hat piece onto the head. Grab a piece of thread and tie the top of the hat closed. If you leave the tails long enough, you can use these to make a hanger. And your done!

Get your kids involved in the decorating! You could completely omit the sewing with glue and this becomes a very do-able kid project for the weekend.

Happy Crafting!

Friday, November 19, 2010

A Friendly Little Reminder...

Happy weekend everyone! I hope this is the start of a wonderful one for each of you! Just wanted to put in one last plug for the Far-Away Friends Ornament Exchange.
Today is the last day to join in the merriment!!!

The quick details are this...
*You sign up to send out anywhere from 1-5 ornaments.
*ornaments can be bought or hand made, try to keep them under $5 each!
*I email you the name and addresses of the friends
you send an ornament to.
*You'll get your names on Monday 11/22, ornaments need to be in the mail by 12/1
*You get back the same # of ornaments in the mail
-each from a different friend!

To sign up just send me an email with your name, address, and the # of ornaments you want to exchange.

I've emailed/talked with so many of the ladies already participating and everyone is SO excited to see what they get and to have a new friend to correspond with. So come on, come and share some holiday fun with us!
It's going to be a great start to the Christmas Season!


Related Posts Plugin for WordPress, Blogger...